All Small Six 68 small log head porting

This relates to all small sixes
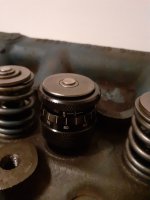
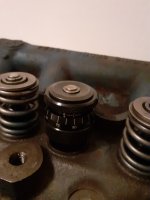
Today I got my two different springs back from the machine shop. They measured the springs with a digital scale on a bench drill, so the measurements are estimates at best, but maybe helpful as a guideline. These are the numbers they measured:

VALVE SPRING
Manufacturer reference
Advertised specifications
Measurements from machine shop
Sealed Power 6513-1
(single spring)​
B6A-6513-A​
-
-​
installed height 1.67 --> 86lbs
installed height 1.30 --> 183lbs​
Clay Smith Cams CSC-TOY-SPG
(dual spring)​
-​
installed height 1.68 --> 100lbs
installed height 0.98 --> 232lbs​
installed height 1.67 --> 147lbs
installed height 1.30 --> 242lbs​

Initially I wanted to install the dual springs, but it seems they are a lot stiffer than advertised. I think I will go with the Sealed Power single springs, they shouldn’t be too hard on the stock camshaft and still be able to control the valve with 1.65 rockers.

@pmuller9 the Sealed Power springs have basically the same specs you recommended, that gives me confidence they should work just fine, so thank you again for your input!
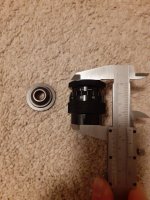
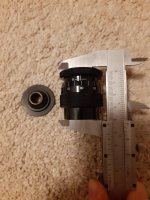
 
Last edited:
The only question I have is The actual installed height appears to be a lot more than 1.67 according to the picture you posted?
 
I have to admit the picture I took is not very good, it looks like it’s more but that is just the result of my poor camera angle. When I measured it without the camera in hand I measured ~42.5mm = 1.673”. I also ordered a “valve spring installed height gauge”, should arrive next week, then I can confirm my ruler reading!
 
The gauge arrived earlier than expected. With the single spring retainer I got an installed height of1.677", with the dual spring 1.661".

It looks like the installed height is close to 1.7"
If that is the case use the Comp 903 spring which will give you 80 lbs closed @ 1.7" and 190 lbs open @ 1.319" or .381" valve lift.
@pmuller9 I did some more research on my single valves, their coil bind is 1.3" (how could the machine shop that measured the springs not realise that :rolleyes:). With my 0.381" lift that is too high, so I ordered the comp 903 springs as you suggested. It's the 3rd set of springs I ordered by now :rotfl: but they are for sure the best choice for my setup!

PS: If anybody needs a set of dual springs with retainers, will sell them in the "buy, sell and trade" forum.
 

Attachments

  • 20210924_230916.jpg
    20210924_230916.jpg
    1.5 MB · Views: 5
  • 20210924_231109.jpg
    20210924_231109.jpg
    1.5 MB · Views: 6
  • 20210924_231347.jpg
    20210924_231347.jpg
    1.3 MB · Views: 6
  • 20210924_231513.jpg
    20210924_231513.jpg
    1.3 MB · Views: 6
I have a question regarding the exhaust port and the port divider.

The openings of the port 3 and port 4 on my pacemaker header are longer (more height) than the other ports, but the opening doesn’t have as much height as the original manifold. In my sketch one can see that with the stock cylinder head Siamese exhaust port (pink), there would be a big step into the header (orange) à port bigger than header. If I install the port divider (green) without altering the shape, there would still be a step, but better for air flow à port smaller than header.

To everyone who installed the divider and everybody else who has an opinion on the subject: Is it better to leave the divider as it is, or to match the divider to the header openings?
I am unsure because the port 3 and 4 on my header are bigger in cross section area than the other ports and I thought maybe it is better to keep the size of the exhaust ports (at least on the cylinder head side) as even as possible? What would you all suggest?
 

Attachments

  • 20211126_131528.jpg
    20211126_131528.jpg
    2.9 MB · Views: 14
  • 20210515_202515.jpg
    20210515_202515.jpg
    2.6 MB · Views: 13
cant really C the sketch or recognize the Oz header's difference (much),
Think ofa side view? Looking acc the mate surface it must B flush with.
Inside, pushed back far enuff to close off. It hasa kinda T shape and all
the 'tails' (3) need contact with / a tack to 'roof/walls'. As I B membah it took
alota hand work to die grind, file, etc down to match that frnt 'gasket'. The
Oz headers ('tubes") don't have the 3 / 4 siamesed port to stuff a divider in.
Some of their heads are not siamesed, round ports (not square like our, etc).

I'm not sure if this is the case but 1 fella here tried to match the frnt cuz he did not know abt the bench work. No, the
divider needs pushed all the way back to block/attach. The frnt needs ground dwn to hold that gasket which drops acc that
face area of the "T"...
Hello Chad,

Yes my sketch is a sideview of the exhaust port on either the 3rd or 4th port of my small log head.
I did grind the divider to fit the siamese port.

What do you mean with matching the "frnt" and "bench work" (--> flowbench?)?

I attached two more pictures, hopefully they clarify my problem: With divider the 3rd and 4th header ports are to large, without the divider the header ports are to small...
 

Attachments

  • 20211126_154421.jpg
    20211126_154421.jpg
    794.6 KB · Views: 12
  • 20211126_154440.jpg
    20211126_154440.jpg
    1.2 MB · Views: 12
Match the divider to the same as 1256...I do not gasket match, I do what is the right thing to do and the gasket may or may not have anything to do with it...I do not hog out the head flange to the gasket size, it's too large... A mismatch smaller at the head than the header will help with reversion during overlap.
 
Match the divider to the same as 1256...I do not gasket match, I do what is the right thing to do and the gasket may or may not have anything to do with it...I do not hog out the head flange to the gasket size, it's too large... A mismatch smaller at the head than the header will help with reversion during overlap.
Thanks, that were the infos I was looking for!
So I will just match the divider port cross section area size with the cross section of the other four exhaust ports as you suggested.

And one more thing regarding securing the divider (besides welding it in): I read I should weld and also lock the divider with a screw in place.
My plan would be to drill a hole where the red dot is and cut a thread into the hole (around #10-32). In the divider I would make a hole were the green dot is (without threads). Then weld the divider in place and put a screw through which pushes against the divider.
Has somebody done it this way too?
 

Attachments

  • Drilling holes.png
    Drilling holes.png
    1.4 MB · Views: 13
There is no real flange w/the Oz PaceMakers. Seems to get stang so I will step out~
8^ )
 
I do not think that it is necessary, if you fitted the divider good and a touch proud, the header and gasket will keep it from moving...I have had no problems with tig tacking it in three places with nickel rod...I tack it at the ribs one third in and at two thirds where the head rib meet the divider grove, less heat is needed there and one tack at the bottom...If you get carried away with welding it too much you risk cracks in the head.
 
Thank you, that saves me a lot of trouble, I was a bit anxious to drill in the head to be honest!
 
no drill & as per stang - hi content nickle, no prolonged bed, TACH.
'Bench wrk' - I meant lotta after-grinding to bring it back even w/ex-manuf.
 
A question to the forum about compression ratio, because my head goes off to the machine shop this week for shaving:

What are the negative effects of a static compression ratio higher than 9.5:1 ?
Higher octane fuel needed and lesser mpg numbers, anything else?

And does a higher compression ratio usually mean more torque/power?

Appreciate all inputs, thanks!
 
Higher comp. will be more efficient, something about the smaller chamber pressure decaying after the combustion and less power loss after.. Too much comp for the octane the more you have to cut back timing and power..The problem is having to balance comp., and the timing with the octane that you use. What is that number:confused:I have no clue.
 
Higher comp. will be more efficient, something about the smaller chamber pressure decaying after the combustion and less power loss after.. Too much comp for the octane the more you have to cut back timing and power..The problem is having to balance comp., and the timing with the octane that you use. What is that number:confused:I have no clue.
I have 94 and 98 octane available, on basically every gas station.

Heat might be another disadvantage (I installed a 2 row champion radiator with flowkooler high flow waterpump to account for that).

With ARP head bolts, will the head take pressure up to 10:1 ? In the articles about Ak Miller I read he bumped the compression ratio up to 10:1 and had no drawbacks, only power gains, sounds almost too good to be true... ;)
 
If you Zero deck the block you be able to run a higher NA Compression Ratio you just might be able to run 10.0 to 1 static C.R. A usually safe C. R. Is if you divide the Octane Rating with a des. point in the center so 9.4 or 9.8 the small Ford can usually go a couple tenths of a point higher when the Quench Distance is set right. I think the ARP studs will handle lots more than 10 to 1 think about if it were a Turbo build up

The thing about the time frame when Ak Miller was building those 10 to 1 engines we also used to have 100 and better octane fuels. Don’t forget to check or calculate your Dynamic Compression Ratio for your Camshaft choice. Back in those days of the really good fuels I also build a few 11 & even as much as much as a 12.5 to 1 C. R. engine for duel purpose street & drag use. Many late 1960’s to the early 1970’s factory performance engines had high C. R. too. Its great that you have such good fuel in your area. Best of luck
 
Also remember that Euro octane is measured higher than US octane. Thus euro 98 is about US 94,
Euro 91 is about US 87.
So when using octane divided by 10 as comp ratio its all referring to US octane numbers
 
@bubba22349 do I understand this right, you mean a higher compression "needs" a narrower quench height? Or would it just "be better" to have one?

@gb500 thanks for the clarification of the octane readings. If I remember right there are forum members who drive with a 9.5:1 compression on pump gas (would that be 89 octane?). If I can get euro98/us94 would that likely give me enough margin to ride 10:1 without knock?

Is there a formula or how does one know when knock occurs, is it all just experience?
 
I would "port" the small log intake bore first.
The intake bore can be increased to the about the same area of the bore of a large log intake bore but it may be slightly egg shaped.
A lot of material can be removed at the bottom of the 1' deep bore which makes a sharp 90 degree turn.
I have read a few stories of the port dividers coming loose and rattling.
I would not install a port divider. I want my intake manifold to heat up a quickly as possible. The divider may interfere with this.
A leaner mixture can be run on hot intake intake manifold. A leaner mixture can cause an engine with a cold intake to quit at aold idle but run great at a 200 degrees or so engine temp. I run a 205 thermostat year round.
Buy yourself a wide band Air Fuel meter. You may find that the stock carb low speed circuit was designed to run rich because of cold drivabilty problems. Due to high gas costs you may want to investigate the low speed circuit of your carb. If it is rich and you lean it out by what ever method you may enjoy the leaner low speed circuit increased in traffic performance so much that you forget about wide open throttle performance.
 
Last edited:
Back
Top