All Small Six How to replace oil pan gasket

This relates to all small sixes

shreqshack

Well-known member
I need your help. I am replacing my oil pan gasket and valve cover gasket. I am a novice and have never done this before. I have been watching youtube videos and reading forums but everyone seems to suggest different things.

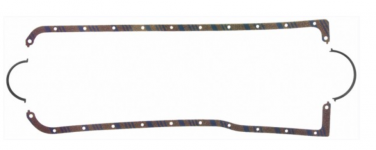
I am using the felpro cork gaskets that I purchased from NAPA (Part #: FPG OS12701C)
1628699389126.png
The gasket comes in two long pieces and 2 half circle pieces.

My plan is to use a light coat of ultra black RTV on the entire surface on surface of the engine to place the long strips on the bottom of the engine. Next I plan to put on the half circle pieces. THIS IS WHERE I AM STUCK....Do I use a thin coat of ultra black RTV to install the half pieces? What do I do there?

Here is a youtube video I found....I wondered if this guy was doing it right?

My other question is whether I should replace the oil pump while I have the cover off? I haven't had the car running long enough to know whether it needs a new pump. It is likely the original 1965 pump - as the car sat in a garage for 25 years...and all the other parts are still original factory parts. I am shorter on cash but would rather not have to take the cover off again to replace it.

Thanks everyone!
 
Hi, removing the oil pan and valve cover is a really cool experience. I removed my oil pan and valve cover last summer and I was super nervous too.
My biggest suggestion is to take your time and go slowly to enjoy what you’re doing. It is really not that hard of a task once you’re doing it.
Does your oil pan leak at all or what is the reason you want to replace the gasket? If you’re battling a leak are you sure it isn’t a rear main seal leak, which you could change while you have the pan off also. The screen and pump aren’t that expensive and would be a good idea to change. Also, while the pan is off check the looseness of the timing chain, if it’s too lose it would be a good idea to change that too. The key to enjoying working on these cars is to take your time and not rush it that’s how I make my mistakes.
I don’t have leaks after I changed my pan and I followed the advice on this video and used the aviation gasket stuff he uses.

the other guys on the forum are super helpful. Also check old posts I have a thread on all my changes I did and there was a recent thread on a rear main seal change. Also check the Performance Handbook if you don’t have it already.

good luck!
 
thanks MustangDadDrake....I watched the video you suggested. I am going to put on the oil pan gasket the same way. It helps to know that it worked for you too! I am going to change the oil pump while I got it all open.
 
...Also check the Performance Handbook if you don’t have it already.

good luck!


didn't view the vids. DO KNOW we have the goods on best practices. C our stickie on pan & VC gaskets thru the search function above... Make sure pan/vc is not 'warped' on a known machinist plain (sheeta glass?) for 1st step. When tightening make sure U do not tighten beyond tolerances as U will warp again...
 
Last edited:
I am working on the oil pan gasket tonight. I discovered that the rubber seal that I ordered that goes around the back crankshaft is too long. There must be different sizes for manual versus automatic? Where would I find the right size?
 
There is only one size used be sure you have everthing clean and are getting the two little side tabs going all the way into the grove in the block. Good luck
 
Update - I was able to get the rear crankshaft rubber seal on - I had to scrape some RTV out in order to insert the tabs. Thanks!!!
 
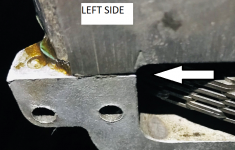
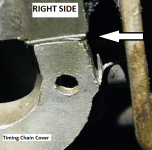
New question - I was working on the oil pan seal last night and realized that I did not put on my timing chain cover perfectly level with the bottom of the engine block - where the oil pan is attached. If you look at the two pictures the LEFT SIDE looks pretty good but the RIGHT SIDE is off maybe a 1 or 2 mm on one side....the other side is good (I think).
I have a couple questions - Will the gasket and RTV that will be used be enough to cover the gap or do I need to fix/move the timing chain cover? If I need to move the timing chain cover would I be able to loosen some of the bolts and tap the cover in place? OR would I need to take the timing cover off, scrape the new gasket off (I put this on last weekend) and put a new gasket on....etc.
Thanks for all of your help! You all are a big help in this project. I would have gotten this far without you...THANKS!!

1632489073852.png
1632489508575.png
 
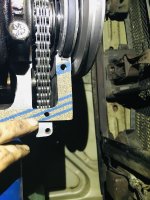
X2 yes would be better to get the timing cover lined up correctly. I posted this on one of your other posts before on how to get the timing cover lined up since your doing it in the car it's a bit harder than doing it on an engine stand because you can't see the timing cover to block aliment unless you crawl under the car to look at it. Nows the time to fix the timings cover position as the gaskets are still new and haven't been heat cycled yet so there is still a good chance they can move a little with out damageing them.

"Since your doing this with the engine in the car you can glue down the timing cover gasket to the block with some of the Aviation Cemet or some Gasket Snitch also works good too. Then you are ready to re-install the timing cover you can use a littl bit of RTV on the cover gasket if you want leave all the bolts a little bit loose so it can move until after you install the crankshaft Dampener (that will help center the timing cover) next align the timing covers oil pan flanges to each side of the blocks oil pan rails then you can start tightening up all the timing cover bolts. Glue down the oil pans long side gaskets to the blocks pan rails you can then use your pan bolts to hold the gasket in place until it's set up some also install the front and rear rubber end seals to help hold the pan rail gaskets too, after that you will be ready to reinstall the oil pan. Your doing a great job on your assembly, best of luck"
 
New question - I was working on the oil pan seal last night and realized that I did not put on my timing chain cover perfectly level with the bottom of the engine block - where the oil pan is attached. If you look at the two pictures the LEFT SIDE looks pretty good but the RIGHT SIDE is off maybe a 1 or 2 mm on one side....the other side is good (I think).
I have a couple questions - Will the gasket and RTV that will be used be enough to cover the gap or do I need to fix/move the timing chain cover? If I need to move the timing chain cover would I be able to loosen some of the bolts and tap the cover in place? OR would I need to take the timing cover off, scrape the new gasket off (I put this on last weekend) and put a new gasket on....etc.
Thanks for all of your help! You all are a big help in this project. I would have gotten this far without you...THANKS!!
it helps to review guidance B4 moving forward w/new adventures. We got some v e r y good right here (search function, tech archive, the Handbook, 'stickies') as specific to these motors (international experst). Hanyes and Chiltons, Ford's Service Manual can all lead U in the right directions. Lot easier than going backwards to correct or worse yet, missing & destroying~
 
X2 yes would be better to get the timing cover lined up correctly. I posted this on one of your other posts before on how to get the timing cover lined up since your doing it in the car it's a bit harder than doing it on an engine stand because you can't see the timing cover to block aliment unless you crawl under the car to look at it. Nows the time to fix the timings cover position as the gaskets are still new and haven't been heat cycled yet so there is still a good chance they can move a little with out damageing them.

"Since your doing this with the engine in the car you can glue down the timing cover gasket to the block with some of the Aviation Cemet or some Gasket Snitch also works good too. Then you are ready to re-install the timing cover you can use a littl bit of RTV on the cover gasket if you want leave all the bolts a little bit loose so it can move until after you install the crankshaft Dampener (that will help center the timing cover) next align the timing covers oil pan flanges to each side of the blocks oil pan rails then you can start tightening up all the timing cover bolts. Glue down the oil pans long side gaskets to the blocks pan rails you can then use your pan bolts to hold the gasket in place until it's set up some also install the front and rear rubber end seals to help hold the pan rail gaskets too, after that you will be ready to reinstall the oil pan. Your doing a great job on your assembly, best of luck"
thanks Bubba and others....I want able find more specific instructions in the two manuals I have.... the info you all are sharing is invaluable.
Last couple questions related to oil pan installation...hopefully....
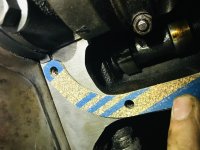
1.) what is the verdict in using..black RTV under the rubber crankshaft gaskets... I have read arguments on both sides.
2.) how much RTV do you use where the rubber crankshaft gasket meets the cork gasket?
 

Attachments

  • FF4AA19F-7EE0-42C7-A3E1-46EB3AEF7D3A.jpeg
    FF4AA19F-7EE0-42C7-A3E1-46EB3AEF7D3A.jpeg
    2.8 MB · Views: 11
  • 1311E3BF-1F3D-479D-B554-CBF72823EBC4.jpeg
    1311E3BF-1F3D-479D-B554-CBF72823EBC4.jpeg
    2.8 MB · Views: 10
Back
Top