Autolite 2100 problems

StarDiero75

1K+
VIP
Supporter 2018
Howdy guys,

So i got the 2100 on the car and it drove pretty powerfully but just off idle it drove like it had a small vacuum leak. Well now its bad.

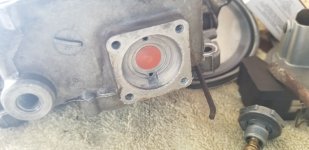
I replaced the gasket around the power valve cover and found that the cover was pretty warped. I had an extra parts 2100 sitting around so i took the one off that and put it on. Fixed that leak (I've been checking with starter fluid)

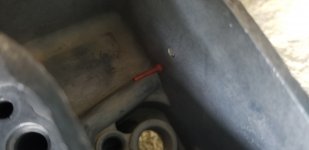
Now heres the bad one, after reinstalling the carb it got worse after i thought it'd get better from replacing the power valve cover. Now if i spray with carb at the side near the valve cover it just about dies (and has died), thats how bad the leak is. Also when i drive my AF gauge is all over the place and gets into the 16, 17 range when the throttle plates are not at idle. So I take the carb off and place it on a flat piece of aluminum..... its fricken warped a bit on the valve cover side. Like enough to probably need like 3 gaskets in place to fill it...... i shamefully put heavy duty permatex gasket sealant around that side of the carb and around the base. Very upset but i dont have money to buy another.

Can the warpadge be machined out? Like a belt sander or something? I'd do that when i go to put the new head on it.

Thanks guys,
Ryan
 
If you have enough material there you can spray-glue some sand paper to a thick glass table, good cast iron table saw or flat stone like granite and flatten it out. Like 120 grit. Be careful, firm steady sweeping strokes holding it firmly to the surface until it's flat. Then clean the sh*t out of it and give it a go. Carbs are pretty delicate, some more than others(1100), and it isn't too hard to warp them by over tightening the tops or using multiple gaskets and tightening them some more. The gaskets generally swell a bit to, so a small leak in the fluid side will often self resolve if it's wet with a new gasket. Give it some time, like a week, then a little snug. Alway tighten evenly, crosswise and don't monkey arm them. Just like any gasket. Don't do it all at once at each fastener. Settle it in evenly.
 
yep, Ryan may B gettin there...

strong arm the 120 grit, soft hand the gasket...
Then the trial'n error.

Here's my best on the trial, "F" the error (I hope).
Let us know...
 
If the sealant works i just won't touch it till i get the E0 head on. Then I'll try the sand paper. I'm hoping i wont have to screw with it till then.

Thanks guys!
Ryan
 
So i sealed the bottom which helped but my problem of running lean still occurs when the throttle plates are anything more than idle. But when i take my foot off the gas while driving it richens back up to 12-13. But the moment i give it gas it leans out again. Like 16-17. Also, when the choke is closed, it actually runs leaner and i have to open it. Does this sound like this is the result of a vacuum leak or blocked circuit?

At idle the thing is great. It idles extremely smooth and my AF is about 13.

When at idle and I'm spraying for vacuum leaks, it only spases out when sprayed around the choke. Like it'll almost die. I wouldn't think the choke would pull that much air to where it'll lean out like that.

I'm about to swap the weber back on until i rebuild it b/c this thing will end up blowing up my engine.

Let me know guys,
Ryan
 
Ryan, you have 2 choices, take the carb & have a machine shop resurface the base plate. If there is play in the throttle shaft to body, you can install bushings.
The lean condition is not enough accelerator pump shot & maybe too lean main jets.
Are the PVCR under the power valve clogged??
Might be time to get another carb.
Put on a 7448-350 Holley & give that a try. I'm sure you will like it.
 
wsa111":1gt2v4pa said:
Ryan, you have 2 choices, take the carb & have a machine shop resurface the base plate. If there is play in the throttle shaft to body, you can install bushings.
The lean condition is not enough accelerator pump shot & maybe too lean main jets.
Are the PVCR under the power valve clogged??
Might be time to get another carb.
Put on a 7448-350 Holley & give that a try. I'm sure you will like it.
I think the accelerator pump shot works fine, it has absolutely no hesitation, and gets rich when i hit it then leans up quick. I will check the PVCR next. I'm gonna attempt to clean it out and see what that does. If its crap, I'll go with the 350.

I put the weber back on today and its very sad. I can't even chirp the tires, the autolite would let me peel the tires. Very noticeable power change between the 2. I will go back to a real 2bbl when i can, i miss it.
 
Quick question, when i take the power valve cover off, should there be gas in there or no? Mine was dry, and I'm thinking that if it's supposed to be then something is blocked
 
So i started getting the carb apart and putting everything in the parts cleaner bucket when i noticed this. Is this supposed to be there? If so, what serves its purpose, or why was it put there?
 

Attachments

  • 20190502_150843.jpg
    20190502_150843.jpg
    1.9 MB · Views: 171
  • 20190502_150835.jpg
    20190502_150835.jpg
    1.8 MB · Views: 171
Yes it's suppose to be there and it's important to the accelerator pumps operation. If your getting a carb kit you will get a new one in it if not try and take it out without damaging it so you can reuse it. It works like a one way valve so the accelerator pump can build pressure to push the fuel from the fuel bowl up to accelerator pump nozzles. Good luck (y) :nod:
 
bubba22349":1cqwhwch said:
Yes it's suppose to be there and it's important to the accelerator pumps operation. If your getting a carb kit you will get a new one in it if not try and take it out without damaging it so you can reuse it. It works like a one way valve so the accelerator pump can build pressure to push the fuel from the fuel bowl up to accelerator pump nozzles. Good luck (y) :nod:
Thanks a lot bubba. I pulled up a diagram and saw it in there but thanks for saying what it does. The new kit should come with it.

Whats bugging me is that it looks pretty clean and all the gaskets look good. I'm running wires through the holes in it and nothing seems blocked. i wonder what caused my problems of leaness while cruising
 
Depending on if the carb set for very long even if they are clean looking inside, yet there there can be gum like deposits or varnish inside the passages that you can’t see. In some cases a carb can clean itself out with use, but with the fuels we have today it’s kind of iffy. I have had good luck when everthing looks good like yours by doing a parchal tear down and getting a can of the good Berryman's spray carb cleaner to clean out all the internal passages then reassemble it again without using a new kit. Good luck (y) :nod:
 
bubba22349":1hgy0b8z said:
Depending on if the carb set for very long even if they are clean looking inside, yet there there can be gum like deposits or varnish inside the passages that you can’t see. In some cases a carb can clean itself out with use, but with the fuels we have today it’s kind of iffy. I have had good luck when everthing looks good like yours by doing a parchal tear down and getting a can of the good Berryman's spray carb cleaner to clean out all the internal passages then reassemble it again without using a new kit. Good luck (y) :nod:
I actually got the berrymans parts can to dip it all into. I'll look into the spray too. I got a gasket kit coming as well. I'm not taking chances with this one this time. I'm doing it right like ive always done in the past.

I still do have to flatten the slightly warped carb bottom, should i take the butterflys out or am i best to try to flatten it with all that on?
 
Excellent the Berryman's carb cleaner / dip is better yet, if you also have an air compressor for the use of some compressed air that's all you will need. On the butterfly's and shaft I usally don't remove them unless there are signs of wear in the throdle shaft or carb base, in which case it would need to be repaired so you don't have an excessive vacuum leak. If you can use that mill again that would be a excellent way to true up the carb's base. Good luck (y) :nod:
 
bubba22349":2gfwvr59 said:
Excellent the Berryman's carb cleaner / dip is better yet, if you also have an air compressor for the use of some compressed air that's all you will need. On the butterfly's and shaft I usally don't remove them unless there are signs of wear in the throdle shaft or carb base, in which case it would need to be repaired so you don't have an excessive vacuum leak. If you can use that mill again that would be a excellent way to true up the carb's base. Good luck (y) :nod:
Good idea about the mill! I don't know why i didnt think of that! I'll hit it on Monday! Thanks man!

I'll let you all know how it goes after i get it back on the car
 
Fyi, if you decide to take the butterflies out for any reason you have to grind the screw tips down b/c they are staked so they won't turn out. If you force them out without grinding the staking off you will distort the shaft @ the holes and if you were to remove the shaft you would mess up the shaft bore pulling it through creating a vacuum leak. New screws will need staked after reinstalling.
 
I milled the bottom of the carb flat. I had to go down 20 thousandths. Also, since it was all set up on the mill, i made sure the power valve area was flat and cut that 3 thousandths. Since the power valve cover was warped, i had to cut that 25 thousandths from the lowest spot. All the sides were bowed on it. Then i put in on a flat stone and made sure it was all nice and flat.

I'll be putting it back on the car here soon. I got it sitting in the carb cleaner bucket and have the rebuild kit ready. I'll update next when its back on the car.
 

Attachments

  • 20190506_162222.jpg
    20190506_162222.jpg
    2.6 MB · Views: 101
:beer: 
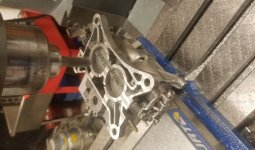
that’s great StarDiero, glad you were able to get everything flat and true again. (y) :nod:
 
more'n 1/2 way now.
2100's worth it. :nod:
How ya doin on it's tune now?
 
Back
Top