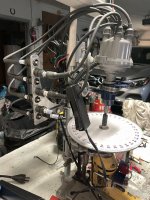
All Six Home Brew "Distributor Machine"

This applies to all sixes
I was messing around with this thing the other day and couldn't figure out why the advance readings I was seeing on my degree wheel maxed out at such a low value (I was seeing maximum advance at the numerical value stamped on the slotted part).

It was then explained to me that I was reading the advance on the distributor, not at the crank. To explain and (hopefully) clarify, the timing marks are on the crankshaft, which spins twice as fast as the camshaft and distributor. So the degrees of advance seen on my degree wheel will actually be half of what would be seen on the crankshaft marks. Doing this will provide resonably accurate numbers for the distributor mechanical advance curve.

Something to keep in mind if you build one of your own. :)
 
Last edited:
Just for fun take a stick shift Load'0'matic distributor remove the vacuum advance unit.
Remove the advance springs. Test various very weak single springs to see how much the rubbing block friction advances the timing.
 
Just for fun take a stick shift Load'0'matic distributor remove the vacuum advance unit.
Remove the advance springs. Test various very weak single springs to see how much the rubbing block friction advances the timing.
I have no use for a LoM distributor but since the machine is so easy to build, you could easily make one and do your own experiments on your own machine :)
 
Still haven't gotten around to actually doing some plots but I did find a way to characterize all the springs I had in my "collection". Since it was really hard for me to tell relative strengths of some of the springs just by tugging on them, I was trying to think of a way to quantify them with stuff I had already (I'm cheap too).

I was rummaging through my closet looking for something else when I saw my tackle box and remembered the spring fish scale I'd bought long ago. I pulled it out and took it to the garage. I clamped a pin (nail, actually) in my vice and slid the loop of each spring over the nail in turn. I hooked the fish scale in the other end of the spring and pulled to extend the spring 1/4 inch. I wrote down the scale reading and the respective compartment of a pill reminder case that I put the spring into after testing. I'd bought the pill case for a buck at a local store. This worked really well and I now have quantitative values for each of the 6 springs that I have.

Hopefully I'll make it through my "honey do" list soon and will be able to start running tests with different spring combinations and plotting curves.
 
UPDATE: I finally made some time to tinker with this some more. I was having trouble with the tach in the Sears "engine analyzer" reading rpm at anything over 3000, and the cheap add-on tach was starting to have the same issue. I was also getting shocked when I adjusted the rotation of the distributor to line up a mark with the pointer. I deduced that having only one spark plug was not good enough for the system to work properly. Since I had 8 spark plugs with the M18x1.5 thread, I bought a tap and drilled 5/8" holes in a scrap piece of aluminum plate, then threaded each hole. Unfortunately the plate was a little too thin to accommodate the gap between the threads and the taper on the spark plugs, so I had to make 8 threaded washers from the aluminum plate to make sure that the plugs were tight in their respective threaded holes. Once I added the wires from the distributor cap to the spark plugs, everything worked as it was supposed to - even the engine analyzer tach worked all the way up to 4000 rpm. Lesson learned. It's actually pretty neat with the lights out, the plugs sparking and the timing light flashing. I can probably work this into my Christmas decorations later this year.

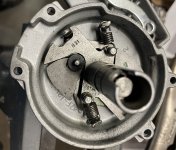
I did a run with a couple of yellow springs in the advance mechanism and everything seems to be working properly now - especially so after I tightened down the bolt holding the distributor so it doesn't move. Now I need to find a way to make my "13" slot a "10" slot. I've seen posts in which others said they added a sleeve to the pin but am having trouble seeing how to do that without causing an interference between the moving plate and the pin. So maybe I just cut a piece of metal to the right dimension and glue it to the inside edge of the slot. More experiments to come. Stay tuned ... same bat time, same bat channel. :)
:)WithPlugsa.jpg
 
Excellent John, for Moding the Advance Slot we used to weld them some on one side then grind it to get the amount that was needed.
 
Excellent John, for Moding the Advance Slot we used to weld them some on one side then grind it to get the amount that was needed.
I've seen that method too but my welding skills are pathetic and I was really hoping to avoid taking the thing apart that far - doing so would definitely increase the likelihood that it would become good for nothing but yard art. But maybe I'll have to. I do sincerely appreciate the encouragement though. Thank you! :beer:
 
now U morphed it into a spark plug tester AND dizzy (and man zapper and light show). 8^ 0

I'm enjoyin this as the ISPs take more & more of my e-mail boxes away. 1 for 30 yrs = no 2 step authentication = we
confascate your box even if you pay for it. (verizzon owns at least 2 aol, yahoo). I wonder if the dark net can help? I'm
onto a 3rd, google & they crashed me too due to no more aol box for the 2step (& no smart phone registered). Buzzards !

I hate the corps John, U go for DIYing!
 
The Old Chevy's 55, 56, 57 and up used a simple Rubber Sleeve on their Pins so a short piece of some Vacuum line could work or else some Brass Hobby Tubing maybe.
 
The Old Chevy's 55, 56, 57 and up used a simple Rubber Sleeve on their Pins so a short piece of some Vacuum line could work or else some Brass Hobby Tubing maybe.
I thought about that but when I looked at the mechanism, it looked to me like a full sleeve would either rub on the moving plate or on the housing.
sleeve.jpg
I did some math early this morning and found that I need to reduce the opening (or increase the pin diameter) by about 2 mm. I have some copper tubing that has the right wall thickness (about 1 mm). I'm thinking that maybe I can make a "C"-shaped sleeve that fits over the post such that there is no interferrence with anything else. But, I'll have to look at it and experiment some.

I'm probably making this much, much harder than it needs to be, but I really appreciate all of the inputs. Thanks all!
 
Back
Top