All Small Six Dizzy Install - Tips & Lessons Learned

This relates to all small sixes

tim7777

New member
Going to be installing a DUI distributor I purchased from wsa111. Looks great and can’t wait to see the difference it will make over the original dizzy.

Shameless Plug - If you need a dizzy or just need one recurved, reach out to wsa111. We spent about 30 minutes discussing my engine so the dizzy I purchased could be recurved to match my engine specs. Shameless plug over.

I have read multiple posts on this site, the VFM site, watched multiple videos on YouTube, etc. on installing a dizzy so I have a pretty good comfort level that I can tackle the job.

However, I am curious if those on this forum have developed any tips/tricks that you’ve learned over the years when installing a dizzy that you could share. I’m interested, and I’m sure others would be as well, to learn from others who have tackled this install. So, post up any tip/trick you care to share.

Thanks!
 
Last edited:
BEFORE you pull the old distributor turn the crankshaft to 14 degrees BTDC at the compression stroke for cylinder #1.
If the engine is at the compression stroke, if you remove the cap the rotor will be pointing to the #1 spark plug wire on the cap before it was removed.
With the cap still off take a picture of the rotor position and the vacuum advance canister position.

Remove the old distributor and install the new distributor so both the rotor and vacuum advance canister are in the same position as the old distributor being careful not to let the crankshaft turn.

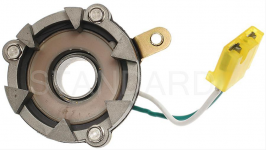
With the crankshaft still at 14 degrees BTDC adjust the distributor so the rotating shaft poles line up with the sensor poles and lock it down.

Install the new cap, rotor and wires making sure the #1 plug wire is at the place on the cap where the rotor is pointing and the firing order is correct.
 
Last edited:
Going to be installing a DUI distributor I purchased from wsa111. Looks great and can’t wait to see the difference it will make over the original dizzy.

Shameless Plug - If you need a dizzy or just need one recurved, reach out to wsa111. We spent about 30 minutes discussing my engine so the dizzy I purchased could be recurved to match my engine specs. Shameless plug over.

I have read multiple posts on this site, the VFM site, watched multiple videos on YouTube, etc. on installing a dizzy so I have a pretty good comfort level that I can tackle the job.

However, I am curious if those on this forum have developed any tips/tricks that you’ve learned over the years when installing a dizzy that you could share. I’m interested, and I’m sure others would be as well, to learn from others who have tackled this install. So, post up any tip/trick you care to share.

Thanks!
Set it at 14 degrees as previously discussed.
 
Good to see info to make help swapping a distributor simple, here's tips I posted over at Maverick/Comet forum:


another $ .02 :

Important - as distributor is removed the 5/16 hex drive from oil pump (@ 2" long) will either stay in bottom of dist. or stay down in the engine's oil pump. It is not attached to either and can easily fall into the oil pan if dislodged !.

Distrib' swap:

> turn engine with fan to near balancer TDC timing mark with rotor pointing away from block (towards #1 as marked on dist cap or #1 wire ) Remove dist. cap out of way.

> note approximate position of the dist related to block, remove dist lock clamp and gently pull up on dist. - * * as dist comes up, the rotor will follow drive gear and rotate a bit, these are positions new dist. and rotor need to be in to re-install. Hex drive must be engaged in oil pump for re-install, and may have to 'jiggle' rotor to engage hex shaft as dist. is inserted.

> button up cap, start engine and adjust timing to your preference.

IF the engine spits and back fires it's off time - line up balancer TDC and repeat installation more carefully until dist. is close to original distrib position. If the dist. gear is off it will only shift the position of the dist. housing but may make the vac. diaphragm interfere with block.

IF the oil pump hex drive should ever inadvertently falls into oil pan - it can easily be fished out by removing fuel pump for access to using a stick magnet into pan - (ask me how I know... :cool:
:)
)

[IMG]

hav efun
 
Last edited:
Put the timing mark on the damper at what you initial should be on the timing cover scale.
You want #1 plug wire at 6 o'clock.
With the rotor at 7:30 insert the distributor & the rotor will move to the 6:00 position because of the helical gear. If you can't get the distributor to sink all the way, remove distributor & rotate the 5/16 oil pump shaft slightly, then repeat the above till the hex shaft engages & the rotor points to the 6:00 position. If you bounce the distributor when hitting the oil pump shaft that might help obtain full engagement.
As previously mentioned make sure the reluctor is even with the pickup coil.
Loosely tighten the dist. hold down & light it up.
Then verify the initial advance.
 
wsa111
Does the DUI distributor use a single pickup with six reluctors on the shaft or does it use the GM style pickup that has the six points that align with six points on the distributor shaft?

1617050294977.png
 
Last edited:
Don't forget the "pink wire" ... if your looking to hook directly to the cars ignition switch (key), take out the pink wire, and put in a wire directly from the dizzy.. u can connect a12volt directly to the battery with a toggle switch.. but the "pink wire" makes it so much easier..
 
Last edited:
Hi, I take a Sharpie and mark the distributor housing directly under the #1 wire on the distributor cap. That way I know the rotor is close to where I want it. I also make an arrow labeled A, pointing counter clockwise which tells me which way is timing advance. Good luck
 
Awesome suggestions! Thanks so much. Going to give the installation a shot tomorrow morning since the weather is supposed to be good.
 
Back
Top