Engine running smoother after changing jet, and making some carb adjustments. Timing set at 12 be fore top dead center . But when I accelerate it only advances maybe a few more degrees advanced. I think it should advance 20 or more degrees when I wrap in out to 3000 plus right?Not enough vacuum? Old load a matic. distributer shot? Maybe I should try annother svc valve? Another issue is oil seems to leak out of the valve cover gasket and in one of the head bolts is showing it. That valve cover only has two screws on the carb side of the head. I permatexed the cork pan gasket to a very clean head on the bottom and has slowly tighten up the crews. I am concerned about crushing that cork gasket. Somehow this issue seems to be a common occurrence. I remember this about 30 yrs ago.
You are using an out of date browser. It may not display this or other websites correctly.
You should upgrade or use an alternative browser.
You should upgrade or use an alternative browser.
All Small Six Running with two issues
- Thread starter adobejoe
- Start date
This relates to all small sixes
The reason for what your seeing and why is that those old "Load O Matic Distributors" just don't work like most other types of Distributors they do not have any Mechanical Advance inside them (see below link for info on how they work). If you are wanting to be able to get that kind of performance out of the Distributor then you will need to swap in a newer one, like a 1968 to 1974 200 Six Duel Advance Point type Distributor or better still a 1976 to 1983 DuraSpark II Electronic Distributor. The LOM Distrib's Info on how they work is here. https://fordsix.com/ams/load-o-matic-distributor-spark-control-valve.28/Engine running smoother after changing jet, and making some carb adjustments. Timing set at 12 be fore top dead center . But when I accelerate it only advances maybe a few more degrees advanced. I think it should advance 20 or more degrees when I wrap in out to 3000 plus right?Not enough vacuum? Old load a matic. distributer shot? Maybe I should try annother svc valve?
Best way I have found on both Valve Covers as well as the Oil Pan's is to:Another issue is oil seems to leak out of the valve cover gasket and in one of the head bolts is showing it. That valve cover only has two screws on the carb side of the head. I permatexed the cork pan gasket to a very clean head on the bottom and has slowly tighten up the crews. I am concerned about crushing that cork gasket. Somehow this issue seems to be a common occurrence. I remember this about 30 yrs ago.
1. Make sure the Gasket Surface / VC or Oil Pan Rail is Straight, Flat / True also check around all the Bolt Holes they can get pretty flared downward / out of shape from being over tightened. Use a Body Hamer and Dolly to flatten them out again as needed.
2. Glue the Gasket onto the Valve Cover with Gasgacinch or some Permatex Aviation Cement and set it on a Flat Table overnight place some bolts into the holes to keep the Gasket aligned right. Note for an Oil Pan the Gaskets get Glued down the same except they are should be glued down to the Block's Pan Rails and then use Bolts in the holes to aligned the Gaskets right. The Rubber Oil Pan end Gaskets get a little dab of RTV in the corners were they meet with the Cork Rail Gaskets.
3. The next day you can use some RTV Silicone on the the Head side of the Cork Gasket to seal it and still be able to remove the Valve Cover 1 or 2 times without do damage to the Cork Gasket. Do not over tighten the Valve Cover Bolts they only should be tightened to 3 to 5 Ft. Lb.'s of Torque. Note for an Oil Pan the RTV Silicone would go on the Oil Pan Rails.
Good luck.
Good advice above. I'd been using a rubber valve cover gasket for quite a while. Had the cover off over the winter, and decided to replace the fairly hard old rubber gasket with a cork one on hand, leftover from a head gasket set. I didn't put sealer on the head side because I hate cleaning it off. Then, hmmm, what's that smell? Hot oil from a valve cover leak! Found a new rubber gasket and problem solved. I like that you don't need sealer on either side too.
Oh, distributors can't be that hard to locate. I didn't mean to or try very hard. But I have my original (retired) LOM, a 1970 points type on my car now, a specific part number 1969 dual-advance I searched for on eBay, a large cap and a small cap Duraspark, and I just sold a points type and a big cap Duraspark distributor. Or maybe they are hard to find because I'm hoarding them all! Seek and ye shall find...
Hi adobejoe, the stock DuraSpark II's (DS II) systems are so easy to swap in (I used to be able to do them in able an hour after gathering all the parts) and many of the parts are the exact same as were used on all the other Ford engines of those years with only a few exceptions. You would only need to find these specific items of 200 or 250 Six parts. A factory Ford 1976 to 1983 200 Six engine Ignition Wire Harness, a 200 or 250 Six DS II Distributor, a DS II Distributor Cap and Rotor for a Six, and a 200 Six Length Spark Plug Wire Set those are the only engine specific parts. You can use an aftermarket Ignition Wire Harness if you can't find the OEM. You also need a DS II Coil, and ICM (Ignition Control Modula). I often used to go and get everything from a junk yard to do the swap on the cheap. You can still get most everything new.
There are a number of ways to wire a DuraSpark II system (DSII) depending on how much rewiring of your Car, Truck, or Farm or Construction Equipment you want to do. Here is how I did it on a quite a number of early cars and trucks that is very simple and it keeps and uses all the car or trucks original wiring by only adding one or two new wires. Also if you should ever want to return to the old stock system it's easy to change back.
1. With the new or used DSII Distributor installed its 3 Wire socket plugs into the DSII Factory Ford or aftermarket Ignition Wire Harnesses 3 Wire Plug and then you can start to route the DSII wire harness. These are the Orange, Black, and Purple wires.
2. The Ignition Control Module (ICM) gets mounted to the inter fender well / panel and the DSII harnesses 4 Wire Plug gets plugged into the ICM's 4 Wire Socket. The Orange, Black, and Purple wires are connected to the distributor (as in above #1 by the 3 wire plug), the 4th Green wire goes to the Coils - or Negative Side and if your also using a Tach its also hooked to that same side. Some people run an extra ground wire to one of the mounting screws of the ICM if the inter fender panel is made of metal it probably isn't necessary but it also won't hurt if you wanted to, as you really can't have too many Grounds!
3. I used most all of the stock vehicle wiring including the Pink Resistor wire that goes to the Battery or the + Positive Side of the stock Ford coil. This Pink wire goes right into the DuraSpark II coils Red wire that's hooked up to the Battery or + side of the new DSII coil, this wire comes from the ICM's two wire plug (with a Red and White Wire). Note if you also have the stock Horse Shoe (See Below step) DSII Coil Plug its even easier and all Plugs together. Also if using the resistor wire or a ballast resistor to power the coil in the ignition switch's run position then the other Red wire coming from the I terminal (for extra voltage when starting) from the starter solenoid goes onto this same + Positive Red wire on Coil.
4. The DSII horseshoe clip is made so that the Green wire coming out of the DSII wire harness plugs onto the Tach or the - negative side of the coil, so you just plug it on as is.
5. The ICM's 2 wire plug socket is plugged into the 2 wire plug and it has a Red and a White wire coming out of it. I ran a new wire connecting this Red wire and splicing it into the Pink wire about 2 or 3 inches under the dash behind the ignition switch so that it's before the Resistor in the Pink wire, this give you a full 12+ Volts input going to the ICM. I even used a Crimp On type Splice / Trailer type Connector so I didn't have to cut any of the original wiring harness. If you have a Volt / Ohm meter probe the wire there you are looking for at least a full 12 + volts with the Key On in or in the Run position as the ICM needs to have a full 12 volts to run correctly. This is all you really need to make it run and many people don't even bother to hookup that White wire. However the White wire though is for the Ignition retard feature of the ICM and in my OPIN is a good idea to hookup easier on the starter. To do so just run a new wire connecting the White wire over to the I terminal of the starter solenoid and now your all done and can Enjoy all the benefits of the new DSII ignition system.
If you are thinking of making your own wire harness you could even customize the above instructions some by installing the ICM inside the car, in the truck cab or any convenient location on a piece of Equipment ideal is in a cooler location to protect the ICM and make it last even longer this would also make the system semi hidden if you wanted to keep a more stock looking appearance under the hood and then you could also use the DSI small cap, and rotor, and your current Spark Plug Wire Set for a very stock looking install on a more vintage looking model. If you wanted to up grade some of the stock grade parts, then an aftermarket Coil, Plug Wire Set, a Higher Quality Distributor Cap, and Rotor with Brass contacts is good very good to do.
A side note on the Ignition Control Modules (ICM's) many in the past that had early failure problems and these complaints were specifically tied to the ICM they were usually caused by using an inferior quality part so look for quality parts.

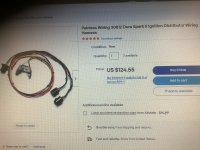
Sorry don't have any good pictures currently of the complete 4 or Inline Six DuraSpark II Ignition System Parts to show what they look like, but here is what some of the stock parts will look like for a V8 DSII system again all the parts are going to be exactly the same with the exception of you needing to use Engine Specific Distributor, with it's matching cap, rotor, and plug wires, etc. the below link also has a DSII wiring diagram.

 mustangsteve.com
http://www.wrljet.com/fordv8/duraspark.html
Here is an example of a New Replacement Motorcraft ICM for the stock DuraSpark II ignition system
https://www.amazon.com/Motorcraft-DY-893-Module-Assy-Amplifier/dp/B000EQ82UK
There are a number of ways to wire a DuraSpark II system (DSII) depending on how much rewiring of your Car, Truck, or Farm or Construction Equipment you want to do. Here is how I did it on a quite a number of early cars and trucks that is very simple and it keeps and uses all the car or trucks original wiring by only adding one or two new wires. Also if you should ever want to return to the old stock system it's easy to change back.
1. With the new or used DSII Distributor installed its 3 Wire socket plugs into the DSII Factory Ford or aftermarket Ignition Wire Harnesses 3 Wire Plug and then you can start to route the DSII wire harness. These are the Orange, Black, and Purple wires.
2. The Ignition Control Module (ICM) gets mounted to the inter fender well / panel and the DSII harnesses 4 Wire Plug gets plugged into the ICM's 4 Wire Socket. The Orange, Black, and Purple wires are connected to the distributor (as in above #1 by the 3 wire plug), the 4th Green wire goes to the Coils - or Negative Side and if your also using a Tach its also hooked to that same side. Some people run an extra ground wire to one of the mounting screws of the ICM if the inter fender panel is made of metal it probably isn't necessary but it also won't hurt if you wanted to, as you really can't have too many Grounds!
3. I used most all of the stock vehicle wiring including the Pink Resistor wire that goes to the Battery or the + Positive Side of the stock Ford coil. This Pink wire goes right into the DuraSpark II coils Red wire that's hooked up to the Battery or + side of the new DSII coil, this wire comes from the ICM's two wire plug (with a Red and White Wire). Note if you also have the stock Horse Shoe (See Below step) DSII Coil Plug its even easier and all Plugs together. Also if using the resistor wire or a ballast resistor to power the coil in the ignition switch's run position then the other Red wire coming from the I terminal (for extra voltage when starting) from the starter solenoid goes onto this same + Positive Red wire on Coil.
4. The DSII horseshoe clip is made so that the Green wire coming out of the DSII wire harness plugs onto the Tach or the - negative side of the coil, so you just plug it on as is.
5. The ICM's 2 wire plug socket is plugged into the 2 wire plug and it has a Red and a White wire coming out of it. I ran a new wire connecting this Red wire and splicing it into the Pink wire about 2 or 3 inches under the dash behind the ignition switch so that it's before the Resistor in the Pink wire, this give you a full 12+ Volts input going to the ICM. I even used a Crimp On type Splice / Trailer type Connector so I didn't have to cut any of the original wiring harness. If you have a Volt / Ohm meter probe the wire there you are looking for at least a full 12 + volts with the Key On in or in the Run position as the ICM needs to have a full 12 volts to run correctly. This is all you really need to make it run and many people don't even bother to hookup that White wire. However the White wire though is for the Ignition retard feature of the ICM and in my OPIN is a good idea to hookup easier on the starter. To do so just run a new wire connecting the White wire over to the I terminal of the starter solenoid and now your all done and can Enjoy all the benefits of the new DSII ignition system.
If you are thinking of making your own wire harness you could even customize the above instructions some by installing the ICM inside the car, in the truck cab or any convenient location on a piece of Equipment ideal is in a cooler location to protect the ICM and make it last even longer this would also make the system semi hidden if you wanted to keep a more stock looking appearance under the hood and then you could also use the DSI small cap, and rotor, and your current Spark Plug Wire Set for a very stock looking install on a more vintage looking model. If you wanted to up grade some of the stock grade parts, then an aftermarket Coil, Plug Wire Set, a Higher Quality Distributor Cap, and Rotor with Brass contacts is good very good to do.
A side note on the Ignition Control Modules (ICM's) many in the past that had early failure problems and these complaints were specifically tied to the ICM they were usually caused by using an inferior quality part so look for quality parts.
Sorry don't have any good pictures currently of the complete 4 or Inline Six DuraSpark II Ignition System Parts to show what they look like, but here is what some of the stock parts will look like for a V8 DSII system again all the parts are going to be exactly the same with the exception of you needing to use Engine Specific Distributor, with it's matching cap, rotor, and plug wires, etc. the below link also has a DSII wiring diagram.
Conversion From Points to FORD Duraspark II Electronic Ignition - MustangSteve
The white wire connection is not absolutely necessary, but it’s function is to energize the “retard while starting” function of the Duraspark II module. When cranking the engine, the module actually retards the spark so the engine can crank easier. This allows you to run additional initial advance.
http://www.wrljet.com/fordv8/duraspark.html
Here is an example of a New Replacement Motorcraft ICM for the stock DuraSpark II ignition system
https://www.amazon.com/Motorcraft-DY-893-Module-Assy-Amplifier/dp/B000EQ82UK
Yes you sure could there isn't any difference to those Wire harnesses and they can be used on any 4, 6, or 8 Cylinder Ford engine's that uses a DS II Distributor then it will fit right into the other parts. They were all made the same way and are a basically a Plug & Play system. You could even make up your own harness if you wanted to.
Oh and there is also one other way you can go that's even less expensive and very easy to do, take a look at this one and see what you think, lots of the Ford Six Forum Site members are using them with good results. Go to this site. https://www.gofastforless.com/
Then click on the Ignition Tab Link
Then click on Better Ignition
Go down to second to the last paragraph "Can I hook a TFI to a Duraspark (magnetic pickup) distributor?"
In that paragraph are the directions on how to install and wire a GM HEI Module as the ICM for the DuraSpark II Distributor for an even cheaper Electronic ignition system. Then all you need is the 200 / 250 Six DS II Distributor, a DS I Cap & Rotor and maybe a Coil depending on which one you are using now. Good luck
Thanks for all the information. That gofastforless site is very detailed. It will take a bit to digest everything. It is easy for those th at have done this before. I am a little nervous how the advance curve matches what previously was controlled by vacuum. Just need to do some reading.
Hi adobejoe, well it's not really going to match it but it will way exceed the LOM's potential leaving it in the dust. The 1968 to 1974 as well as the all the DuraSpark I's and II's both have the same Centrical Advance Systems where 2 Weight's, 2 Springs, plus a choice of one of 2 Slot's to limit the amount of Advance and the engine's RPM advance's the Ignition it's pretty Bullet Proof, they also still have a Vacuum Advance system on them too. If you wanted there is Bill that can also set up a Distributor to your specs if you need the help he is site member Wasa111.
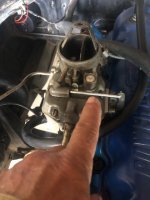
Ordered the Duraspark II. Have the ignition module and cabling. What do you recommend on coil? I now have the engine running smoother at idle but just not accelerate like it should. The ignition may help but I am wondering if it is in the pump, and carb settings. I find if I remove the power vent rod it runs better. How important is that power vent? What does it do? Vent more air? Here is a pic and video.
Attachments
A stock DurSpark II has a ignition resistance wire of 1.25-1.35 ohm resistance. A stock Duraspark II coil has an internal resistance of around 1.17 ohm's. You can probably use any aftermarket coil tat is between 1.0 and 1.5 ohm not have any problems. Personally on these I just use the OEM Pink Wire from the Ignition switch and the Brown Wire form the Starter Solenoid going to the Coil along with a stock DuraSpark II Coil or a NAPA replacement there are others too like Standard Ignition products.
The Autolite Carb Vent is to shut off Air to the Bowl when the engine is not running to cut down on fuel evaporation, thet later Model AutoLites did away with that part.
The Autolite Carb Vent is to shut off Air to the Bowl when the engine is not running to cut down on fuel evaporation, thet later Model AutoLites did away with that part.
Similar threads
- Replies
- 3
- Views
- 252
- Replies
- 32
- Views
- 2K
- Replies
- 12
- Views
- 2K