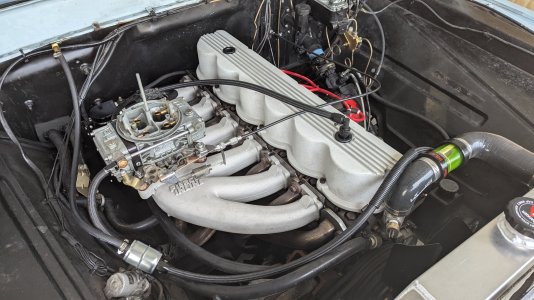
For Sale ALL SOLD-Still have a couple 4 barrel intake manifolds for sale from the first batch

JPierce

Well-known member
Approved Vendor
PXL_20240721_202803094.jpg

$475 includes tax and shipping. Manifold can be used as a single plane or dual plane with the included divider plate.

The test manifolds that I am selling at a discount differ slightly from the new versions I am making. The test manifolds are identical both outside and inside the to the new ones I am making but the new ones will cost significantly more. The difference is the test versions used two Chaplets which are small aluminum spacers that keep the sand cores from floating while the manifolds are being cast. The Chaplets are located on the bottom in the water jacket area. I applied a thin layer of 1 hour JB weld epoxy around each Chaplet inside the water jacket to insure water doesn't seep around the chaplets into the inside of the manifold. The new version eliminates the need for chaplets and having to seal them but ends up costing a lot more for the casting process.

The manifold is sold with a water jacket plate that is drilled and tapped for 1/2-14 NPT heater hose fittings if you need a heated manifold. You need to make a gasket for it or use an RTV type gasket sealer. Also need (6) 1/4-20 bolts to secure it to the manifold. Length of bolts determined by gasket type.

I also include the aluminum divider plate that will convert it from a single plane to a dual plane if you decide to go that way. The short sides of the divider plate slide in the slots on each side of the manifolds carb base. The plate is laser cut and has a slight wedge shape to make it easier to fit in the slots but has square edges. The carb slots have a rounded shape, you need to round the two short side of the plate to make it fit. Take your time grinding until the plate drops all the way in and fits snug. Don't grind too much, you don't want a loose fit. To secure the plate and keep it from rattling due to the intake pulses I have drilled and tapped an allen set screw that you need to tighten up against the divider plate. Use blue thread sealer so it doesn't back out. If you don't run the divider plate you need to replace the allen set screw with a bolt and seal it in place so you don't have an air leak.


I make my manifold with thicker tabs than the stock manifolds. I do this for extra strength so the tabs won't break off so easily. You can grind them down to the same size as your exhaust manifold tabs (not recommended) or grind a little off one side of the thick factory washers. If you want some larger washers, I had some laser cut that also have a longer reach than the stock washers so they cover more of the tabs. They would also need to be ground. I can add these for $10.
 
I am working on a 1958 F100 with 223. I had the engine rebuilt and would like to convert to efi. Would this manifold work on the engine? If so, what efi would you recommend?
 
I am working on a 1958 F100 with 223. I had the engine rebuilt and would like to convert to efi. Would this manifold work on the engine? If so, what efi would you recommend?
Dave A.- this 240/300 intake will not fit a 223.
 
Welcome aboard Dave A,
Please start a thread here:

Members will be able to help you with your project.
 
View attachment 23298

$475 includes tax and shipping. Manifold can be used as a single plane or dual plane with the included divider plate.

The test manifolds that I am selling at a discount differ slightly from the new versions I am making. The test manifolds are identical both outside and inside the to the new ones I am making but the new ones will cost significantly more. The difference is the test versions used two Chaplets which are small aluminum spacers that keep the sand cores from floating while the manifolds are being cast. The Chaplets are located on the bottom in the water jacket area. I applied a thin layer of 1 hour JB weld epoxy around each Chaplet inside the water jacket to insure water doesn't seep around the chaplets into the inside of the manifold. The new version eliminates the need for chaplets and having to seal them but ends up costing a lot more for the casting process.

The manifold is sold with a water jacket plate that is drilled and tapped for 1/2-14 NPT heater hose fittings if you need a heated manifold. You need to make a gasket for it or use an RTV type gasket sealer. Also need (6) 1/4-20 bolts to secure it to the manifold. Length of bolts determined by gasket type.

I also include the aluminum divider plate that will convert it from a single plane to a dual plane if you decide to go that way. The short sides of the divider plate slide in the slots on each side of the manifolds carb base. The plate is laser cut and has a slight wedge shape to make it easier to fit in the slots but has square edges. The carb slots have a rounded shape, you need to round the two short side of the plate to make it fit. Take your time grinding until the plate drops all the way in and fits snug. Don't grind too much, you don't want a loose fit. To secure the plate and keep it from rattling due to the intake pulses I have drilled and tapped an allen set screw that you need to tighten up against the divider plate. Use blue thread sealer so it doesn't back out. If you don't run the divider plate you need to replace the allen set screw with a bolt and seal it in place so you don't have an air leak.


I make my manifold with thicker tabs than the stock manifolds. I do this for extra strength so the tabs won't break off so easily. You can grind them down to the same size as your exhaust manifold tabs (not recommended) or grind a little off one side of the thick factory washers. If you want some larger washers, I had some laser cut that also have a longer reach than the stock washers so they cover more of the tabs. They would also need to be ground. I can add these for interested in whatever ya got. I've seen your stuff on the Ford truck forum that someone bought from you. botters129@gmail.com
 
Hi Brett, they are all gone, sorry. I sold those at a discounted price because the foundry was working with me to refine the casting process to get less failures and basically gave me a deal on the prices until we ironed out the problems.

I have made new manifolds and they look exactly like the one you bought but without the two chaplet buttons in the water jacket. I had to make several changes to my patterns and core boxes and this has added more foundry labor cost. On top of that the foundry is paying more for raw materials which got passed on to me. Bottom line they cost more, $575. If you want one, private message me, I'll cut you a deal being a returning customer.
 
I hope to have a website soon. It's more work then I thought getting everything to work right.
Prices will be:
Manifold - $575 Manifolds sold as offroad/racing use only due to emissions laws.
Valve Cover - $325
Side Cover (stock) - $150
Side Cover (coil Mount) $175
Plus shipping cost.
Sorry for the prices, all my costs shot up the last year.
 
View attachment 23298

$475 includes tax and shipping. Manifold can be used as a single plane or dual plane with the included divider plate.

The test manifolds that I am selling at a discount differ slightly from the new versions I am making. The test manifolds are identical both outside and inside the to the new ones I am making but the new ones will cost significantly more. The difference is the test versions used two Chaplets which are small aluminum spacers that keep the sand cores from floating while the manifolds are being cast. The Chaplets are located on the bottom in the water jacket area. I applied a thin layer of 1 hour JB weld epoxy around each Chaplet inside the water jacket to insure water doesn't seep around the chaplets into the inside of the manifold. The new version eliminates the need for chaplets and having to seal them but ends up costing a lot more for the casting process.

The manifold is sold with a water jacket plate that is drilled and tapped for 1/2-14 NPT heater hose fittings if you need a heated manifold. You need to make a gasket for it or use an RTV type gasket sealer. Also need (6) 1/4-20 bolts to secure it to the manifold. Length of bolts determined by gasket type.

I also include the aluminum divider plate that will convert it from a single plane to a dual plane if you decide to go that way. The short sides of the divider plate slide in the slots on each side of the manifolds carb base. The plate is laser cut and has a slight wedge shape to make it easier to fit in the slots but has square edges. The carb slots have a rounded shape, you need to round the two short side of the plate to make it fit. Take your time grinding until the plate drops all the way in and fits snug. Don't grind too much, you don't want a loose fit. To secure the plate and keep it from rattling due to the intake pulses I have drilled and tapped an allen set screw that you need to tighten up against the divider plate. Use blue thread sealer so it doesn't back out. If you don't run the divider plate you need to replace the allen set screw with a bolt and seal it in place so you don't have an air leak.


I make my manifold with thicker tabs than the stock manifolds. I do this for extra strength so the tabs won't break off so easily. You can grind them down to the same size as your exhaust manifold tabs (not recommended) or grind a little off one side of the thick factory washers. If you want some larger washers, I had some laser cut that also have a longer reach than the stock washers so they cover more of the tabs. They would also need to be ground. I can add these for $10. Ready to start a 300 carburetor build and have nothing but stock 1971 engine at this time. Looking for helpful advice and equipment. Computer skills very limited so brief phone conversation to start would be helpful and appreciated. Regards, silverstate9
 
Back
Top