mysavioreigns
Famous Member
This sticky (which is also over on Classic Inlines) has, what I believe, is some incorrect information which could cause heartache.
After reading an exhausting 17 page guide to Ford's Duraspark Ignition Timing, I am thinking that the sticky above is incorrect in the statement:
There are 2 springs controlling the centrifugal advance in the DSII Distributor, and (most of the time) one has a thicker wire diameter than the other, and therefore requires more force to stretch it the same distance. If the thicker wire is replaced with the Mr. Gasket #925D spring - a much thinner wire diameter - it would require less speed to achieve the same advance. Simply, it will take less time to reach a higher advance.
Here's a picture of the thicker wire [top left] vs. the Mr. Gasket #925D [top right]
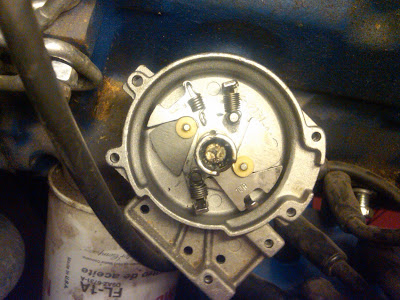
here's a larger image
Now, for the panel's approval :mrgreen: Is that what others understand this as, also? I know Jackfish commented in the original sticky that he believed it was wrong, and he had replaced the thicker wire, not the thinner, and had successful results.
Now, on to part 2 of the Duraspark Ignition Confusion...
The thicker wire diameter will frequently have "slack" in it, from the factory. This means it will take slightly longer to engage tension in it. A chart of the advance would rise, and once the thicker spring is engaged, it would flatten out some. I'm not sure if, when Mark P wrote this Sticky, he was saying that you need to create an even more "slack" state, or if he was conveying that it should just match up to like Ford had intended when they left it "slack" from the factory.
Hope that makes sense to everyone. I'm trying to increase my level of understanding on these engines and in the process of doing so, I want to make sure I don't do things "just because someone said it will make it better" but because I really want to understand the engineering and logic behind it.
I'll have more questions, I'm sure. But I'll wait until we have some feedback.
Thanks
Stephen
After reading an exhausting 17 page guide to Ford's Duraspark Ignition Timing, I am thinking that the sticky above is incorrect in the statement:
1. Remove the lighter of the 2 springs in the DII and replace it with one of the #925D springs.
There are 2 springs controlling the centrifugal advance in the DSII Distributor, and (most of the time) one has a thicker wire diameter than the other, and therefore requires more force to stretch it the same distance. If the thicker wire is replaced with the Mr. Gasket #925D spring - a much thinner wire diameter - it would require less speed to achieve the same advance. Simply, it will take less time to reach a higher advance.
Here's a picture of the thicker wire [top left] vs. the Mr. Gasket #925D [top right]
here's a larger image
Now, for the panel's approval :mrgreen: Is that what others understand this as, also? I know Jackfish commented in the original sticky that he believed it was wrong, and he had replaced the thicker wire, not the thinner, and had successful results.
Now, on to part 2 of the Duraspark Ignition Confusion...
2. There is a support arm that holds the larger spring, on it's non-slotted end. Bend this arm in toward the center of the distributor, just 3/32".
The thicker wire diameter will frequently have "slack" in it, from the factory. This means it will take slightly longer to engage tension in it. A chart of the advance would rise, and once the thicker spring is engaged, it would flatten out some. I'm not sure if, when Mark P wrote this Sticky, he was saying that you need to create an even more "slack" state, or if he was conveying that it should just match up to like Ford had intended when they left it "slack" from the factory.
Hope that makes sense to everyone. I'm trying to increase my level of understanding on these engines and in the process of doing so, I want to make sure I don't do things "just because someone said it will make it better" but because I really want to understand the engineering and logic behind it.
I'll have more questions, I'm sure. But I'll wait until we have some feedback.
Thanks
Stephen

")