All Small Six Guide to electrical?

This relates to all small sixes

JoeCrozier

Well-known member
Good morning! Beginner question here:

I've got a few posts on here about how I've been rebuilding an old 144 I got for free, lying in the dirt. Well, I've made a ton of progress and I think its physically 'done', its just time to wire it up, add fuel, and try to start it.

engine.jpg

But that little comment about 'wire it up' isnt as easy as it sounds. I'm a total beginner, have no idea what I'm doing, and I've been trying to do everything as cheaply as possible for this little hobby.

I found a wiring diagram:
freshdrawing.png

and that's helped, also RockAuto has helped me get things like the starter relay assembly, etc.. but when looking for the actual cables to use I'm kinda at a loss. I dont really care whether things are original or numbers matching, I just want it to work. When I google wires/wiring harnesses for the 144 I get a bunch of old NOS parts that are like $70 for a wiring harness and I'm too cheap to pay that. Are there guidelines for what wires I should use? What gauge? What connectors?

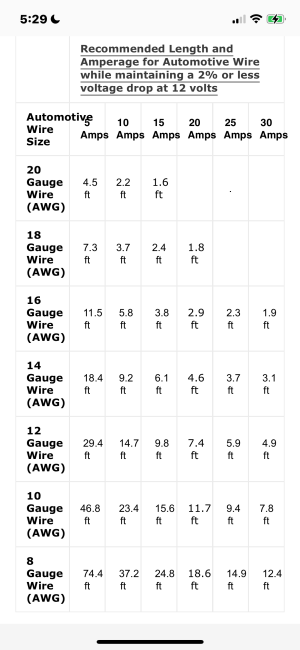
ChatGPT says I can just buy a 4 gauge wire kit kinda like this one and make what I need, but is that true? I don't always trust ChatGPT answers.

Lastly, that diagram doesnt show it, but both the head bolt that I removed and one of the new ARP head bolts that I installed have a little post for connecting a wire to, and I have no idea what its for. Any ideas?
 
I am not expert, on the first ? no, that is audio stuff, you want Auto battery and starter #4 gauge like for 14300, 14301, 14431.
The head bolt is for a car and that is where 14301 would go. A jumper should go from the head bolt to the block wire point. There is more that one way to wire the ground but that is what your diagram shows. The other wires I think that #14 would be good.
This is just for a cheap engine stand to see it run, right? I am sure others will have more info.
 
That kit does not come with battery terminals.
A decent terminal will need to be crimped on and will cost about 9-10 dollars each unless you luck into some. (the simple clamp posts will cause trouble down the road) The type down below is what I prefer. You should also use some double wall heat shrink on them also to seal out damaging battery vapor; the shrink can be had in red and black to help identify connections more easily.
4 ga is sufficient, I think originally is was only 6ga. If you want something more rock-solid, I would go 2 ga; it is still very manageable. I did on mine.
The best point for the main ground is the block itself; you can branch off to other points of the engine if need be.


I am not expert, on the first ? no, that is audio stuff, you want Auto battery and starter #4 gauge like for 14300, 14301, 14431.
The head bolt is for a car and that is where 14301 would go. A jumper should go from the head bolt to the block wire point. There is more that one way to wire the ground but that is what your diagram shows. The other wires I think that #14 would be good.
This is just for a cheap engine stand to see it run, right? I am sure others will have more info.
Exactly, I just want to see it run. In fact I’ll probably just use the battery from one of my actual cars to get it going. I.e. if I can safely ignore the alternator for now I’ll probably do that.

Honestly once I get it running I’ll probably swap all the good parts onto a 200, but that’s a topic for a different thread.

So you think battery 4 gauge for a few of those cables, but #14 should suffice for much of the rest?
 
That kit does not come with battery terminals.
A decent terminal will need to be crimped on and will cost about 9-10 dollars each unless you luck into some. (the simple clamp posts will cause trouble down the road) The type down below is what I prefer. You should also use some double wall heat shrink on them also to seal out damaging battery vapor; the shrink can be had in red and black to help identify connections more easily.
4 ga is sufficient, I think originally is was only 6ga. If you want something more rock-solid, I would go 2 ga; it is still very manageable. I did on mine.
The best point for the main ground is the block itself; you can branch off to other points of the engine if need be.


I’ll make sure to get good terminals, thank you
 
Exactly, I just want to see it run. In fact I’ll probably just use the battery from one of my actual cars to get it going. I.e. if I can safely ignore the alternator for now I’ll probably do that.

Honestly once I get it running I’ll probably swap all the good parts onto a 200, but that’s a topic for a different thread.

So you think battery 4 gauge for a few of those cables, but #14 should suffice for much of the rest?
Yes. for the test stand without generator/ alternator.
 
If you are running it on a test stand without coolant you should leave the belt off; you don't want to burn up the seals in the water pump
At least in the beginning (unless you think this is a terrible idea), I was thinking of running it like this kinda:

I know that engine was specifically set up for a boat, but I was thinking of just hooking up a bucket of ice water or something before I have a radiator.

Or if that’s a terrible idea I’ll just do as you suggest and leave the belt off and do very short runs
 
You could run it forever with the hose. Best to warm up the engine too cold is not good, regulate the flow so that the water coming out is warm but not like about to boil.
Thank you. This thread has been super helpful. The pace of rebuilding this engine has been glacial because of how cheap I am, but I feel like the end is in sight. At least the ‘end’ meaning when I can finally turn it on.
 
Hi, if you installed a new cam, you will need a radiator and cooling system bolted to the run stand, so you can break in the cam, at @ 2000 RPM for 20 minutes. If you did not replace the cam, you just need a battery, with cables to the solenoid, starter, and ground, along with a hot wire to the positive side of the coil, maybe with a ballast resistor, so you don't burn the points. We don't ground our negative to the head bolt, most any 3/8 bolt will do, like the motor mount bolt. You can get fancier with the wiring, like using a switch for the S post on the solenoid, or you can use a remote starter switch, or just jump the solenoid with a screwdriver. A remote starter switch is nice, so you can play with the throttle and ignition timing. Good luck
 
Hi, if you installed a new cam, you will need a radiator and cooling system bolted to the run stand, so you can break in the cam, at @ 2000 RPM for 20 minutes. If you did not replace the cam, you just need a battery, with cables to the solenoid, starter, and ground, along with a hot wire to the positive side of the coil, maybe with a ballast resistor, so you don't burn the points. We don't ground our negative to the head bolt, most any 3/8 bolt will do, like the motor mount bolt. You can get fancier with the wiring, like using a switch for the S post on the solenoid, or you can use a remote starter switch, or just jump the solenoid with a screwdriver. A remote starter switch is nice, so you can play with the throttle and ignition timing. Good luck
No new cam yet, this is perfect, thank you! Curious what you mean by jump the solenoid with a screwdriver…though doubt I’ll do anything out of the box as I’m such a beginner
 
Hi, When you turn the key in the car to start, the ignition switch energizes the S post on the solenoid. To spin the engine from in front of the engine compartment you either hook a remote starter switch to the large cable post on the solenoid, from the battery, and the small S post. If you take a large screwdriver and touch it to the large post and the S post at the same time, you will "jump" the solenoid and the starter will spin. Try it, you'll like it! Good luck
 
For just running it on a stand, I used jumper cables from the battery direct to the starter. Remember to make sure you can unhook the power supply to the distributor so you can turn it off 👍. Hose into a gas can to the fuel pump, you have to have a way to mount the starter too. I started mine with the engine on a square wood frame on the floor, it doesn’t need a lot of bracing for stability
It would make a cool video when you do it😎
I find this table helpful 👍
 

Attachments

  • IMG_4444.png
    IMG_4444.png
    243.6 KB · Views: 2
Back
Top