The past couple weeks I've been fiddling with this conversion. My goal was to do the conversion on a decent budget without having to have any parts involved that were not readily available at any parts store. This led me to a GM style alternator as I already had one sitting around I could use for mockup also. I wanted to go one wire because my local Advance store had one in stock but it wouldn't line up properly. I ended up going with a three wire GM style and leaving my stock voltage regulator in at the same time. The three wire is internally regulated so I don't actually use the voltage regulator for that purpose. I will outline the steps in this post.
Step One: removing the generator, this is pretty self explanatory. Oh yeah, disconnect the battery. Remove the wires, remove the belt, remove mounting bolts and remove that, what feels like, 50lb hunk of metal...
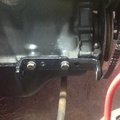
Step Two: moving the bottom mount bracket forward in order to line up with the front of the upper swing arm bracket. For me this consisted of drilling two 1/2" holes about 7/8" to 15/16" to the rear of the existing holes on the bracket.
Step Three: I also ground about 1/4" off the top on the front half of the bracket and rounded the front of the bracket taking about a 1/4" of material off the front around the bolt hole to clearance for the alternator hitting the bracket.
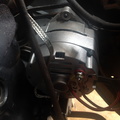
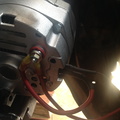
Step Four: I had an old GM 3 wire alternator from an 81 c10 pickup laying in the building I used for mockup. I made sure mounting it up that the pulley would line up correctly. I was pretty sure it would as I measured my generator first. I got 1-3/8" from the front face of the generator to the outside of the pully. I got the same measurement on the alternator. I also had a bracket from the same truck still mounted to the rear of the alternator that I used as a spacer behind the alternator. Without this bracket you could use a short piece of iron pipe or even a piece of 1/2" copper pipe. I ended up having to run to Lowes and purchase a 7"x3/8" bolt, three flat washers, one lock washer, and a nut for the lower mounting bracket. Two of the flat washers made up the 1/4" extra space I still had in the lower generator bracket. Everything mounted up nicely. I went to a local parts store and picked up a new reman alternator that was the same as the one I had. The bearing in mine was screaming.
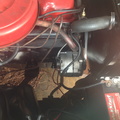
Step Five: WIRING: I did some researching online, turned out I could turn my 3 wire into a one wire and have it self excite. First thing I did was get some 10awg wire from the parts store and and some weatherproof connectors. I got eyes to fit the terminal on the solenoid and the charging lug on the back of the alternator. Also push clip ends to hook into the alternator where the pigtail normally goes in. You could use a pigtail for the alternator but I already had to buy the wire so I figured I would make my own. The first wire I made up was for charging the battery. It ran from the charging lug on the back of the alternator to the lug on the starter solenoid that the battery hooked to. All you have to do after that is figure out which terminal coming off of where the pigtail plugs in will excite the alternator, or cause it to start charging. Easiest way is to make a jumper, plug it into the alternator and touch it to the charging lug on the rear. One of these connectors will cause the alternator to begin charging, you can hear it when it happens. Once I had all this determined the other connector would actually be for the dummy light on the dash. This is why I kept my stock voltage regulator in place. I had a yellow or white wire originally hooked to the generator that wound up being the correct wire for the dash light. It was hard to tell the original color as the previous owner painted all wires black along with the engine bay. I had a little trouble with this at first because I would hook the wire up and the mechanical points in my regulator would stick together causing the light to actually illuminate when turning the key off. I ended up removing the cover from my stock regulator and pushing the tab for the top point to where it applied more pressure with the spring for that point that was sticking. This fixed the issue and the dash light for the generator began functioning properly. I also ended up needing a 15340 v-belt to make this setup work. Even though the case on the alternator is supposed to be internally grounded I still added a ground strap from the rear of the alternator right up to where the ground from the battery hooked to the engine.
On a side note I ended up adding heat shrink to the connector ends that plug into the voltage regulator on the alternator. This was a safety point so if a connector came loose it wouldn't short out against the case of the alternator and perhaps start a fire or melt wires. This is something I was wanting to do before I started adding relays and such for lighting, ignition, possible electric fan, radio system and such.
The factory generator is a 30 amp model and a cheap 3 wire alternator that can be found at almost any parts store for about $50 runs 63 amps. At least the one I picked up does. This should cover me for anything I plan on doing and if not I can always upgrade later with a similar style that wires up the same and puts out more amperage. So far it works great and I havnt had any issues. I also don't have any parts involved in this that isn't available down the road at a parts store. No funky wiring to be done and other than the alternator everything looks stock. Including the original voltage regulator.

Step One: removing the generator, this is pretty self explanatory. Oh yeah, disconnect the battery. Remove the wires, remove the belt, remove mounting bolts and remove that, what feels like, 50lb hunk of metal...
Step Two: moving the bottom mount bracket forward in order to line up with the front of the upper swing arm bracket. For me this consisted of drilling two 1/2" holes about 7/8" to 15/16" to the rear of the existing holes on the bracket.
Step Three: I also ground about 1/4" off the top on the front half of the bracket and rounded the front of the bracket taking about a 1/4" of material off the front around the bolt hole to clearance for the alternator hitting the bracket.
Step Four: I had an old GM 3 wire alternator from an 81 c10 pickup laying in the building I used for mockup. I made sure mounting it up that the pulley would line up correctly. I was pretty sure it would as I measured my generator first. I got 1-3/8" from the front face of the generator to the outside of the pully. I got the same measurement on the alternator. I also had a bracket from the same truck still mounted to the rear of the alternator that I used as a spacer behind the alternator. Without this bracket you could use a short piece of iron pipe or even a piece of 1/2" copper pipe. I ended up having to run to Lowes and purchase a 7"x3/8" bolt, three flat washers, one lock washer, and a nut for the lower mounting bracket. Two of the flat washers made up the 1/4" extra space I still had in the lower generator bracket. Everything mounted up nicely. I went to a local parts store and picked up a new reman alternator that was the same as the one I had. The bearing in mine was screaming.
Step Five: WIRING: I did some researching online, turned out I could turn my 3 wire into a one wire and have it self excite. First thing I did was get some 10awg wire from the parts store and and some weatherproof connectors. I got eyes to fit the terminal on the solenoid and the charging lug on the back of the alternator. Also push clip ends to hook into the alternator where the pigtail normally goes in. You could use a pigtail for the alternator but I already had to buy the wire so I figured I would make my own. The first wire I made up was for charging the battery. It ran from the charging lug on the back of the alternator to the lug on the starter solenoid that the battery hooked to. All you have to do after that is figure out which terminal coming off of where the pigtail plugs in will excite the alternator, or cause it to start charging. Easiest way is to make a jumper, plug it into the alternator and touch it to the charging lug on the rear. One of these connectors will cause the alternator to begin charging, you can hear it when it happens. Once I had all this determined the other connector would actually be for the dummy light on the dash. This is why I kept my stock voltage regulator in place. I had a yellow or white wire originally hooked to the generator that wound up being the correct wire for the dash light. It was hard to tell the original color as the previous owner painted all wires black along with the engine bay. I had a little trouble with this at first because I would hook the wire up and the mechanical points in my regulator would stick together causing the light to actually illuminate when turning the key off. I ended up removing the cover from my stock regulator and pushing the tab for the top point to where it applied more pressure with the spring for that point that was sticking. This fixed the issue and the dash light for the generator began functioning properly. I also ended up needing a 15340 v-belt to make this setup work. Even though the case on the alternator is supposed to be internally grounded I still added a ground strap from the rear of the alternator right up to where the ground from the battery hooked to the engine.
On a side note I ended up adding heat shrink to the connector ends that plug into the voltage regulator on the alternator. This was a safety point so if a connector came loose it wouldn't short out against the case of the alternator and perhaps start a fire or melt wires. This is something I was wanting to do before I started adding relays and such for lighting, ignition, possible electric fan, radio system and such.
The factory generator is a 30 amp model and a cheap 3 wire alternator that can be found at almost any parts store for about $50 runs 63 amps. At least the one I picked up does. This should cover me for anything I plan on doing and if not I can always upgrade later with a similar style that wires up the same and puts out more amperage. So far it works great and I havnt had any issues. I also don't have any parts involved in this that isn't available down the road at a parts store. No funky wiring to be done and other than the alternator everything looks stock. Including the original voltage regulator.