All Small Six Stalling Issues 1983 200ci Mercury Marquis

This relates to all small sixes
See picture 23, 24 and 25 of the standard X code 3.3 liter. This is a car for sale, and it looks like your missing a few of the vac lines.


"https://classiccars.com/listings/vi...ry-zephyr-for-sale-in-o-fallon-illinois-62269"


If you aren't going to be able to put all that jazz back on, its probably just the Evap iths Bowl.vent and tank ventilation via the charcoal canister and PCV that needs to be hooked up. The problem is the AIR, EGR and three vents to the Ported , Manifold and Spark vents on the carb might not be working probably. I'm pretty reluctant to remove AIR and EGR Function, but they might be your problems.
Could it be because that car has cruise control and mine doesn't?
 
No, your all good with that. The Speed Control/cruise control was just a non invasive option on the 3.3 through all the years on most Foxes from 78 to 83...just a chain to the throttle, a vacuum line to modulate throttle, and a speed sensor hookup and a brake deactivation wire cut out with a few other safeguards.

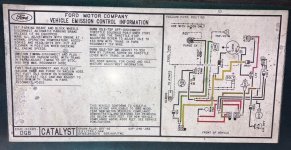
The Mustang never had a factory X code 3.3 liter in 1983, so my checking with LMR to get an 83 3.3 liter VECI sticker....It didn't work.

You should have one on your radiator core support or hood, with a code number on it. All the details should be similar to trice351s B code VECI sticker in colors. That ought to help you nail the vacuum leaks that I recon are taking your six down.

That tells you what vacuum lines, one way vac diodes , check valves and back flow prevention lines hook up. Sometimes, it's just the Heater Box vacuum line opening up at the wrong time that scuppers vacuum to the engine.

In your case, I would advise re-establishing the stock lines, but to get it running, and considering the previous deleting of some of those lines, you might have to try capping some lines to get it to run after the 8 to 20 minute mark.


The choke pulldown has to be functioning, the way to do that is to apply a Hand Vacuum pump vac at Point A and just follow the set up instructions. Its gonna be that or the other green items to the EGR or an AIR system leak.


These are clues you need to jump on, and best wishes. Once you nail the leak, you'll be golden.
 
Last edited:
If the Brake Booster is Bad that can be a Vacuum leak just in itself sometimes only when you step on the brakes. Just so you know deleting all the emissions parts of the engine usually isn't worth the effort you might gain about a 1/2 of a H.P. and you would be need to do a lot of re-tuning to see that, it's an advanced project to do it right. Have you checked if the EGR Valve is Clean and not stuck? I have some of the Vacuum Lines and a few other small parts as well as a nice OEM Low Mileage Carb off a Fox Mustang too. Best of luck
 
No, your all good with that. The Speed Control/cruise control was just a non invasive option on the 3.3 through all the years on most Foxes from 78 to 83...just a chain to the throttle, a vacuum line to modulate throttle, and a speed sensor hookup and a brake deactivation wire cut out with a few other safeguards.

The Mustang never had a factory X code 3.3 liter in 1983, so my checking with LMR to get an 83 3.3 liter VECI sticker....It didn't work.

You should have one on your radiator core support or hood, with a code number on it. All the details should be similar to trice351s B code VECI sticker in colors. That ought to help you nail the vacuum leaks that I recon are taking your six down.

That tells you what vacuum lines, one way vac diodes , check valves and back flow prevention lines hook up. Sometimes, it's just the Heater Box vacuum line opening up at the wrong time that scuppers vacuum to the engine.

In your case, I would advise re-establishing the stock lines, but to get it running, and considering the previous deleting of some of those lines, you might have to try capping some lines to get it to run after the 8 to 20 minute mark.


The choke pulldown has to be functioning, the way to do that is to apply a Hand Vacuum pump vac at Point A and just follow the set up instructions. Its gonna be that or the other green items to the EGR or an AIR system leak.


These are clues you need to jump on, and best wishes. Once you nail the leak, you'll be golden.
Here's the 83 X code VECI sticker

image0.jpeg

If the Brake Booster is Bad that can be a Vacuum leak just in itself sometimes only when you step on the brakes. Just so you know deleting all the emissions parts of the engine usually isn't worth the effort you might gain about a 1/2 of a H.P. and you would be need to do a lot of re-tuning to see that, it's an advanced project to do it right. Have you checked if the EGR Valve is Clean and not stuck? I have some of the Vacuum Lines and a few other small parts as well as a nice OEM Low Mileage Carb off a Fox Mustang too. Best of luck
I'm gonna try and pull the egr off today, it looks reasonably easy to get to. The reason I left all the stuff on the car in the first place is because I wanted one vehicle where everything was stock and not messed with.
 
Tested the car again.

Ran for the usual 15 minutes. With the new battery I was able to crank longer to test before it died.

This time the car would start an run for about 2-3 seconds and then die again.

I felt around under the hood and the ignition coil was hotter than the valve cover. Couldn't touch it longer than 5 seconds before it hurt.

So I pulled out the multi-meter and tested the coil resistance, it came in at 11100 ohms

Went down the street, got a new coil and installed it. Still no dice.
 
Last edited:
I went outside this morning and probed the distributor plug. Got 561 ohms between the two parallel blades.
That first part tested out good.
When I went to probe the parallel and perpendicular plugs I couldn't get a reading other than 1 at any of the settings.
This part though should of been 70,000 Ohm's or more.
Tested the car again.

Ran for the usual 15 minutes. With the new battery I was able to crank longer to test before it died.

This time the car would start an run for about 2-3 seconds and then die again.

I felt around under the hood and the ignition coil was hotter than the valve cover. Couldn't touch it longer than 5 seconds before it hurt.

So I pulled out the multi-meter and tested the coil resistance, it came in at 11100 ohms
Was this with the coil wiring unhooked? This should be ok if its under 12,000. But what was your Ohm Meter test of the DS II Coils Primary resistance across the two terminals with the wiring disconnected?
Went down the street, got a new coil and installed it. Still no dice.
From the Coil's (+) to Red ICM wire the spec is 1.05-1.15 Ohm’s

Under normal "run" conditions, power comes from the key switch through a length of resistance wire (0.8 to 1.6 ohms). This wire is normally pink and is found under the dash. During cranking, this resistance is bypassed by a wire from the "I" terminal on the starter relay, in most applications. So with the Key on (in the Run position) you will have something like 7.36 volts at the + Pos. post of the Coil

And with the Key cranking the engine over (Key in the start position) you should have the Battery voltage or very close to it. The Duraspark II Coils had an internal resistance of around 1.17 ohm.
 
Two distributor pickups later we're on to something.

First one was DOA. Car wouldn't even try to start after installing.

With the new pickup the timing light flashes the whole time while cranking.

It will only start now if I hold the pedal to the floor, RPMS are super low and will die if I let off the gas.

If I don't let off the key just as the engine starts up it will stall the engine.

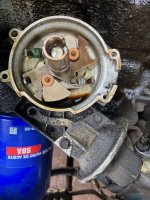
Is the reluctor on these distributors directional? I forgot to mark it before removing.

I ordered the Mr. Gasket #925D springs so I can do the recurve if I ever get this thing running right


69922030596__24AF0C5A-4E9E-4281-90A2-2183F867B2F0.jpg

 
Two distributor pickups later we're on to something.

First one was DOA. Car wouldn't even try to start after installing.

With the new pickup the timing light flashes the whole time while cranking.

It will only start now if I hold the pedal to the floor, RPMS are super low and will die if I let off the gas.

If I don't let off the key just as the engine starts up it will stall the engine.

Is the reluctor on these distributors directional? I forgot to mark it before removing.

I ordered the Mr. Gasket #925D springs so I can do the recurve if I ever get this thing running right


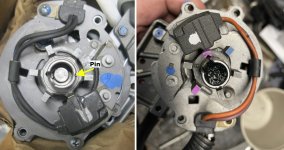
The Reluctor has a slot that uses a Pin and goes with the slot in the center shaft so it would seem it should only be able to go on it one position. However I always try and mark them so they will go back together in the same way and I don't think you can turn it upside down, if that is so then its not directional. However there have been some that found that the Pick Up Coil wiring is reversed on some replacement parts causing it run like yours is doing, it kind of retards the timing. How much Base Timing do you have it set at?
 
The reluctor has two slots (at least the ones I have do) and I'm told that it is important to reinstall it in the orientation in which it was removed. If you suspect that the reluctor is installed 180° out, note the orientation, remove it (to get the pin), then reinstall it so the opposite reluctor slot lines up with the slot in the shaft, and install the pin.

dist2.jpg
 
Your six has a blue strain relief Duraspark II ICM ( Ignition Control Modules) .

There are three differentley coded Variable Reluctor replacements, with a different wiring color code.

Idle cut out on Foxes is really tough to trace, as it could be air pockets caused by oxygenated fuel and a combination of incorrect Vaccum Emission Line and load. Control line set up, Fuel sock, check valve, Ignition Variable Reluctor positioning.

We had one guy with a two peg Duraspark II Ignition that interfaced with the Yellow Strain Relief module in his Turbo M81. It was headed for Smog testing, and it took him and his son over half a year to get the engine idling and driving properly so it didn't stall out and require a AAA Flat bed assistance.

Read through from page 12 to 19.

Post #296 is probably what you need to know.

"http://vb.foureyedpride.com/showthr...Mclaren-ready-to-start-after-15-years!/page12"

"http://vb.foureyedpride.com/showthr...Mclaren-ready-to-start-after-15-years!/page19"
 
Last edited:
The reluctor has two slots (at least the ones I have do) and I'm told that it is important to reinstall it in the orientation in which it was removed. If you suspect that the reluctor is installed 180° out, note the orientation, remove it (to get the pin), then reinstall it so the opposite reluctor slot lines up with the slot in the shaft, and install the pin.

View attachment 15246
X2 So now since you didn't mark the Reluctor position then you need will to swap it to the other slot position as "John Ha" stated above so you know which is right one of the slots to use. Good luck I feel like you are much closer now to getting the car running right.
 
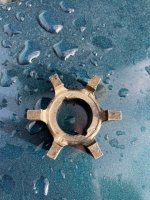
I swapped the reluctor around and it made no difference.

Seems like a symmetrical piece of metal to my eye, but I'm not a distributor technician

image0.jpeg

Wonder if I got another bad pickup. Working on stuff was a lot more fun when I didn't have to question if new parts would work.

My buddy suggested adding some timing, will probably try that next.
 
Great advice.

In this post, you've got the B and X code VECI's for 1980, 81, 82 and 83. The post marquis83 was the best, IMHO, it shows the X code colors!

Other posts on 1978-1979 T code 3.3 liters exist, but they are color coded only on Four Eyed Pride.


T code discussion with a really comprehensive 93 element VECI list which was used in the last 1987 Carb HO 5.8 F150 Trucks.

"https://fordsix.com/threads/holley-1946-ported-vacuum-source.75674/#post-582790"

B code discussion, with colors on the lines, not the full color 1982 B code VECI.
"http://vb.foureyedpride.com/showthread.php?178352-3-3-Vacuum-nightmare"
 
Last edited:
Did some more testing today.

It failed DSII Test 4 for the ballast resistor.

The resistance was reading 460 ohms for that test when it was supposed to be .8 - 1.6

The car also keeps shocking me when I touch the door of fender after changing the key from run to off or off to run..

It's really being a pain
 
Last edited:
Finally some good news.

I was thinking, out of all the parts I installed the only thing that made the car run different (worse) was the distributor pickups I installed.

I went with my instincts and I ordered another distributor pickup from a different brand.

Went with WVE which came in a box with NGK printed on it.

I installed it in the car, and like magic it started right up.

As of this moment the car has been running for 45 minutes without stalling out.

Thanks everyone for the help and moral support, I'm gonna go drive it now.
Sorry it took so long, but the Variable Reluctor pickup, yeah, it's the most common problem. And sorry for shoving the whole Fraud Motoring Company Emission Bible down your throat. Looks like you got this basic problem nailed.
 
Congratulations for sticking with it and fixing your car. It didn’t use to be so hard when the best quality of parts were being made by many. I do hope you continue to enjoy your car!
 
way to go! Thanks for posting your process, should be helpful for others down the road.
 
Last edited:
Back
Top