You are using an out of date browser. It may not display this or other websites correctly.
You should upgrade or use an alternative browser.
You should upgrade or use an alternative browser.
'76 F250 Turbo Build
- Thread starter jgavac
- Start date
In solving my missing water pump pulley situation, I grabbed a double stack pulley for a 289 off summit, the bolt pattern was correct but I had to drill the center hole out to the correct size.

After getting the triple stack Damper on, the innermost pulley on the damper doesn't line up, but the middle one does. I only have 1 accessory to run (the alternator), so as long as one set is aligned I'm okay with it. I wish it was a little better so I may do some more digging/experimenting, but it should get the job done.
I finished getting the front end chassis wiring terminated and wrapped, save for a couple odds and ends, then pulled the radiator support back out so I could get the damper in. In retrospect I was a bit eager to get the front end back together

After this I focused on finishing the rear body chassis wiring, so I've got all the lights done in the back now. I still need to wrap and loom it, and run wiring for the fuel pump and sender before I can stick the tank up there. There's also the problem of a filler neck since I don't have one for the bed tank, and it's been surprisingly difficult to track one down.
Moving back to EFI wiring, I feel a lot better about doing this than I did at this time last year. Wiring the chassis helped, plus I've done a bunch more research and have a better grasp on what sensors I needed. I was thinking I'd sacrifice my glove box for the ECU, but I'm not super happy with the placement of things in there so I tore the dash back out tonight so I can play around with the ECU placement, and also to give access to the firewall for ECU wiring. I've got a milspec bulkhead connector on order and found a nice spot in the firewall I can bring it through with easy access on both sides, so once that's here and I decide on an ECU location I'll finally be able to dive into that admittedly scary part of the project.

Other than that it's been miscellaneous odds and ends. Took way longer to get the transmission cover with the shift forks back in than I'd like to admit, all the rails had gotten bumped out of position. But transmission is buttoned up again, transfer case linkage is done. The rear axle has unfortunately decided it's gotten tired of sitting and I sprung 2 separate leaks, one at the passenger side axle seal and now one at the pinion, but those are future me problems.
Oh and as a "quick/small" side project I was going to replace the circuit board on the back of my gauge cluster, but as I took things apart the old plastic turned to powder so I'm now rebuilding that with new parts on order death by a thousand cuts, as they say

After getting the triple stack Damper on, the innermost pulley on the damper doesn't line up, but the middle one does. I only have 1 accessory to run (the alternator), so as long as one set is aligned I'm okay with it. I wish it was a little better so I may do some more digging/experimenting, but it should get the job done.
I finished getting the front end chassis wiring terminated and wrapped, save for a couple odds and ends, then pulled the radiator support back out so I could get the damper in. In retrospect I was a bit eager to get the front end back together
After this I focused on finishing the rear body chassis wiring, so I've got all the lights done in the back now. I still need to wrap and loom it, and run wiring for the fuel pump and sender before I can stick the tank up there. There's also the problem of a filler neck since I don't have one for the bed tank, and it's been surprisingly difficult to track one down.
Moving back to EFI wiring, I feel a lot better about doing this than I did at this time last year. Wiring the chassis helped, plus I've done a bunch more research and have a better grasp on what sensors I needed. I was thinking I'd sacrifice my glove box for the ECU, but I'm not super happy with the placement of things in there so I tore the dash back out tonight so I can play around with the ECU placement, and also to give access to the firewall for ECU wiring. I've got a milspec bulkhead connector on order and found a nice spot in the firewall I can bring it through with easy access on both sides, so once that's here and I decide on an ECU location I'll finally be able to dive into that admittedly scary part of the project.
Other than that it's been miscellaneous odds and ends. Took way longer to get the transmission cover with the shift forks back in than I'd like to admit, all the rails had gotten bumped out of position. But transmission is buttoned up again, transfer case linkage is done. The rear axle has unfortunately decided it's gotten tired of sitting and I sprung 2 separate leaks, one at the passenger side axle seal and now one at the pinion, but those are future me problems.
Oh and as a "quick/small" side project I was going to replace the circuit board on the back of my gauge cluster, but as I took things apart the old plastic turned to powder so I'm now rebuilding that with new parts on order
death by a thousand cuts, as they saySo appreciative of your updates. It's a huge project, but man when it's done and rolling that rewarding feeling inside will be over the top. I've got it now driving my little f100 with the new engine, wiring and PS. That's 1/10th of your project, and it's still unspeakably satisfying when the old steel is rolling under it's it's personally-assembled power. .
One thing to be prepared for: the Tuff Stuff alternator with one V belt WILL squeal loudly for 1 second when you crank up. I've got the exact same alternator and belt arrangement on the f100. The belt is all-but-too tight. The single belt just can't hold that first surge. I want to do something about it because the squeal is way more obnoxious than an average belt squeal, can be heard 1/4 mile away. It did not squeal with the old 300 engine and two V belts, and the other TuffStuff alt does not squeal on the '90 with serp belt. IF there's any way to rig 2 belts it's worth it.
One thing to be prepared for: the Tuff Stuff alternator with one V belt WILL squeal loudly for 1 second when you crank up. I've got the exact same alternator and belt arrangement on the f100. The belt is all-but-too tight. The single belt just can't hold that first surge. I want to do something about it because the squeal is way more obnoxious than an average belt squeal, can be heard 1/4 mile away. It did not squeal with the old 300 engine and two V belts, and the other TuffStuff alt does not squeal on the '90 with serp belt. IF there's any way to rig 2 belts it's worth it.

So appreciative of your updates. It's a huge project, but man when it's done and rolling that rewarding feeling inside will be over the top. I've got it now driving my little f100 with the new engine, wiring and PS. That's 1/10th of your project, and it's still unspeakably satisfying when the old steel is rolling under it's it's personally-assembled power. .
One thing to be prepared for: the Tuff Stuff alternator with one V belt WILL squeal loudly for 1 second when you crank up. I've got the exact same alternator and belt arrangement on the f100. The belt is all-but-too tight. The single belt just can't hold that first surge. I want to do something about it because the squeal is way more obnoxious than an average belt squeal, can be heard 1/4 mile away. It did not squeal with the old 300 engine and two V belts, and the other TuffStuff alt does not squeal on the '90 with serp belt. IF there's any way to rig 2 belts it's worth it.
Thank you for the kind words! This project has definitely had a steep learning curve but I'm so excited for the first drive. And terrified that I accidentally messed up something in the engine that causes it to throw one of my pretty rods and pistons to the moon
 but nothing to be done about it now!
 I also appreciate the tip on the alternator. I would like to track down the correct pulleys, and if I do I'd likely be able to run dual belts. Never needed it with the stock alt even though it had provisions for it. I'll probably have to end up hitting junkyards or something.
and the other TuffStuff alt does not squeal on the '90 with serp belt. IF there's any way to rig 2 belts it's worth it.
Honestly this has gotten me thinking. I had never considered doing serp because I've only got the one accessory and didn't want to have to change the water pump for the reverse rotation. But the more I think about this I wonder about doing a single flat (serp) belt - I'd need to figure out a grooved pulley for the water pump since I think the late model uses smooth. But also, the late model serpentine dampers have clearance and provisions on the back for a click wheel as opposed to putting one on the front like my current plan is. The greater contact area from the flat v belt should keep it from squealing, I would think
Yes, both alternators are the same, the serp does not slip.Honestly this has gotten me thinking. I had never considered doing serp because I've only got the one accessory and didn't want to have to change the water pump for the reverse rotation. But the more I think about this I wonder about doing a single flat (serp) belt - I'd need to figure out a grooved pulley for the water pump since I think the late model uses smooth. But also, the late model serpentine dampers have clearance and provisions on the back for a click wheel as opposed to putting one on the front like my current plan is. The greater contact area from the flat v belt should keep it from squealing, I would think
I'm casually banging the idea around of converting my fresh build 240 to serp, in light of this embarrassing piercing squeal on start up. You know, you show a guy your fresh engine bay and new engine, then fire it up and sounds like someone ran over the dog for a half second. . I've got a full dressed efi engine for parts, but if the PS hoses have to be redone, forget it. They're custom and I'm not going to redo them.
I don't know if this will ruin the alternator, or will solve the issue- about to put a 125 amp relay on it so it is not pulling that hard load right as the belt is just getting up to speed. Start up then throw the switch. .
Have you thought about using a delay/relay wired to the alt. turn-on? There are adjustable ones. This would give you a chance to start and let the rpms settle as well as the belt to warm up.I don't know if this will ruin the alternator, or will solve the issue- about to put a 125 amp relay on it so it is not pulling that hard load right as the belt is just getting up to speed. Start up then throw the switch. .
https://www.12voltplanet.co.uk/user...justable Delay Timer Relay 12V & 24V 10A.pdf
PSIG
Famous Member
If I didn't mention this before, Ford used the 130A alternators with single V-belts on some models, so it can take some power. However, when they do slip with a fresh belt and proper 100-115# tension (use a tension tool/gauge at every oil change), it is usually the condition of the pulleys. If any pulleys show any visible wear or surface waviness in the sheave sides - it's trash. This is common on older vehicles. Verify pulley alignment. If the belt ever squeals, it can glaze, and then it's trash. One diagnostic is to shut-down from a run and check each pulley temperature. One that is especially hot is likely your 'slipper'.
That said, if your alternator is over 130A, or if the battery is at all low, or if it does not have a 'soft-start' regulator - it may slip in any case. In that case, either dual-V or multi-rib (serpentine) would be options, or use a more suitable lower-amp alternator.
That said, if your alternator is over 130A, or if the battery is at all low, or if it does not have a 'soft-start' regulator - it may slip in any case. In that case, either dual-V or multi-rib (serpentine) would be options, or use a more suitable lower-amp alternator.
Last edited:
10-4. New alternator and pulley, correct NAPA Gold USA premium belt. It's an aftermarket one-wire alternator, 100 amp. No pooing the one wire please, I've had excellent results with this same model alt on another vehicle. It will deliver enough amps to cover dual electric fans, AC, interior fan and headlights @ 750 rpm. This quick amperage rise is the root of the issue, it's generating a load right as the engine is first accelerating from off, and is trying to catch the cranking drain before the engine/belt get inertia. The squeal is ONLY for 1/2-1 second the instant of crank up. Never slips after that regardless of demand or rpm.If I didn't mention this before, Ford used the 130A alternators with single V-belts on some models, so it can take some power. However, when they do slip with a fresh belt and proper 100-115# tension (use a tension tool/gauge at every oil change), it is usually the condition of the pulleys. If any pulleys show any visible wear or surface waviness in the sheave sides - it's trash. This is common on older vehicles. Verify pulley alignment. If the belt ever squeals, it can glaze, and then it's trash. One diagnostic is to shut-down from a run and check each pulley temperature. One that is especially hot is likely your 'slipper'.
That said, if your alternator is over 130A, or if the battery is at all low, or if it does not have a 'soft-start' regulator - it may slip in any case. In that case, either dual-V or multi-rib (serpentine) would be options, or use a more suitable lower-amp alternator.
Of course a soft-start regulator would cure it at once, but not an option here, unless you know a way to install one. ?
PSIG
Famous Member
I'd ask the alternator company for options. Else, list your specific alternator, and I'll take a quick look for possible options.
Did you test for which pulley is slipping? Sheave alignment and proper V angles on the pulley vs belt? I'm assuming the regulator is slamming the circuit full-on as soon as rpm allows, but looking at everything. 100A shouldn't bark, chirp or squeal typically. Oh - does it do it after a warm immediate restart? If not, can you top the battery before first morning start to see if it's thinking it needs to jump full-on for recharge?
Did you test for which pulley is slipping? Sheave alignment and proper V angles on the pulley vs belt? I'm assuming the regulator is slamming the circuit full-on as soon as rpm allows, but looking at everything. 100A shouldn't bark, chirp or squeal typically. Oh - does it do it after a warm immediate restart? If not, can you top the battery before first morning start to see if it's thinking it needs to jump full-on for recharge?
Set up is spot-on. It's the alternator pulley. I'm about to install a relay in the single power-wire so it can be left off until the engine is stable. Hopefully this won't ruin it. May not even stop the squeal, but I suspect it will.I'd ask the alternator company for options. Else, list your specific alternator, and I'll take a quick look for possible options.
Did you test for which pulley is slipping? Sheave alignment and proper V angles on the pulley vs belt? I'm assuming the regulator is slamming the circuit full-on as soon as rpm allows, but looking at everything.
PSIG
Famous Member
[EDIT] Diagnostics. Just so you know where I'm at, if the drive system is assumed good, then I'm looking for reasonable basis that the regulator is excessively sensitive, out-of-spec, or other issue. If diagnostics indicate they should supply you with a replacement regulator, then ...Oh - does it do it after a warm immediate restart? If not, can you top the battery before first morning start to see if it's thinking it needs to jump full-on for recharge?
")
Last edited:
Honestly this has gotten me thinking. I had never considered doing serp because I've only got the one accessory and didn't want to have to change the water pump for the reverse rotation. But the more I think about this I wonder about doing a single flat (serp) belt - I'd need to figure out a grooved pulley for the water pump since I think the late model uses smooth. But also, the late model serpentine dampers have clearance and provisions on the back for a click wheel as opposed to putting one on the front like my current plan is. The greater contact area from the flat v belt should keep it from squealing, I would think
Have you thought about using a delay/relay wired to the alt. turn-on? There are adjustable ones. This would give you a chance to start and let the rpms settle as well as the belt to warm up.
https://www.12voltplanet.co.uk/user/downloads/User Guide For Adjustable Delay Timer Relay 12V & 24V 10A.pdf
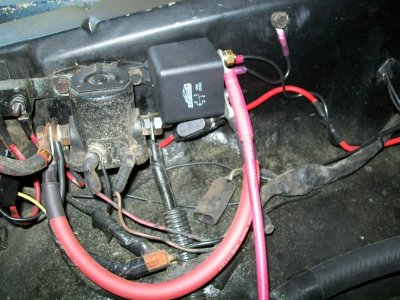
Guys- just installed a relay to keep the alternator off until the engine is running at idle speed. It works perfectly. Multiple starts (which has the battery down even more than average). At any rpm once the engine/alt are rotating, there's no hint of a slip when the switch is flipped on, voltage gauge just jumps up to normal.I'd ask the alternator company for options. Else, list your specific alternator, and I'll take a quick look for possible options.
Did you test for which pulley is slipping? Sheave alignment and proper V angles on the pulley vs belt? I'm assuming the regulator is slamming the circuit full-on as soon as rpm allows, but looking at everything. 100A shouldn't bark, chirp or squeal typically. Oh - does it do it after a warm immediate restart? If not, can you top the battery before first morning start to see if it's thinking it needs to jump full-on for recharge?
Whether or not this will damage the alternator over time remains to be seen. Worth the risk to eliminate the slippage IMO.
Side note- I wired the "batt" side to the alternator and the "device" side to the battery, since the current is flowing from the alternator. Don't think this is critical, wouldn't think the relay cares which way the current is flowing, just FYI.
Attachments
Last edited:
Finally ordered the bulkhead connector I want to use for the EFI wiring - 55 pin milspec connector. I'm surprised at how small it is, but all the MS wires are only 20 ga

Spent today working on the ECU mounting in the glove box. I had ordered up an ABS replacement that ended up being a bit thinner than I would have liked, but seems okay. I had to mount the MS almost all the way to the right due to a notch in the box to clear ductwork and needing to give enough space for the main harnesses to get out. Because of this, I needed to cut a window in the right side to allow access for the serial/usb connections for tuning.

Missed the mark on one of my measurements, so it ended up wider than it needed to be. But nobody should really see it

Englarged the existing slot on the top which was a bit sloppy, then added another hole for the main plugs to pass through.


While working on this today I noticed some pins on the ECU were pushed back and seemed like there might be the wrong type of pins on the connector side for those 5 affected. I have an email out to DIY autotune to see what they say. Unfortunately I'm out of the warranty period, but hoping it's either not a big issue or they help out.

Spent today working on the ECU mounting in the glove box. I had ordered up an ABS replacement that ended up being a bit thinner than I would have liked, but seems okay. I had to mount the MS almost all the way to the right due to a notch in the box to clear ductwork and needing to give enough space for the main harnesses to get out. Because of this, I needed to cut a window in the right side to allow access for the serial/usb connections for tuning.
Missed the mark on one of my measurements, so it ended up wider than it needed to be. But nobody should really see it
Englarged the existing slot on the top which was a bit sloppy, then added another hole for the main plugs to pass through.
While working on this today I noticed some pins on the ECU were pushed back and seemed like there might be the wrong type of pins on the connector side for those 5 affected. I have an email out to DIY autotune to see what they say. Unfortunately I'm out of the warranty period, but hoping it's either not a big issue or they help out.
PSIG
Famous Member
Yes, and is one alternative to solve the issue I was mentioning, with a 'soft-start' or on-delay. While you can mod your relay to do this internally, the concept is to simply slow the onset of charging until stable. While clunky but for example only, this delay-relay is an example of automated delay-ON to do get it done without a thought: https://www.amazon.com/Time-Delay-Relay-seconds-SPDT/dp/B0744HSF8PGuys- just installed a relay to keep the alternator off until the engine is running at idle speed. It works perfectly.
This alone, or triggering a larger relay is the concept. Adjustable delay modules under $10 are an option, simply controlling the relay you have now.
Well I've certainly had a week lol. After getting in contact with DIY Auto tune they agreed that there was a problem with the pigtail I was sent, so they sent me a replacement free of charge. And thankfully, all I had to do to fix the pins was open it up and pop the back of the connector back in, so this resolved easy enough.

I had also finally tracked down the stock filler neck that I needed to run the rear tank, and managed not to get scammed this time (first time I tried to buy one didn't go well lol). This was a surprisingly hard part to find, I've been searching for one off and on for 3 or 4 years.

After getting all the undercoating and dirt off, and giving it a nice scrub, I got some Evaporust (which I'd never used before) to get rid of the little bit of rust on here. This turned into a big mess, as some combination of the evaporust, potassium hydroxide residue left over from cleaning (I used POR15 cleaner/degreaser), bits of the undercoating left on there, or zinc from being galvanized caused the evaporust to turn mustard yellow and leave a power caked over the whole outside and sporadically on the inside.
This was after the first soak (only had enough to do half at a time), and I ended up flipping it over and putting it back in since I wasn't sure if this was normal. Turns out it's not, and it isn't easily coming off - doesn't rinse off which tells me it's not fully water soluble, and didn't have much luck with acetone either. It will come off with scrubbing, which will likely be the way I have to go.

Spent a lot of time going back and forth with CRC tech support, and they had no idea what the problem was. I tried to dust off my chemistry hat, but didn't make much progress. In the end, CRC is sending me a replacement bottle and told me scrubbing will probably be the way to go.
So after doing all that, I figured I'd get the rest of the gas tank ready to go and get it mounted. Wired up a pigtail for the fuel sender, got the pump permanently mounted and sealed in there, hooked up hoses, and went on my way.


Right away I noticed it was going to run into the hitch mounting, which wasn't unexpected but I'd hoped I could leave it there.

Problems only continued from here. It was a much tighter fit than I expected, and it was a bit of a pain doing this alone. I finally got it up to where the rear tabs were in place, but I couldn't get the front to go all the way up, leaving ~1.5" between the tabs and the frame. Finally noticed that the fuel pump cartridge provided with the tank is running into the underside of the bed at one of the supports


This one is more than a little frustrating to me. For those not familiar with highboys, these trucks (67-77.5 F250 4wd only) have a bunch of little differences from the 2wd and half ton 4wd trucks that make them a pain to work on sometimes. One of the biggest hurdles is the frame is 7" narrower than any other truck from the era, meaning they didn't get a factory tank under the bed. For a long time there was only one company making an aftermarket tank for this truck, Aerotanks, and that's the one I bought, prepped for EFI (there's a couple more options now). It's advertised as a drop in fit on these trucks, and this is very much not fitting. I can't do spacers and leave it in the position it's in because the fill tube will be below the frame. I could notch the bed cross beam, but I really don't want to do that either. I'm talking with the company to see if we can figure something out, because for the money ($$$$) this is really disappointing.
I had also finally tracked down the stock filler neck that I needed to run the rear tank, and managed not to get scammed this time (first time I tried to buy one didn't go well lol). This was a surprisingly hard part to find, I've been searching for one off and on for 3 or 4 years.
After getting all the undercoating and dirt off, and giving it a nice scrub, I got some Evaporust (which I'd never used before) to get rid of the little bit of rust on here. This turned into a big mess, as some combination of the evaporust, potassium hydroxide residue left over from cleaning (I used POR15 cleaner/degreaser), bits of the undercoating left on there, or zinc from being galvanized caused the evaporust to turn mustard yellow and leave a power caked over the whole outside and sporadically on the inside.
This was after the first soak (only had enough to do half at a time), and I ended up flipping it over and putting it back in since I wasn't sure if this was normal. Turns out it's not, and it isn't easily coming off - doesn't rinse off which tells me it's not fully water soluble, and didn't have much luck with acetone either. It will come off with scrubbing, which will likely be the way I have to go.
Spent a lot of time going back and forth with CRC tech support, and they had no idea what the problem was. I tried to dust off my chemistry hat, but didn't make much progress. In the end, CRC is sending me a replacement bottle and told me scrubbing will probably be the way to go.
So after doing all that, I figured I'd get the rest of the gas tank ready to go and get it mounted. Wired up a pigtail for the fuel sender, got the pump permanently mounted and sealed in there, hooked up hoses, and went on my way.
Right away I noticed it was going to run into the hitch mounting, which wasn't unexpected but I'd hoped I could leave it there.
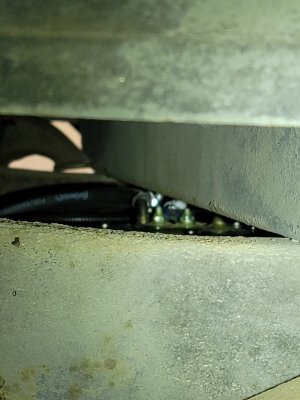
Problems only continued from here. It was a much tighter fit than I expected, and it was a bit of a pain doing this alone. I finally got it up to where the rear tabs were in place, but I couldn't get the front to go all the way up, leaving ~1.5" between the tabs and the frame. Finally noticed that the fuel pump cartridge provided with the tank is running into the underside of the bed at one of the supports
This one is more than a little frustrating to me. For those not familiar with highboys, these trucks (67-77.5 F250 4wd only) have a bunch of little differences from the 2wd and half ton 4wd trucks that make them a pain to work on sometimes. One of the biggest hurdles is the frame is 7" narrower than any other truck from the era, meaning they didn't get a factory tank under the bed. For a long time there was only one company making an aftermarket tank for this truck, Aerotanks, and that's the one I bought, prepped for EFI (there's a couple more options now). It's advertised as a drop in fit on these trucks, and this is very much not fitting. I can't do spacers and leave it in the position it's in because the fill tube will be below the frame. I could notch the bed cross beam, but I really don't want to do that either. I'm talking with the company to see if we can figure something out, because for the money ($$$$) this is really disappointing.
Attachments
Another option; and I know you don't want to mutilate any of it, is marginally flatten the fill neck into an oval shape where it goes over the frame, just enough to allow the tank to be shimmed down.
Another option; and I know you don't want to mutilate any of it, is marginally flatten the fill neck into an oval shape where it goes over the frame, just enough to allow the tank to be shimmed down.
The issue is more with the tank side - the filler neck doesn't go over the frame, there's a hose that will. But if the fill neck on the tank is 1.5" lower, with it being at a 45° angle up, it will be half inside the frame. And with how tight this is to the frame rails, it would be impossible to get the rubber line hooked up to it.
I see. What about having the angle of the fuel neck changed? I know you don't want to disassemble for that but....
You would need to have your length of hose for the connection over-extended on the inside of the frame to secure it to the tank first and then push/pull it back to the outside as you raise the tank into position. Hopefully not creating a kink in it.
I have had a few battles getting custom tanks installed in rv's; they're bulky, heavy, crowded and uncooperative
Last edited:
Similar threads
- Replies
- 4
- Views
- 206
- Replies
- 157
- Views
- 6K
- Replies
- 15
- Views
- 1K
- Replies
- 17
- Views
- 1K
All Small Six
250 Engine Build
- Replies
- 41
- Views
- 2K