I don't think you can get an accurate RPM using the water pump pulley since it's a smaller diameter than the the crankshaft which is driving it.
You are using an out of date browser. It may not display this or other websites correctly.
You should upgrade or use an alternative browser.
You should upgrade or use an alternative browser.
All Small Six Tuning Engine for New Transmission
- Thread starter 65 Mustang
- Start date
This relates to all small sixes
Make sure that you disconnect and plug the vacuum line to the distributor if you set the initial timing. If you don't disconnect the vac line when setting the timing the engine be running at the initial timing setting while going down the road. This can cause the exhaust valves and manifold to glow red hot + the engine will overheat. The initial timing will also be way off.
The automatic LOM distributor had a less advance than the stick shift LOM distributor. This is why the automatics used a higher initial timing. A stick shift LOM distributor set at the automatic initial timing setting may cause the engine to ping.
It's a good idea the check and or replace the vacuum advance unit on the distributor.
Here is some info on running a newer distributor with mechanical advance with a LOM Autolite 1100 carburetor:
"While you can use a Duraspark or DUI distributor with a stock Autolite 1100 carb, both of these distributors utilize a mechanical advance mechanism that was designed to operate with ported or manifold vacuum. As such they will not operate properly using the vacuum port on the stock Autolite 1100 carburetor. To correct this you need to plug the port on the carb, so you don't have a vacuum leak, and run the vacuum line from the Duraspark or DUI distributor to a manifold vacuum source."
Classic Inlines
How The Stock Load-O-Matic Distributor Works.
65 Mustang
Well-known member
Yeah, I suspected that Bubba. I thought maybe they were moving at two different speeds, but completed their revolution at the same time. It seems more likely that the water pump pulley is making more revolutions for each complete turn of the crankshaft. Just couldn’t find a good spot on crankshaft pulley to attach reflective tape. I’ll try again. I also have another tachometer that works by induction. I’ll try that as well.
Learn how to adjust the valves with the engine running a very slow idle.
Use a piece or cardboard (like a valve cover gasket box for oil control) If valve adjustment is too loose (1/4 turn) the rockers will clack when cold but be fine at operating temp. Try a 1/2 turn.
This way the lifters will be bled down and not hold any valves open making it run terrible.
Install an ebay China made Black cap HEI dist. with wire set powered thru a relay.
If you install an HEI advance curve kit don't use the weights, only use the lighter springs.
Connect the HEI vacuum advance to full vacuum, plug the LOM carb vacuum advance port.
You really don't need a tach. Adjust the the high and low idle speeds to what you like. 1380 is high though.
You really don't need a repair manual to work on an old Ford six.
I was paid by my grandfather back around 1969 to install new rings, bearings and a clutch in a 6 cylinder ford truck with a granny 4 speed when I 16. I didn't have a manual. If needed I got bolt torque spec's from the parts store. This very old mechanic (about 90) told me I didn't need a torque wrench. He was right. I do use a torgue wrench on the head, rod, and main bolts but I am sure I that really don't need one.
I understand where you are coming from.
Personally, there isn't much here I agree with, but I know a lot of older hobbyists that do things similarly, and rarely have issues.
I agree completely with the first four lines. I do it a bit differently, but your method also works.
the china-made distributor, although great in the 80's and mid 90's its not something I would recommend with today's manufacturing climate. I am not familiar enough with how the LOM carb vacuum effects an HEI, but if you are going to go through the work of putting an HEI on a 6, why not get the larger venturi stronger vac. 1v carbs that breath better? (completely personal here)
although experienced people don't need a tach to adjust idle speeds, I would not recommend eschewing it. Trust but verify. use the tach if you got it.
repair manuals can sometimes warn you of things to look out for while doing a job. and working on these engines isn't as big of a pastime as working on eights. its not just about technical specs in shop manuals anymore. how many of us working on SB6's have forgotten that the right front head bolt is wet, forgotten to put sealer on it, just to take it out, seal it, and have to put it back? shop manuals will warn of things like that as well.
when I was 16, my grandfather and I were restoring a 1949 Ford Special Sedan that had killed his grandfather in 1954. I still remember grabbing that big torque wrench and still struggling to get to that 215 lb.ft. that the technical manual wanted for the final torque on the flathead v8. some jobs don't need them, and its not a big deal. other jobs need them, and under/over torque can be a huge deal especially with aluminum parts like thermostat housings, or milled heads. Tightening the conrods around the crank journals you shouldn't be under-torque, and can go a little over (but not much), or for other parts you can be slightly under, but shouldn't go over torque like wire loom mounts, or valve cover bolts on some engines. modern shop manuals tell new hobbyists these things and give warnings accordingly, some things we may do out of habit, and forget to tell others as well.
for most jobs, I don't use the torque wrench until I am almost done, and then torque it, mainly to have less wear on the wrench, but also because ratchets are so much easier to use.
I trust my feeling, but I still grab that torque wrench and verify what I have done. I mean I spent the money to get the parts, I spent the time to take the old one off, and put the new one on; and I like the drive of the car and don't like seeing her just sit in my garage, I might as well make sure I did the job right as well; and I am not over straining anything, or that it won't come apart on me later.
Yeah, I suspected that Bubba. I thought maybe they were moving at two different speeds, but completed their revolution at the same time. It seems more likely that the water pump pulley is making more revolutions for each complete turn of the crankshaft. Just couldn’t find a good spot on crankshaft pulley to attach reflective tape. I’ll try again. I also have another tachometer that works by induction. I’ll try that as well.
there should be a groove on the harmonic ballancer of the crank that lines up with the timing tab, it would make a lot of the adjustments easier. if you find it hard to see, some white fingernail polish, or paint marker helps.
65 Mustang
Well-known member
78_200_C4 - I did remember to disconnect and plug vacuum line. Thanks for reminding me in case I didn’t, though. Didn’t realize the consequences of not doing that could be so severe. Possibly in the future I may upgrade my distributor like so many have mentioned. I’ll definitely take all that info into consideration. At the moment, I’m still not positive about the distributor currently on my car. I tried to look for a casting number or ID tag but did not find one. I did note, though, from the door tag on my car that my axel code is 3. This corresponds to a 3.20 open differential on a 1965 mustang. Providing that’s what is still on the vehicle, hopefully it is compatible with the 3.03 manual transmission. The car did start out as a manual vehicle.
R_Calris- thanks for info. I did set TDC on the pulley and marked it with some white out. The white out really popped with the timing light.
Alright, going to head back out into the garage. My goal for today is to adjust the hot idle screw and get that along with the air/fuel mixture dialed in. I‘ll try to find a new spot on crank pulley for the tach’s reflective tape. The tach wasn’t picking it up the last time I tried. As mentioned earlier, I also have a tach that works by induction so I’ll try that as well. Thanks again for all the great info.
In this picture of a Load O Matic (LOM) small block six Distribitor if you look closely you can see the lowered blocked out rectangle were the distribitor numbers are located. Also notice the unique Vacuum Advance Canister of the LOM, here is the link https://i.ebayimg.com/images/g/NMsAAOSwUYNZ7LVD/s-l300.jpg
As a side note the Autolite 1100 is one SCV Carb that is very easy to convert into a ported Vacuum Sorce with a few simple mod's called the "Drop A Load". Personally I am not much of a fan of the cheap HEI's but they can work if you devote the time and funds into them to set them up correctly.
Yes the 3.20 rear gear would be a good one for use with your new 3.03 Trans swap and give you good ratio for street and hyway use. Best of luck
Last edited:
Set the initial at 12 degrees & road test.Thanks for replies. The engine feels very strong. It starts up with a lot more power than it did several weeks back when I had the C4 in there. That got me thinking that it does not have as much resistance on it at idle as it once did and it seems to be revving high. I suspect my curb idle rpm is a lot higher than the 500-525 range that was mentioned. There is no tachometer on the car so it’s difficult for me to tell where the idle rpms are exactly. I’m going to try using a handheld digital tach the next time I’m out there. I do remember setting the idle rpm on the high side a long time ago to deal with stalling issues I was having. I’ll start by resetting the idle rpm and see where that gets me. Hopefully it brings that noise down. I will video the engine running the next time I get out there (hopefully tomorrow) and post it to let you all hear what I am referring to. After that, I’ll look to reset the timing to the suggested 6 to 8 degrees BTDC. Thanks again.
The block is a duel bell pattern 68 so it will be 5/16'' drive oil pump drive and dist. drive. The dist. may also be a 68, the whole engine could be a 68..The head is no later than 68.
Well that would of been helpful to know at the beginning you might put all that info into your signature. Then add a couple of pictures of the distributor and carb to see whats there to work with. Though it wont change the tuning any, if you have the 1968 up Point Distributor that has the Duel advance and is a paired with 1968 Autolite !!00 that not that bad of a system to use for a daily driver. Then you could then pop in a Pertronix Electronic trigger. a hotter Blaster Coil, a better set of Plug Wires, Quality Cap & Rotor if you wanted up grade it into a fairly decent Ignition System for a good improvement.
65 Mustang
Well-known member
I guess I should have mentioned all of that. Both my block and cylinder head have a 1968 casting. I had my cylinder head rebuilt a while back. Didn’t realize the ‘68 and up distributor was different from what was on a ‘65. I’ll take and post a picture of the distributor. I did remove the points a while back and installed the Petronix II ignition system. I also installed the Flamethrower ignition coil. I guess I didn’t mention any of that because I was focused on the clacking noise from the valve train that suddenly became very noticeable. I was out in the garage a again yesterday afternoon and got the car dialed in to a point where I am fairly happy. I‘m sure I’ll be tweaking a few things after several drives. I was able to find a good spot on the crank pulley for the reflective tape and got a good and steady RPM reading with the tach. Bubba- you were right the fan pulley gave a completely different (higher) reading. So I wasn’t idling at 1380 after all. It was more like 1000 rpm (still high). I ended up bringing it down to about 750. That seemed to be a good spot for the engine. I did try 600 like the manual suggested but the engine didn’t seem to like that. Thanks again everybody for all of the great input to help me get back on the road.
65 Mustang
Well-known member
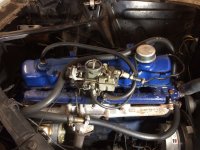
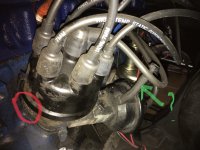
Hello guys. I included two pictures. One is a wide angle of my engine as a whole which includes my Autolite 1100 carburetor. Notice it does not have the antistall dash pot on the right side as you would see with an automatic. The other picture is a close up of my distributor. I can’t believe it, but when taking this picture today I saw something on my distributor that I never noticed before in all the time I had the car. I pointed to it in green in the photo. It is a hose sticking up with a screw in the top to plug it up. What is going on there? The hose that goes to the vacuum port of the carburetor is coming out from the back of the distributor. I think you can see it in the picture. Does anything look out of place? Also, where I circled in red reads the word “motorcraft”. It appears there are some numbers above it, but I can’t make them out at the moment. Perhaps someone can ID the distributor from the photo. Thanks again.
Attachments
65 Mustang
Well-known member
Ok. Wow I’m shocked. I just assumed it was a load O-Matic distributor. I have to stop doing that. So, this has been connected incorrectly then all this time? I’ve had the car for 10 years now and this is how it came. I am confused, though. It is a Ford motorcraft distributor. Is the distributor correct for the engine and year (1968 not 1965) but not the carburetor? Did they not use autolite 1100 in 1968? Ok, so you are suggesting that I close off the port on the carb with a brass plug and then connect the vacuum line into the opening on the manifold (which has a brass plug in it at the moment)? Is the ultimate solution here to get a carburetor that is compatible with the distributor that I have? When I had the cylinder head rebuilt, I asked the machinist to open up the intake hole from 1.5 to 1.75 inches in anticipation of putting a slightly larger carburetor on in the future. Really glad you pointed this out. I’d like to get this sorted. Thanks
Thanks for the pictures it really helps! X2 Yes for some reason you probably still had the 1965 Autolite 1100 Carb (SCV) during the engine swap many people don't know the difference between the two systems I.E. The LOM or the Duel Advance Distributor"s, and which parts are needed for them to work together. But they did use the better 1968 up Duel Advance Distributor witch is a decent one to use and since you have the Flame Thrower Coil, plus the Pertronix unit in it that makes the ignition system even better. The good news is that that Autolite Carb can be easily Modded with the "Drop A Load" process to get it to what the later 1968 & 1969 Autolite 1100's were or you can just go to one of the newer and better Carter YF or YFA since you were thinking ahead when you opened up that Carb mounting hole.
65 Mustang
Well-known member
Ok. I think I’ll look to get a Carter in the future. What about that hose on the distributor that has a screw plugging it? Does that seem normal? Is the vacuum line supposed to be connected to that? At the moment, the vacuum line is coming out of another spot in the back.
It wouldn't be normal on a 1968 Ford 200 that still had the complete stock Emissions system they used that duel vacuum canister plus several other supporting parts of vacuum lines and a vacuum control fitting mounted in the T Stat housing. The one that's plunged off was for retarding of the advance, so for your purposes that's just what you would want in having it plugged off when on an earlier car or you also could get a single ported vacuum canister to replace it with.
65 Mustang
Well-known member
Ok. Sounds good. Thanks. For now, as was suggested, I’ll reroute the vacuum advance line for manifold vacuum and plug the port on the carburetor.
The "Drop A Load" article is wrong about the ported vacuum source. At anything other than an almost closed throttle the vacuum source is full vacuum. The vacuum port has to be plugged with JB Weld then redrilled higher for a ported vacuum source. I have an Autolite 1100 and a Holley carb that I followed the "Drop A Load" article then plugged and redrilled the vacuum port. I have both carbs sitting on a shelf in my garage. I also notified the author of that article that his info was wrong.In this picture of a Load O Matic (LOM) small block six Distribitor if you look closely you can see the lowered blocked out rectangle were the distribitor numbers are located. Also notice the unique Vacuum Advance Canister of the LOM, here is the link https://i.ebayimg.com/images/g/NMsAAOSwUYNZ7LVD/s-l300.jpg
As a side note the Autolite 1100 is one SCV Carb that is very easy to convert into a ported Vacuum Sorce with a few simple mod's called the "Drop A Load". Personally I am not much of a fan of the cheap HEI's but they can work if you devote the time and funds into them to set them up correctly.
Yes the 3.20 rear gear would be a good one for use with your new 3.03 Trans swap and give you good ratio for street and hyway use. Best of luck
"The Autolite 1100 carburetor uses a mixture of manifold vacuum (load) and venturi vacuum (speed) to supply the proper spark advance. As such, the "Load-O-Matic" distributor has a vacuum circuit that supplies manifold vacuum to the distributor. This is accomplished by positioning a vacuum port in the carb body slightly below (not above) the throttle plate, when in a close position. As such the distributor delivers manifold vacuum advance to the ignition system, at idle and light throttle."

Last edited:
My Falcon runs great. I moved the China made HEI module to an external CPU heat sink mounted THRU the radiator support. I set the plug gap at .032 for a high amp blue spark for performance and reliability. The HEI module runs cooler than under hood temperature.I understand where you are coming from.
Personally, there isn't much here I agree with, but I know a lot of older hobbyists that do things similarly, and rarely have issues.
I agree completely with the first four lines. I do it a bit differently, but your method also works.
the china-made distributor, although great in the 80's and mid 90's its not something I would recommend with today's manufacturing climate. I am not familiar enough with how the LOM carb vacuum effects an HEI, but if you are going to go through the work of putting an HEI on a 6, why not get the larger venturi stronger vac. 1v carbs that breath better? (completely personal here)
although experienced people don't need a tach to adjust idle speeds, I would not recommend eschewing it. Trust but verify. use the tach if you got it.
repair manuals can sometimes warn you of things to look out for while doing a job. and working on these engines isn't as big of a pastime as working on eights. its not just about technical specs in shop manuals anymore. how many of us working on SB6's have forgotten that the right front head bolt is wet, forgotten to put sealer on it, just to take it out, seal it, and have to put it back? shop manuals will warn of things like that as well.
when I was 16, my grandfather and I were restoring a 1949 Ford Special Sedan that had killed his grandfather in 1954. I still remember grabbing that big torque wrench and still struggling to get to that 215 lb.ft. that the technical manual wanted for the final torque on the flathead v8. some jobs don't need them, and its not a big deal. other jobs need them, and under/over torque can be a huge deal especially with aluminum parts like thermostat housings, or milled heads. Tightening the conrods around the crank journals you shouldn't be under-torque, and can go a little over (but not much), or for other parts you can be slightly under, but shouldn't go over torque like wire loom mounts, or valve cover bolts on some engines. modern shop manuals tell new hobbyists these things and give warnings accordingly, some things we may do out of habit, and forget to tell others as well.
for most jobs, I don't use the torque wrench until I am almost done, and then torque it, mainly to have less wear on the wrench, but also because ratchets are so much easier to use.
I trust my feeling, but I still grab that torque wrench and verify what I have done. I mean I spent the money to get the parts, I spent the time to take the old one off, and put the new one on; and I like the drive of the car and don't like seeing her just sit in my garage, I might as well make sure I did the job right as well; and I am not over straining anything, or that it won't come apart on me later.
I can always tell if someone is a newby by their torque wrench questions. Bolt stretch is a better indication of a properly tightened nut or bolt than torque.
Practical experience is always better than following a manual that you don't understand.
As for the larger Carter carbs like an Electric choke YFA they are great. Just install a large log head and cable throttle linkage.
I ran a China made Carter YFA for a few years. It's sitting on a shelf in my garage.
Similar threads
All Small Six
250 Engine Build
- Replies
- 41
- Views
- 2K
- Replies
- 1
- Views
- 230
- Replies
- 6
- Views
- 1K
- Replies
- 19
- Views
- 811