Not a problem.
First it looked like the locator was part of and the same material as the guide.
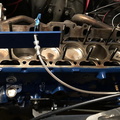
Then your machinist verified that the locator is steel and the guide is bronze so they can't be one piece which means the steel locator was pressed on to the guide.
Then I called the company that will be doing future production for Matt and even though they haven't done any heads yet they felt that the locator was just a press on item.
First it looked like the locator was part of and the same material as the guide.
Then your machinist verified that the locator is steel and the guide is bronze so they can't be one piece which means the steel locator was pressed on to the guide.
Then I called the company that will be doing future production for Matt and even though they haven't done any heads yet they felt that the locator was just a press on item.


 Interesting Delma! Bob, how much needs to be machined off the valve guides lock rings outside Dia. for the inner springs to fit on the valve spring seats? As an alternative what about using a spring cup to bring the spring seats up to the same level of the guides retaining ring, or as a one piece part that also incorporates the valve guides locking ring into it? Clay Smith has listings for the spring cups. Good luck


 I have to say this has really been a great discussion with Bob and everyone on his 250 upgrades.