Autolite 2100

62Ranchero200

Famous Member
Greetings Ford Six Fans,

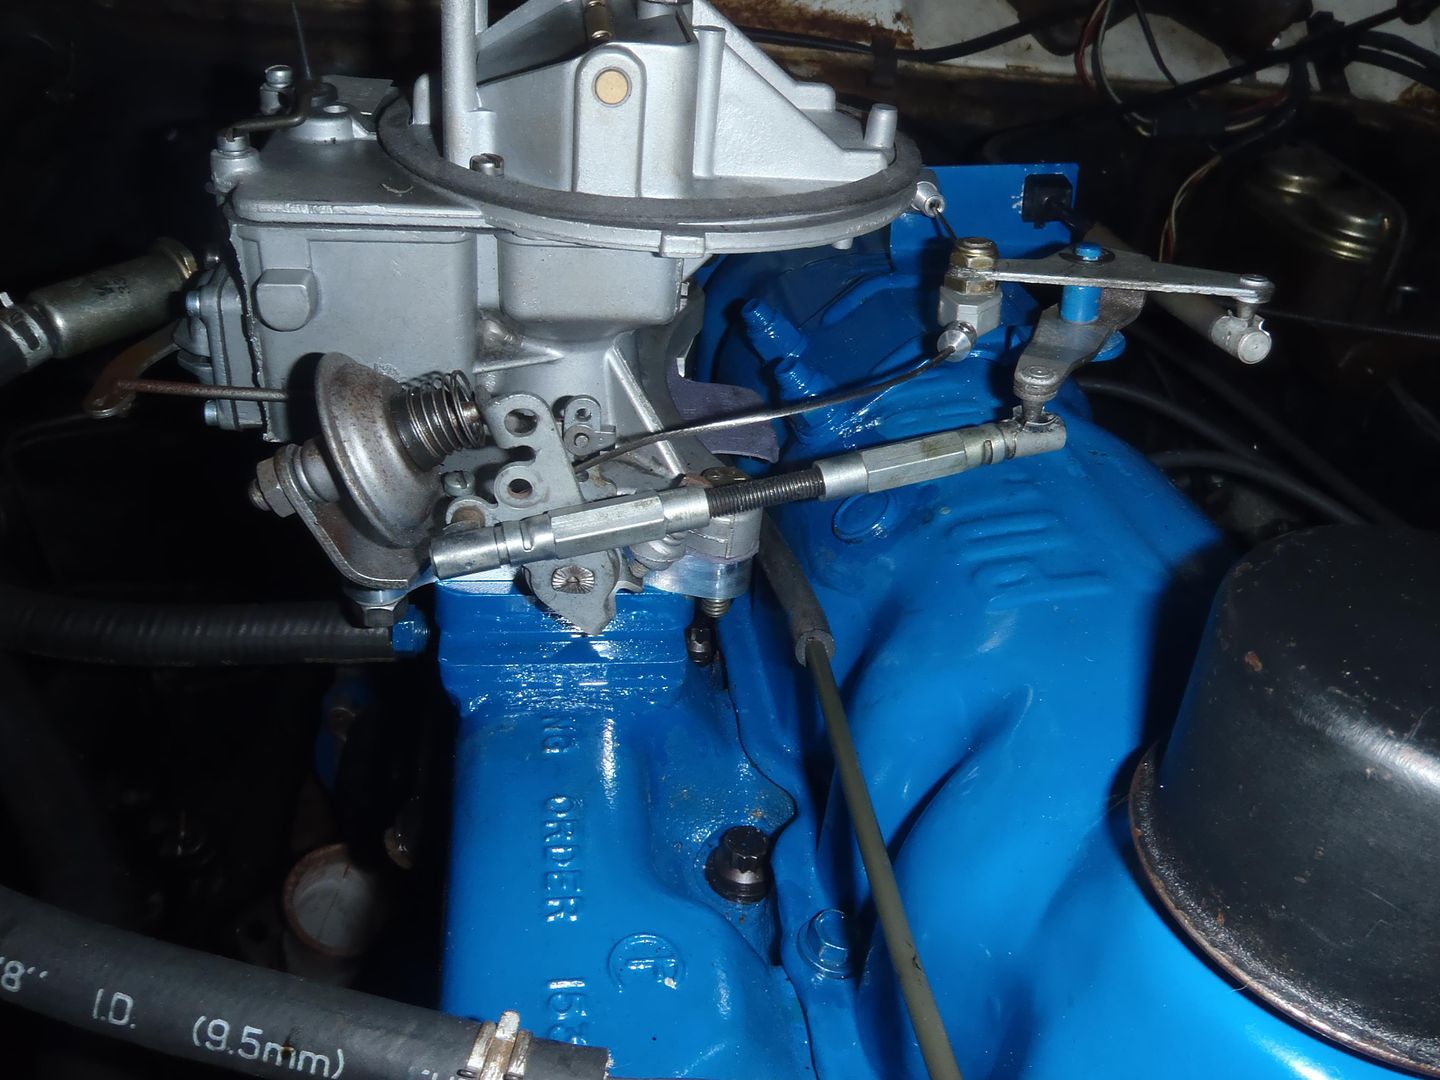
Could any of you that have upgraded from the OEM 1V to an Autolite 2100 or 2150 2V please post photos of your throttle linkage and fuel line hookup? I have an '80 200, currently with a Holley 1946 1V, that I am planning to upgrade with a CI 1V-2V adapter and an Autolite 2100 (1.02 = 245 CFM). The 200 has a flat (not hex) "large log" head and a throttle cable.

I know that the Autolite 2100 upgrade is also done by machining the intake manifold and using a different 1V-2V adapter, but I'm thinking that the throttle linkage and fuel line hookup should be similar either way, although the profile of the adapters might vary, causing slight differences in the geometry of the linkage and fuel line.

Thank you,
Bob the Builder
 
I too have a fox-body, and have not yet figured out a satisfactory solution with cable throttle with a 2bbl.
 
JackFish":zxr9oa20 said:
I too have a fox-body, and have not yet figured out a satisfactory solution with cable throttle with a 2bbl.

If you have a '78 Fairmont I would expect that your engine is very similar to mine ('80 200 cid from a Fairmont/Zephyr, currently with a Holley 1946 carb).

Have you not installed the 2 bbl yet?

As a starting point for me, the CI Autolite 1V-2V adapter orients the Autolite parallel to the crankshaft.

The one photo that I've seen of an Autolite 2100 on a Ford "small six" (in the "Falcon Six Performance Handbook") had the carb throttle lever towards the front of the car, and the fuel inlet on the passenger side. So the throttle linkage or cable would stay on the same side (driver's side), but just needs to move forward, toward the front of the car. The existing OEM fuel line could be cut off just before the old location, and a rubber or woven steel fuel line routed from there to the fuel inlet on the Autolite 1100.

Thank you,
Bob the Builder
 
Hi all,

Have similar question as I have the CI 2V adaptor installed and am trying to see what I need to connect the linkage. Does anyone have a picture or know of a post with pictures that shows the linkage setup for a 2100.

Thanks

Bill
 
8) what i did when i swapped the 2v onto my old 66 falcon was to change the bell crank that is bolted to the firewall from a six cylinder item to a V8 item. i then used the V8 rod from the bell crank to the carb linkage after putting a slight bend near the bell crank.
 
blaze65":3hbm658v said:
Hi all,

Have similar question as I have the CI 2V adaptor installed and am trying to see what I need to connect the linkage. Does anyone have a picture or know of a post with pictures that shows the linkage setup for a 2100.

Thanks

Bill

Update,

On CI's recommendation, I checked with Lokar Performance Products ( http://lokar.com/ ). They have a cut-to-fit throttle cable that will work for my throttle pedal and Autolite 2100 ( TC1000HT36 ), but they don't have a bracket that will work, so I have to make one.


My 200 has a large mounting boss with four bolt holes at the driver's side front, probably for P/S, A/C, and/or A.I.R. pump. My '62 has none of those accessories, and I don't plan to add any of them, so I'm going to make a throttle cable bracket from 1/8" mild steel and attach the bracket at this boss. Will post pictures as the project comes together.

Bob the Builder
 
Thanks very much for the info and lead. Will check it out and see if this can be adapted to my 65 Pedal. Thanks again
 
Hi Bob,

I installed an Autolite 2100 on my 250 as you know, with the 2V conversion. I used the Lokar cable you listed, I purchased mine from Summit. A few notes:

- If you look at the picture on Summit you can kind of tell that the gas pedal end is a clevis. My stock pedal was a U-shaped piece of metal with a hole drilled in it, this didn't at all fit a clevis. I don't have any pictures of this but I can try to take some, but what I did was mash the top inch or two of my gas pedal in a vise until it was flat. Then I drilled a hole through this and the clevis bolted on no problem.

- You're right the throttle linkage ends up forward of the stock arrangement, and the fuel inlet on the passenger side. These pictures maybe aren't the greatest but they show how I made two "arms" angling off the two front corners of the carb. The arm that points to the valve cover is where I installed the throttle cable bracket. The other arm, pointing off towards the passenger side, I had intended to run a kickdown cable to, but the geometry turned out to be too complicated so I gave up on it. I just disconnected the kickdown completely, I figure I don't really need it.

If you click on the photos you can see a larger version, on some of the larger versions I have scrawled some notes.


Throttle cable on the right, Lokar springs to a bracket on the left, and the left side angled bracket was for a kickdown linkage that I did not use. My throttle cable/bracket barely clears the valve cover, and I have a spacer underneath my carb that lifts it about 1/2". So you have to think ahead about this problem. Given how low down the throttle arm is on the carburetor the valve cover is something of a challenge.


Slightly different angle. The Lokar springs in this configuration did a good job of "pulling" the throttle cable back towards the passenger side when the gas pedal was released, but they did not go the final 5% of pulling the throttle lever "down" towards the ground. So I had to add more springs, shown in the next picture.


Here the throttle cable is disconnected and the Lokar fitting has been flipped over to the passenger side so I could take this picture. Notice the two thin springs that go down to a new bracket underneath the carb, these pull the throttle lever closed the last 5% and work very well.


Another view. Also notice that these new springs attach to the ball-stud on the carb throttle lever, where I had originally put my Lokar throttle cable. Now the Lokar throttle cable attaches to a screw-in ball stud a bit higher on my aluminum "throttle lever extension arm." A screw-in ball stud is included with the Lokar kit. Now there is really nowhere left to connect a kickdown linkage but like I say, I don't really need kickdown, I can do it manually.
 
Anyway, I would not at all say that my arrangement is particularly the best, it has required a lot of fiddling to get right, but it does work for me. I don't have welder so I was forced to do all my fabrication with aluminum channel, hand tools, and regular fastners (bolts/nuts). A welded steel bracket of some sort that attaches to the block probably would be best, and in fact that is what my 250 had in the stock configuration, only it simply doesn't work with the new carb.

Here is a somewhat poor photo that shows my fuel line exiting the carb on the passenger side, angled towards the rear. I have a 90 degree elbow fitting on the carb, straight into a fuel filter, then a metal fuel line (painted blue) running around the back-side of the engine and over to the driver's side where it screws into the fuel pump.

Again I'm not sure this is the best arrangement either, bending a fuel tube through all those angles was a real pain, and a flexible cable would probably be a lot easier.

Another mistake I made early on was to clamp the rear of my fuel tube to the firewall with a rubber-lined hose clamp thingy. You would not believe the noise this transmitted to the cab, I thought for the longest time I had a serious exhaust leak but you could only hear it in the cab, never in the engine bay. Turns out it was the vibration of the mechanical fuel pump being transmitted through the hard fuel line to the firewall.

In this photo my fuel line is free-floating but you can still see the hole (small white dot) where I had previously clamped it to the firewall.

Click the image for a large version:

 
Luke76":1ai4g1nf said:
Anyway, I would not at all say that my arrangement is particularly the best, it has required a lot of fiddling to get right, but it does work for me. I don't have welder so I was forced to do all my fabrication with aluminum channel, hand tools, and regular fastners (bolts/nuts). A welded steel bracket of some sort that attaches to the block probably would be best, and in fact that is what my 250 had in the stock configuration, only it simply doesn't work with the new carb.

Congratulations, your installation looks solid and well thought out. I considered a small bracket near the carb for the throttle cable, and found a photo of one on an internet search, but I couldn't think of a way to do it that seemed resistant to bending or loosening. I did use a small bracket for the return springs.

There is a large boss on the lower driver's front of my 200 that's undoubtedly for an A/C compressor, P/S, and/or an A.I.R. pump - but I have none of those accessories and don't plan on adding them (my '62 Ranchero only weighs 2,400 pounds and I can steer it at parking speeds without difficulty; and in the summer I only take it out in the evening - it's not a daily driver). So, I decided to make a right-angled bracket from 3" X 1/8" mild steel, and fasten it to the aforementioned boss. The boss is 2 1/2" wide, with the bolt holes spread out over almost the entire width, so I wanted to use a bracket that was at least that wide for maximum stability.

I'm not a welder either, and don't have a cutting torch, so I cut two pieces of the 3" steel with a hacksaw, and drilled the holes for bolts to mount them to the boss and to hold the horizontal piece onto the vertical piece. The vertical piece was going to make it hard to access the #1 spark plug and wire, so I cut a curved relief into it for that purpose.


A hard line all the way would probably be safer, but the 3/8" fuel hose made it easy to install a see-through inline fuel filter and fuel pressure gauge. I had to move the PVC connection, previously on a spacer under the old 1V carb, to a direct manifold fitting. The spark port on the Autolite 2100 seems to work for my DS II.

On the other hand, so far I still haven't been able to resolve the issue with the idle. I can see gas droplets dripping from the back venturi booster, and I think the carb is running too rich, causing the very poor idle.

Thanks,
Bob the Builder
 
Thanks for those photos Bob, I'm going to save them for future reference. I don't know how my jury-rigged contraption will stand up for the long run and something like what you did may be more durable if I have to change it.

I just realized we ought to post these photos in the "Throttle Cable Setup" thread that is part of the sticky, I will do that with mine now.

I'm following along with your carb thread but the people there already know more than I so I am just "listening and soaking in" for now. I wish you luck on it though.


Luke
 
Nice setup and it looks great!

This is what I did:


I use a 1970 Mustang pedal with 250 cable and Lokar AOD TV cable.


This is the latest setup and it works well. Fits nicely under 14" HiPo air cleaner.

 
Back
Top