Bill1958
Well-known member


I know that there are a bunch of videos on youtube on this subject...like everything else in this world...some good...and some bad.
I don't claim to have all the answers on this process...but I'd like to share what I've learned and hopefully it will help others if they want to try it.
I'll start off by saying...if you have a machine shop near where you live that offers a Thermal Cleaning Process for your engine block...do yourself a favor and for around $200 bucks your block will come back cleaner than you can ever do at home. Cast Iron blocks are baked at 500 degrees...any oil, paint or contaminants are turned to ash. From there...the block is shot peened. Then...to the shaker...which removes any shot left in the block. The shop near me offered this process for $180...which I thought was a pretty fair price.
But......my budget is so small that I couldn't even afford that. Also...I really wanted to try the electrolysis rust removal and see how it comes out.
***********WARNING**************
THIS ELECTROLYSIS PROCESS SET UP IN A 55 GALLON PLASTIC DRUM CREATES A LARGE AMOUNT OF HYDROGEN AND OXYGEN GAS (other names: HHO, HYDROXY or BROWN'S GAS). THIS GAS IS MORE THAN FLAMMABLE...IT IMPLODES AND THEN EXPLODES AND COULD DESTROY YOUR GARAGE OR SHOP AND YOUR LOVED ONES.
PLEASE....DO NOT EVEN THINK OF DOING THIS INDOORS....EVEN WITH A FAN AND THE GARAGE DOOR OPEN. THE GAS CAN COLLECT NEAR THE CEILING AND YOU'D NEVER KNOW IT TILL IT'S TOO LATE. -----------------------------SET THE DRUM UP OUTSIDE IN OPEN AIR--------------------------------------
IF YOU CHOOSE TO TRY THIS PROCESS.....YOU DO SO AT YOUR OWN RISK OF PROPERTY AND LIFE.
(ok...now that's out of the way)
So...for around $75 bucks I was able to set up the system and get the block done.
What I used for my set up:
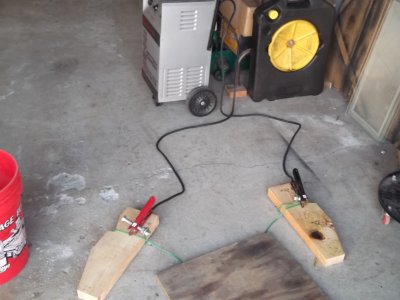
I already had a 200amp charge/start battery charger...so that's what I used for my 12vdc power supply.
I've seen others use the smaller 10amp chargers...and they seemed to get good results...but had to run it a few days longer.
A note on battery chargers and amp settings........just because you have your charger set to the 2 amp setting....that does not mean that only 2amps are going to your electrolysis tank.
I had my charger set to 2 amps....and saw that my meter that's built into the charger I was drawing about 15 amps.
I verified this with a clamp meter which read 15.2 amps.
So...using a smaller 10amp charger might not be the best option. I've seen people do it and it seems to work...but how much are you over stressing the charger and how long will it last? Your guess is as good as mine.
Bottom line....like charging a car battery....the process will draw as many amps as is needed to get the job done. The more Positive and Negative plate area and the stronger the concentration of the electrolyte.....the more amps you will draw from the charger to run the electrolysis. There are other factors as well but those are the main ones.
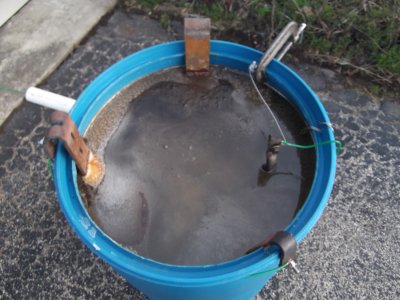
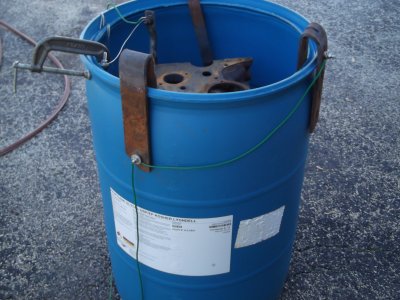
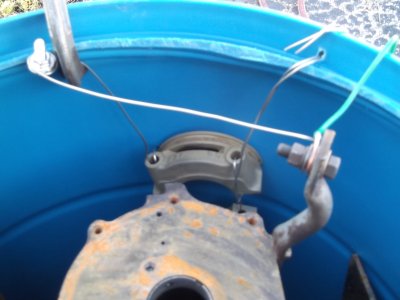
Connect your negative cable from your charger (I used 10 gauge solid core wire) to your engine block. (make sure your connections are tight...use nut's and bolts)
(In one photo you will see a bar bolted to the block...1 wire going to a daisy chain of main bearing caps wired together. The second wire from the bar goes to the negative charger cable. Both block and main bearing caps wired together and are negative. This was my first setup/attempt.)
Connect your positive cable to your "donor" positive electrodes in series (one wire running from one electrode to the next).
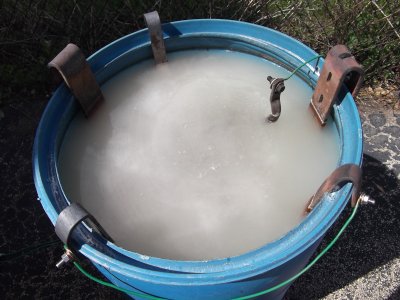
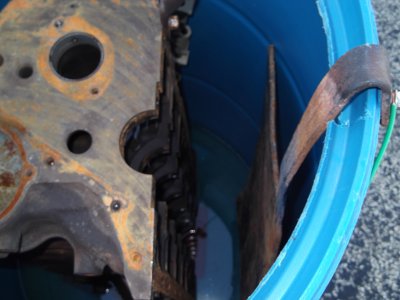
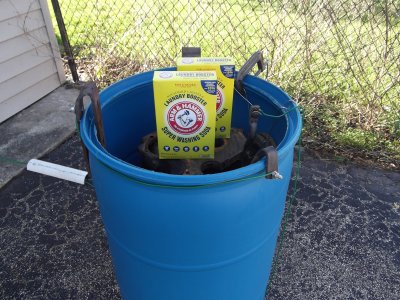
Fill up your drum with water...as filling add your 2 boxes of soda wash.
Continue to fill until you have about 3 inches of water above the engine block.
Turn on your charger.
For my charger the 2 amp setting allowed about 15 amps to be drawn and produced gas from the electrolyte.
After a short while the 10 gauge wire was warm but never got hot and stayed that way for the whole 60 hours.
Cost:
If you already have a charger...then you're good. (?)
55 gal. plastic drum (craigslist) $25
Positive Electrodes (doner metal)..scrap yard $20
10 gauge solid hookup wire (I had on hand) $(?)
Arm & Hammer Soda Wash (2-54oz boxes) $15
Cheap oven cleaner (3 cans) used to de-grease
the block before putting it in the drum. $12
My first attempt...I ran the process for 48 hours at about 15 amps. I thought it looked to be done...but I was wrong. After pulling it out of the drum and rinsing it off I could see that it was only half-baked.
For my second attempt I changed out the electrolyte and also added more positive electrodes (larger surface area).
I also mounted the main bearing caps to the block instead of the daisy chain setup I had earlier.
I let that run for 60 hours at the same amperage. When I pulled it out this time it looked better...but could still see some rust. I believe that I could have let it run another 12 hours for a total of 72 without any problems. Maybe next time.
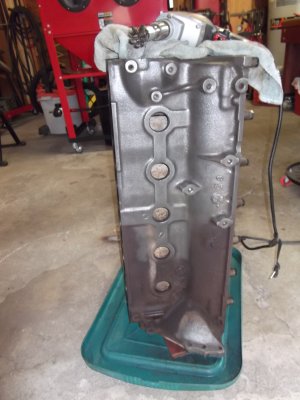
After rinsing the block off I found that the remaining rust and crud brushed off easily. Went over the block lightly with a wire brush wheel on a hand drill. Gave the block a light spray of WD40 to prevent flash rust.
Not bad....but if I had the cash I'd still opt for the Thermal process.
Hope this info helps if you choose to try it.
If you would like to read more about the electrolysis process...I found this link that gives A LOT of background on the process.
The only part of this info that I disagree with is the writer's view on the dangers of the gasses produced by the process.
(Me) - THIS GAS IS VERY VERY DANGEROUS.....PERIOD.
DO NOT DO THIS INDOORS.....EVER.
IT IMPLODES....THEN EXPLODES.
Other than what I state above...you'll find his info very helpful:
https://antique-engine.ns.ca/electrolysis.html
Hope this info is useful.
Thanks
Bill


") Had several with designated tools in each, starting in '79 also. But after their 8 year run on the Atlantic they gradually succumbed to a rusty death. . . The quality we took for granted- nothing whatsoever is built as it used to be. Had I had the knowledge I've got now, would have seen to their preservation.
Had several with designated tools in each, starting in '79 also. But after their 8 year run on the Atlantic they gradually succumbed to a rusty death. . . The quality we took for granted- nothing whatsoever is built as it used to be. Had I had the knowledge I've got now, would have seen to their preservation.


