All Small Six Pilot Bearing Installation

This relates to all small sixes

65 Mustang

Well-known member
Hello. I’m installing a new pilot bearing into my 200 ci. Am I correct in that I gently tap it in until it rests against that inner lip I pointed to in the photo? I just don’t want to potentially tap it in too far. Also, completely unrelated, but does anyone know the purpose of that screw I circled in green. Thanks.
 

Attachments

  • 6BD36EC9-6A6E-4FAE-B947-AA00D7FB943D.jpeg
    6BD36EC9-6A6E-4FAE-B947-AA00D7FB943D.jpeg
    1 MB · Views: 11
.... relax and just tap pilot in with a drift. When it hits inner land, it will feel and sound done. (clean bore, light lube, pilot into freezer awhile if difficult, light hammer)

If it's conventional Sintered Bronze bushing, tapping in with any similar size round drift or old bearing should work. If a 'modern' roller pilot bearing, only push on outer race.

have fun


. .
 
X2 powerband nailed and it it's a very easy job to do! You could also use a socket of the right size to tap in both a Roller type pilot bearing or for a solid pilot busing too.
 
I bought a cheap set of 1'' drive sockets, and I use them more as sets for bearing races and seals, than as sockets. I have a brass headed hammer that I just love for that type of work.
 
Yeah, brass hammers are good to have around. I have another question about the bolts that will be holding the flywheel on. They don’t have lock washers, so is it suggested to use blue threadlocker when they are being torqued to spec (75-85 ft lbs). Also, are any of those bolts suppose to receive special silicone sealant to prevent oil from leaking through onto the clutch? Thanks again.
 

Attachments

  • E36CB712-5C21-4E26-BDD4-5B66C39AB423.jpeg
    E36CB712-5C21-4E26-BDD4-5B66C39AB423.jpeg
    2 MB · Views: 1
Ok. Got it in. Not too bad at all. Ended up using a 15/16 socket. It seemed to be the right size for the bearing. Took just a few minutes. I was able to get the whole clutch assembly on there as well yesterday. Next job is to install the transmission. Thanks again for info.
 

Attachments

  • C1B79B49-03FA-48C7-A9AF-FF5A90306712.jpeg
    C1B79B49-03FA-48C7-A9AF-FF5A90306712.jpeg
    2.4 MB · Views: 5
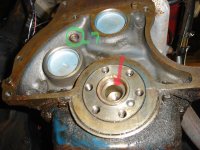
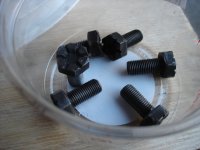
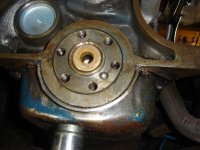
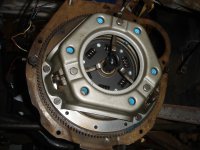
Ha. I learned that the hard way yesterday. It was clear that I needed to remove the pins once I tried to put the block plate on. I tried and tried and tried to remove them but they were really stuck in there. The engine is still in the car so I had limited access. What I decided to do was put white out on the pins. I then put the block plate on so the white out would rub off on it. Next I took the plate to my drill press and drilled out new holes, so the plate could fit on. However, after test fitting the bellhousing, it quickly occurred to me that one of the pins could not stay there as it interfered with the bellhousing covering properly. So, after already installing the flywheel, clutch and pressure plate, I had to carefully drill out one of the dowel pins. I then ground it down smooth using a dremel. That added several hours to the job yesterday, but I’m happy with how it all turned out.
 
Sorry that I did not catch that sooner, but I was short on clues as to what all that you were doing...You should be using the dowels to line up the bell.
 
So, I’m installing a three speed (3.03) manual in my ‘65 mustang. I removed the C4 automatic the other day. The car left the factory as a three speed so the clutch pedal is already in place. I should be able to align the new bellhousing fine without the dowel pins. I had it on yesterday. I plan to attach the bellhousing first and then connect the transmission. If I did it all at once I can see it being challenging without the pins.
Do those dowel pins have a reputation for being difficult to remove? I just couldn’t get them out. If I do, for some reason, need to insert dowels to align the bellhousing, can I make them from a certain size diameter rod? I included some pictures to give a better sense as to where I am with my project. I spent today preparing the transmission (new gaskets and prep work).
 

Attachments

  • E1A59007-0A51-445A-BDD8-96EC6F38D5F3.jpeg
    E1A59007-0A51-445A-BDD8-96EC6F38D5F3.jpeg
    2 MB · Views: 7
  • 8C22997D-7A83-40C7-9675-B81C708EAB94.jpeg
    8C22997D-7A83-40C7-9675-B81C708EAB94.jpeg
    2.3 MB · Views: 6
Ah. Didn’t think of that. Ok, I’ll try to make up some new ones and place them in the slot for the new bellhousing. If the bellhousing is set correctly, though, and mounted properly with the four bolts that hold it to the block, won’t the starter position naturally line up with or without the dowel pins?
 
I wouldn't think of not using dowel pins. When you take off or shift the bell housing may twist out of alignment.
"It is very important to make sure that your bellhousing is properly aligned with the centerline of the crankshaft.
A bellhousing that is not concentric or parallel with the crankshaft centerline will give the transmission poor shift quality as it is putting excessive side load on the input shaft. You may also experience accelerated clutch wear, engagement problems, accelerated input shaft bearing wear, pilot bushing noise/excessive wear."
Bowler transmissions
 
Hi, some of the dowel pins are blind holes and they can be impossible to remove, so grinding them down is an option. The pins with a through hole just bang out with a punch. I get my "new" dowel pins from spare blocks, and use the engine spacer plate to line them up. And yes, you do need them. Good luck
 
Ok. I am convinced now that I need the dowels. So glad drag-200stang brought this up or I would not have had a clue. I thought that if the four mounting bolts were attached correctly everything else would line up. It just dawned on me that I have the engine block that I took the transmission off of. Those dowel pins, hopefully, are still on it. I’ll check tomorrow. If they come off easily, I will place them on the engine in my car and get the bellhousing lined up properly. Thanks again so much for all the great info. Really appreciate it. I’ll let you know how it turns out.
 
Back
Top