All Small Six MPFI 200 Build

This relates to all small sixes
Since you already have the Hyperspark ignition system, use it.
Without the cam sync pulse, does the Terminator X run in Batch Injection mode?

A DS2 distributor can also be modified to supply the cam sync signal by removing 5 of the six reluctors.
So I may have a slight build change. I may be able to get a crossflow depending what the price is. if this is the case, I will reuse my Sniper/Hyperspark on my spare 250 and also build that with the 2vAussie. This willhave to be because there is not enough room for the hyperspark and the crossflow intake (I believe). Maybe there is room but I will verify when all is said and done.

Alright, I will look into keeping it. I would have to call holley on that. I would hope not as that doesnt sound very efficient.

I did see that. That may be an option as well since I have a spare DSii sitting around.
 
Ford australia did in their 1988/ 91 EA falcon sixes did a special cam position sensor that replaces your distributor ( and still drives the oil pump)


4 on ebay Australia now- just need to check shaft diameter where the hex is as ford aust changed around over the years

If you were cluey could modify the orig distributor
That's pretty slick. I'll email the guy and see if he wants to ship to USA. currently it says it does not ship here. I like this. Looks legit and its FOMOCO
 
If it helps the 3.8
I like the sound of that. i will look into this
It is about 2'' tall, make sure that the year you get is the 3-wire hall effect and not the 2 wire VR . It seems that there is some other V6 engines that is the same and cheaper but not sure yet.
 
If it helps the 3.8

It is about 2'' tall, make sure that the year you get is the 3-wire hall effect and not the 2 wire VR . It seems that there is some other V6 engines that is the same and cheaper but not sure yet.
It is a 4 pin, so does that mean it is a 2 wire? Or 3 wire with a ground?
 
You will have to ask the Aussie's about that, but I would assume that it is. As with everything, trust but verify.
Do we know if the 88EA is a direct fit yet for the US 200/250? I am confused as to what you are planning now, complete crossflow or just head on US block?
 
You will have to ask the Aussie's about that, but I would assume that it is. As with everything, trust but verify.
Do we know if the 88EA is a direct fit yet for the US 200/250? I am confused as to what you are planning now, complete crossflow or just head on US block?
I asked the aussie if it was a 2 wire or 3 wire and he said only 4 pin. I keep trying to find information online but finding aussie stuff seems to be difficult. I try putting in for a part for a 1990 Falcon and cannot hardly find anything. keeps wanting to give me 60s stuff. I don't know if its a direct fit, but I cant find anything online about any of this.

So this has always been a Aussie head on a US block build. I am waiting on my friend to let me know if he's parting with the crossflow head or not. Otherwise I have my 2V aussie head. Either way this cam sensor would help me achieve coil on plug ignition. I would much prefer the crossflow head for this since it will make the most power. My 1980 low mount block would be perfect for this. The crossflow would allow me to run less boost to get the same power and be more reliable.
 
I counted 4 pins in the pic on our 'sm block' forum (Y I asked "where do all 4 go?").

I would jaw bone w/our Oz 'members'. Example: aussie7mains is on this forum a good
deal and a pretty straight shooter. B4 purchase...

In some cases this is better than from some sellers. Also to get info from guys here/U know
(I have a lill difficulty w/some on our Oz forum - english but different wrds, totally different sense of humor,
other issues FOR me). Last, Ryan, as U no there's the national where certain companies ('dealers') can export,
others import (we have that w/alcohol just in state, cars cross state lines, etc) plus the duties USA/Oz
 
Star, I see no good reason to pursue the AU cam sync, the gear I can see is wrong not sure about the other pertinent dimensions and it is too hard and expensive to get.
We know that the 1998 Mustang 3.8 and the 2008 ford f150 with a 4.2 is the same part # and 67 used one with success and they are 3 wire hall effect. They are a stocked part in my area.
To make it fit you need to use the 200/250 gear and shorten the shaft.
Reduce the collar to the 200/250 size, this is the part that the hold down clamps it to the block. If you do not it will not sit flat on the machined spot on the block, Turn, grind sand file, does not have to be perfect.
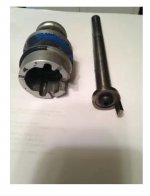
Before you take the cam sync apart measure where the shutter rides, take apart, cut shutter off after drilling and counter sinking for a 1/4''-20 flat head, less material to cut through when you cut it off, figure out how much to shorten shaft using the 200/250 gear pined in the same spot on the shaft as a 200/250 and the proper ford spec from the bottom of collar to the bottom of gear and end play, do not pin it permanently at this time, The tall spacer is removed and not used, may need thin spacer washer between the gear and sync housing maybe not. Drill and tap the shaft and flat head bolt the shutter with red lock tight to the shaft.
This can be done with common tools, but a lathe would be a lot easier and more accurate and faster.
I used a like new points shaft with gear to do mine because it was a better fit in the cam sync and the gear was already set.
If you plan to do this, we can get more detailed, but this should give you an idea of what is involved.
 
Last edited:
Star, I see no good reason to pursue the AU cam sync, the gear I can see is wrong not sure about the other pertinent dimensions and it is too hard and expensive to get.
We know that the 1998 Mustang 3.8 and the 2008 ford f150 with a 4.2 is the same part # and 67 used one with success and they are 3 wire hall effect. They are a stocked part in my area.
To make it fit you need to use the 200/250 gear and shorten the shaft.
Reduce the collar to the 200/250 size, this is the part that the hold down clamps it to the block. If you do not it will not sit flat on the machined spot on the block, Turn, grind sand file, does not have to be perfect.
Before you take the cam sync apart measure where the shutter rides, take apart, cut shutter off after drilling and counter sinking for a 1/4''-20 flat head, less material to cut through when you cut it off, figure out how much to shorten shaft using the 200/250 gear pined in the same spot on the shaft as a 200/250 and the proper ford spec from the bottom of collar to the bottom of gear and end play, do not pin it permanently at this time, The tall spacer is removed and not used, may need thin spacer washer between the gear and sync housing maybe not. Drill and tap the shaft and flat head bolt the shutter with red lock tight to the shaft.
This can be done with common tools, but a lathe would be a lot easier and more accurate and faster.
I used a like new points shaft with gear to do mine because it was a better fit in the cam sync and the gear was already set.
If you plan to do this, we can get more detailed, but this should give you an idea of what is involved.
Using parts that are accessable here is much smarter. The guy never got back to me anyway so no problems.

That's fairly intensive, but not too bad. I have a friend with a lathe that this could be done on. Honestly I think using the old points distributor shaft method is nice since it reuses some parts I have already. That would be more precise to use. Does it need something cut into it for the shutter wheel or something else done to it, or does it almost fit right in?
 
The points shaft needs to be cut to the right length and the shutter piece cut off the 3.8 and bolted to the points shaft. once you have cam sync apart, take pics as you go and when have the points shaft out it will make more sense. I went with the points shaft 1 the shaft was .001 larger than the cheap offshore 3.8. so, the bearings and gear fit better. 2 the points shaft had spiral down grooves that ford designed to keep oil out of the top of dist., the 3.8 uses a rubber seal for that, I plan on leaving the seal spring off. 3 the gear was already pinned in the right spot. I found that the fiber oil reservoir was dry, I made an oiling fitting with cap so I could oil if needed. Just pull the soft plug and oil well and tap for a screw in plug.
Go to the ''Tech Archive'' and go to ''distributor gear wear.'' scroll down to the last part that gives you the ford gear replacement dimensions setup. Make sure that you understand it. Pay no attention to the stuff above that about spacers and gaskets.
Reminder before you Take the gear off the cam sync measure where the shutter is in relation to the top of the housing, both pulled up and then pushed down, so you can keep it positioned the same height wise. Also, it is better to cut twice or more than to start over.
 
Last edited:
67 comments.
"The shaft on the 3.8 is longer than our inlines. I cut the synchronizer of the top of the shaft and bored a hole through the center of the synchronizer.
Then I cut the shaft down to the correct size and tapped a 1/4' hole in the synchronizer end. The cam sensor body is a direct slip-on into the block.
You need to change the cam gear the 3.8 is reverse rotation to the inline six.
[image]https://imageshack.com/i/pm0CzysRj[/image]
This pic is not the sensor I used, it's the magnetic sensor - but I did the same modifications to both the magnetic and hall effect sensors.
Holley recommends falling edge"
 
image shack blocked likea pay wall?
Thnx,
- Chad
 
IMG_1666 - Copy2.jpg
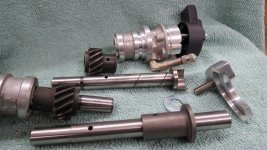
The shaft at the bottom is the 3.8 with the shutter cut off. Up and left is dura spark2 showing it double pinned look close. To the right is a homemade hold down. Above that is points shaft with shutter bolted centered on the shaft at the right length. Next is points gear and then 3.8 cam sync body with sensor and the oiler that I added just because.


IMG_1667.JPG
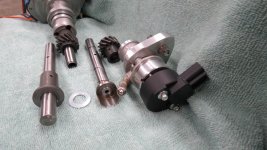
This shows the flat head counter sunk, I also trimmed the bolt some, again just because. You can double click and blow it up for a better look. PS the sensor it just sitting and not in correct spot.
 
Last edited:
Just got here and catching-up. Cool build! Lots of little ideas, but a few randomly:
I'd say the Hyperspark is fine for now, but eventually you'll want to integrate ignition with fuel so you can graph, analyze and diagnostically tune them together. So much easier, quicker, and better tuning that way.

Batch fire (paired injectors) is fine, but I run them with two injections per-cycle, so the effect is quasi-sequential. Many of today's high-tech OEM systems fire two squirts per-injector per-cycle now, for improved efficiency. Perfect fuel distribution and longer fuel dwell (vaporization) that way, equal response to seq, and can integrate with waste-spark coil packs, CNP, COP, etc.

Depending on the ECM you use, just a missing-tooth cam signal can get you full sequential. Else, a missing-tooth crank wheel only for paired and waste-spark, or add a cycle sensor ("cam " sensor) for sequential or timed semi-sequential. Check your damper diameter against the various factory toothed wheels for a possible easy fit.

Ford-36-1-stock-wheel-adapt.jpg


If no joy, there are many companies that will cut a trigger wheel to your spec's for mounting on the damper, or like this one I zapped onto a stock pulley on a Ford V8. You can also notch your pulley edge, or the balancer itself (not the rubber damper ring), the flywheel or flexplate, etc.

36-1-pulley-mount.jpg


"Cam" sensor is very limiting conceptually. I've done cycle sensors (1 pulse per 720° crank) on cut-down distributors, on timing covers to read the gear or fuel pump eccentric, and even a Hall sensor reading a rocker arm. Lots of options if you get away from the "cam" word, and it only indicates it's a cycle sensor.

Cut-distributors.jpg


If you're not having fun, you're not doing it right!
 
View attachment 18503
The shaft at the bottom is the 3.8 with the shutter cut off. Up and left is dura spark2 showing it double pinned look close. To the right is a homemade hold down. Above that is points shaft with shutter bolted centered on the shaft at the right length. Next is points gear and then 3.8 cam sync body with sensor and the oiler that I added just because.


View attachment 18507
This shows the flat head counter sunk, I also trimmed the bolt some again just because. You can double click and blow it up for a better look. PS the sensor it just sitting and not in correct spot.
Really helpful, If only I can find someone to do this as I have no lathe.
 
Really helpful, If only I can find someone to do this as I have no lathe.
I did that with a hand cutoff saw, bench grinder, files, sandpaper on flat surface, drill press, vee block with clamp, dial indicator, .001'' 6'' dial caliper. But I did the collar reduction on a mill but you could do it on a cheap 1''like vertical belt sander, it does not have to be perfect, check with caliper as you go. Wish that I got the narrow sander long time ago, love it. Practice on some scrap till you get it.
 
Last edited:
I did that with a hand cutoff saw, bench grinder, files, sandpaper on flat surface, drill press, vee block, dial indicator, .001'' 6'' dial caliper. But I did the collar reduction on a mill but you could do it on a cheap 1''like vertical belt sander, it does not have to be perfect, check with caliper as you go. Wish that I got the narrow sander long time ago, love it. Practice on some scrap till you get it.
One of those pictured isn't for sale :). I will give that a try when I get the parts/tools. Thanks for the info.
 
Last edited:
Back
Top