All Small Six 1967 Mustang - ACP two row radiator w/factory air

This relates to all small sixes

laketrash

New member
Thanks to all for the wealth of information here, because of that this may be one of my first posts!

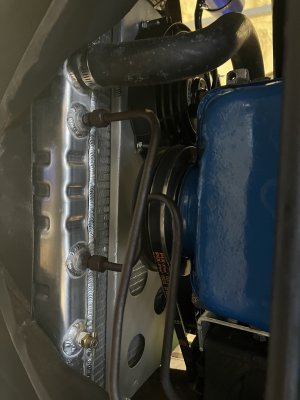
I have a 67 mustang with air and needed to replace my radiator. I researched and certain sites for this ACP two row aluminum radiator referenced all inline 6 67-68 and 69-70 without a/c. Ordered and installed and I'm thinking the prior restoration on my car may not have set the core support properly.

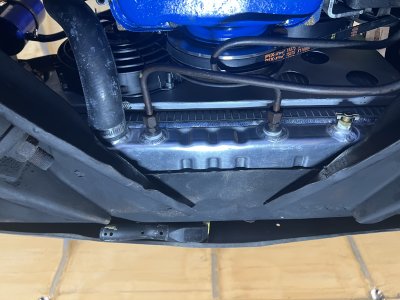
I had to expand the mounting holes by about 1/2 another hole width because the radiator was sitting on the bottom and still too high for the mounting holes.

Fan would not go in with the factoy 1.5" spacer so I tried a 1" fan spacer but that was still touching the radiator, I tried a 1/2" spacer and the fan was hitting the dual pulleys. 3/4" spacer would've still put the fan within 1/4" of the radiator, plus I would still need to custom modify the fan shroud mounting to align with the new radiator position, so I decided to go electric instead.

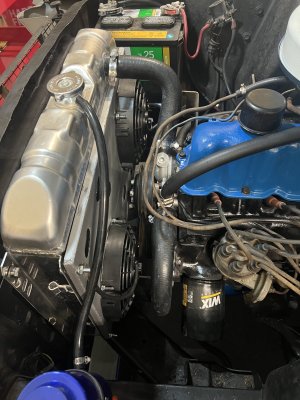
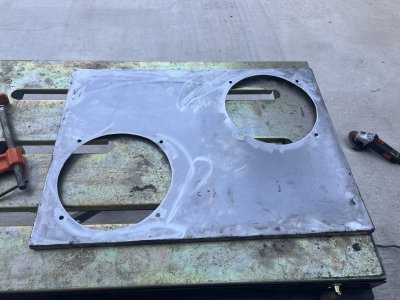
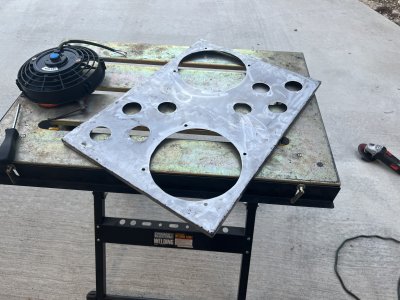
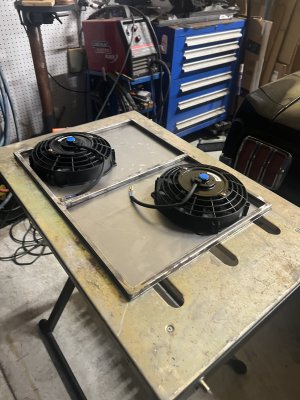
The electric fans at the local parts stores were also too thick and wouldn't fit between the radiator and water pump. Ultimately I decided with two staggered 7" electric fans to fit the water pump pulley in between those. I'm in the middle of making a shroud to hold these now and hoping it works out.

Many of the electric fan shrouds for staggered fans had louvers on the larger spaces left, I do not have a louver press so I drilled holes instead. My A/C is temporarily removed but I left the dual pulleys because it is going back in eventually.

I'm mostly sharing to try and contribute but also interested in feedback if anyone else has been through a similar setup challenge.

I'll post an update with successes or failures after I finish and take it for a drive, but if anyone has feedback to help as I wrap this up I would appreciate it!

Looks like I need more posts or to read the FAQs on posting pictures, will update with pics later.
 
Hi, I'm guessing you are replacing the original style down flow radiator that bolts directly onto the radiator support. If the bolts don't line up, and the fan doesn't fit, it seems you did not get the correct radiator. Good luck
 
A couple things, if you have a 200 cu.in. Engine, from the factory the radiator is bolted to the radiator on the sides of the radiator, they don’t sit on the bottom. If yours is sitting on the supports at the bottom, the supports were probably added and may well be in the wrong place. Not sure if moving them is an option? If you ordered a six cylinder radiator, you might see about mounting it by the sides. If I remember correctly, I have a 3 row ( with a/c and in south fla ) and I didn’t have any problems. I might have used a different fan spacer with a stock fan.
Only the v8 came with “ saddles “ on the bottom.
 
I used a Champion aluminum radiator in my '66 and it fits perfectly. The stock 4-blade fan works well with no shroud.
 
If the radiator has sufficient volume the two separate electric fan set up should be sufficient. I have this set up on a truck with a large radiator, does fine except extended idling in summer, starts to loose ground after 7-10 minutes.
 
Thanks all, I triple checked and even called before ordering, to get the right one for a factory 6 car.

it does bolt to the radiator supports but the bolt holes didn’t line up before hitting the bottom. I’m at least the 2nd owner after the original restoration so not sure on mods or supports.

Got it all in last night with my modifications and shroud and I’m working on wiring the dual fan controller later today.

view from under the car looking up here
 

Attachments

  • IMG_5633.jpeg
    IMG_5633.jpeg
    1.7 MB · Views: 10
  • IMG_5634.jpeg
    IMG_5634.jpeg
    2.7 MB · Views: 10
Last edited:
If the radiator has sufficient volume the two separate electric fan set up should be sufficient. I have this set up on a truck with a large radiator, does fine except extended idling in summer, starts to loose ground after 7-10 minutes.
This car is going to serve as my daily for a while and often in tx summer heat. If it doesn’t keep up in traffic I may need to rethink.
 
This car is going to serve as my daily for a while and often in tx summer heat. If it doesn’t keep up in traffic I may need to rethink.
Run a manual on/off in addition to your thermostat control. It helps on the hottest days or if you know stop n go traffic is ahead to keep the fans on full time rather than waiting till things are already hot. When pulling the trailer I do this, it does help a good bit.
 
Run a manual on/off in addition to your thermostat control. It helps on the hottest days or if you know stop n go traffic is ahead to keep the fans on full time rather than waiting till things are already hot. When pulling the trailer I do this, it does help a good bit.
Thanks! My a/c is currently removed so I may tie into that lead for now and use the a/c switch as my manual for a bit. I really need to swap the stock fuse box for something more modern with my plans for this car.
 
Some pictures of the shroud build. I didn’t get to wire in the fan controller last night so that will likely be a week or so before I share those pics.
 

Attachments

  • IMG_5638.jpeg
    IMG_5638.jpeg
    1.8 MB · Views: 10
  • IMG_5625.jpeg
    IMG_5625.jpeg
    3.5 MB · Views: 8
  • IMG_5626.jpeg
    IMG_5626.jpeg
    3.2 MB · Views: 8
  • IMG_5614.jpeg
    IMG_5614.jpeg
    1.7 MB · Views: 10
Thanks! My a/c is currently removed so I may tie into that lead for now and use the a/c switch as my manual for a bit. I really need to swap the stock fuse box for something more modern with my plans for this car.
The fans are a pretty big amp draw. A dedicated circuit with a relay prevents overloading factory wiring. Also, if you wire the relay with the ground as the trigger, it's safer and easy to wire in a dash switch. In other words, the hot trigger to the relay is always hot when the key is on, and the fans are controlled by grounding the relay.
 
The fans are a pretty big amp draw. A dedicated circuit with a relay prevents overloading factory wiring. Also, if you wire the relay with the ground as the trigger, it's safer and easy to wire in a dash switch. In other words, the hot trigger to the relay is always hot when the key is on, and the fans are controlled by grounding the relay.
Thanks, I ordered the Hayden 3651 fan controller, it is triggered by either the a/c + or the temp sensor reaching temp but it does have a relay and runs the fans off + from the battery.
 
Thanks, I ordered the Hayden 3651 fan controller, it is triggered by either the a/c + or the temp sensor reaching temp but it does have a relay and runs the fans off + from the battery.
That's a good choice. The wire that goes to the block temp sensor is a ground signal to the relay. If you tap into that wire, hook to a dash toggle switch with the other side of the dash switch to a ground right there under the dash, that's your manual fan controller.
 
So, semi success, hard wired the Hayden fan controller direct to the battery until I work out a good key on 12v source.

Temp control works though, turned the temp sensor all the way up, warmed up the car and when the thermostat opened I turned down the temp sensor trigger until the fans came on. Per the instructions this should leave the fans off until the car warms up to thermostat open temp.

Took a test drive to fully warm up the car in driving conditions, then stopped and let it idle and temp held. Will put it through the paces more next week and set up a key on so the fans don’t run until it cools off but it’s good to be back on the road.
 
Another thing to get a bit more cooling. Where you put the small holes in the shroud add a flap on the engine to cover. When you are at hwy speeds the air flow will push the flap open. When you are stopped/low speed and the fans kick on the draw will close the flaps and ALL the air the fans draw goes through the radiator. With out the flaps there is a lot of "leakage".
 
Back
Top