Starting a rebuild

Hey, its even Arrest Me Red. Cool pick-up! Best wishes Beaus67


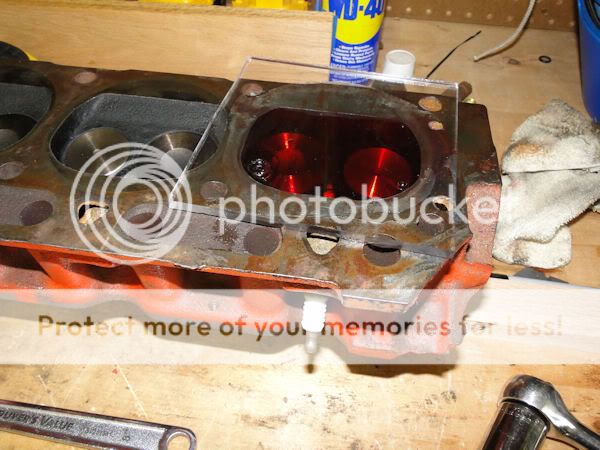
When did Ford start painting 200 head's red again?
My 1966 200 is red,
the last 200 low mount from an x-shell Granada was black.
my mates 81 low mount is grey,
my 1982 Mustang is blue

ah who cares, just go for it, it lookes like its been given some tlc, so should be good...
 
Had time today to measure the cylinder head volumes using the technique laid out in the Ford Six Performance Handbook (great reference manual). The cylinder volumes from 1 to 6 are 56cc, 58cc, 58cc, 58cc, 58cc, 57cc. Based on this I will need to have .020 milled away to achieve a chamber volume of 52cc (using the smallest chamber size as the base line) or .030 if using the bigger volume. Should I then mill away another .020 (.050 total) compensating for added head gasket thickness (steel shim vs. composite)? I don’t want to get myself into clearance trouble but .060 seems to be the “safe” number for milling. This is all based on stock deck clearance. The valves, springs, retainers all look like new, the carbon on the intake valves basically wiped off and the chambers are very clean and smooth. Again, the goal is to achieve a good strong daily driver not a high performance 6, any suggestions or thoughts would be appreciated. :p

DSC05587.jpg
 
I think it depends on the compression ratio you want. Look in the Manual for block decking as an alternative or using 255 pistons. One of the gurus on here will help you out with this.
 
.025 is the compressed thickness of a steel shim head gasket, you than find the compressed thickness of the brand composite head gasket you plan to use. As an example say its .050 it would take 0.25 cut just to get back to the stock spec. The head is no closer to piston than stock (it started out farther away) so no clearance issues this is also the same for cutting down to bring chamber CC’s to the original spec. it ends up a wash and compression is where it's suppose to be.
 
One last question for this thread, does anyone know what was attached to the two bolt holes in the photo that are not for the exhaust manifold? They do not tap into the log. My original head does not have that flat area with bolt holes. Thanks
Bill

sideview.jpg

hope this works for you Chad
 
"...hope this works for you Chad."

:nod: 
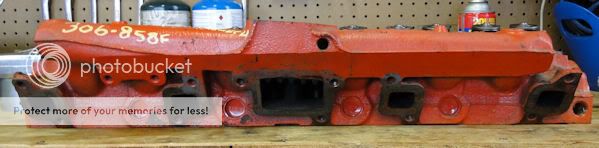
Yeah, Bill, that's great ( 599X148 ) for those of us who aint seen 1. Glad U labeled it, cept 4 the simeesed 3rd & 4th I don't believe I would a recognized it! (when they called it "hex" head) or is dat a diff'rent 3rd one 2? (where's the dunce smilie when I need it?)
 
Chad, as I understand it there is another type “hex” log that has about a half inch of flat surface on top, the one I bought is a “flat top” log with about an inch and a half of flat surface on top which makes it easier to modify for a 2v carb adaptor plate. Thanks JackFish for the information I thought it looked like a good place to lift from and may give a solid place to attach a throttle cable bracket. Thanks to all.
Bill
 
Beaus67":2wm7thg1 said:
This is how things are stacking up right now (subject to change);

Block cleaned - magnafluxed, bored/honed .030 over
Stock crank - cleaned and polished
Cam – Comp Cams 260H
Dual Roller Timing Chain Set
New pistons - rods cleaned and polished
Balance the rotating assembly
APR head and rod bolts
Cylinder head - Cleaned, magnafluxed, three angle valve job, hardened valve seats, port and polish, modified intake log to accept the 2v 32/36 Weber DGV
Ignition - Duraspark II
Exhaust – Dual outlet headers, single exhaust through a Flowmaster muffler


Bill

Bill,

Some additions to your build you might want to consider.
1.Shotpeen the rods to remove striations that may cause a rod to break.
2. Backcut the valves, in addition to the three angle, to increase flow. It's in the handbook.
3. Adjustable rocker arms.

Your D7 head should already have hardened valve seats. I wouldn't go with the expense of installing steel inserts.

You have a good handle on the built. Have fun.
 
Howdy Again Bill:

You're making nice progress. My guess, based on the cc numbers and what looks like new exhaust valves is that the head was resurfaced when it was upgraded. On a typical valve job rebuild the head is milled to true the mating surface. The 58 number is the one I'd go with and depending on how anal you want to get, do some grinding on the #1 and #6 chambers to equalize them out to the 58 cc volume of the others. The ball park ratio we use for an OEM head is a cut of .010" = 2.4 cc reduction in volume. Stock D7 heads typically have 62 cc chambers so my guess is that this head was milled .020" in the rebuild. To get back to a 9:1 CR (Assuming that is your goal) You will need to do some more to reduce the total chamber volume. The total chamber volume includes the chambers in the head, the compressed thickness of the head gasket, the deck height (the distance from the top of the piston to the top of the block), and the dish in the piston. If you're rebuilding the block, milling or decking the top of the block to acquire a true mating surface is a good idea. Also, if you're replacing the pistons, new pistons are built with a little less pin height, which increases the deck height. So, it is best to consider all variables as you plan for a final static compression ratio.

AKT, a performance cam, with more duration than a stock cam will lessen cylinder pressure, which reduces the chance of pre-ignition, and safely allow a little higher CR.

Decking the top of the block gains CR faster than milling the head, so the above ratio doesn't apply to decking. Decking will help to gain back quench effect lost by the thicker after market head gasket.

I hope this is helpful and not more confusing.

Adios, David
 
Beaus67":35z2o7zf said:
One last question for this thread, does anyone know what was attached to the two bolt holes in the photo that are not for the exhaust manifold? They do not tap into the log. My original head does not have that flat area with bolt holes. Thanks
Bill

sideview.jpg

hope this works for you Chad

For illustration heres the lifting eye / tranny kickdown with the tranny kickdown cut off on my 250. Real handy for occasional R&R...

[

Have Fun
 
A return of the pic favor to me:
"...3. Adjustable rocker arms..."

There it is again, & I'd add the 6:1 again -
"...1.6:1 & adjustable rockers?..."

U go boy!
(Speakin of which, yer son even looks like a Beau - w/the car, helmut and 'sports shirt').
 
Thanks for the picture powerband always better to see an example (for me anyway) very helpful. David, what you said makes perfect sense and yes I do want to get back to a 9:1 CR probably with some combination of the items you mention. One thing that does puzzle me though - this head came off of a 200 therefore that 1977 engine would have had very low compression or? Was low CR a smog control device or was the lower end configured differently (0 deck? pistons?). Just my curiosity, it doesn’t matter to this build because my block is a 67.
Once again thanks for everyone’s help, if everything works out I’m pulling the engine this weekend and looking forward to seeing what’s inside.

Bill
 
Howdy Back Bill:

Good questions. The only difference between you '67 200 and the '77 200 is the chamber volumes. '67 = 52 cc for a CR of 9:1. '77 + 62 cc for aCR of 8:1. Pistons on 48 state engines remain as a small dish, and all engines I've had the opportunity to measure had a deck height of about .025" All factory 200s used the .025" steel shim head gaskets.

When you disassemble and assess the block take a number of measurements of deck height. Be sure to do several pistons. Scrap off any carbon buildup first and measure directly above the wrist pin to avoid any piston rock. Also take a careful measurement of the pin height of several pistons to be able to compare to replacement pistons. These measurements will be the before numbers to compare to the new stuff; pistons, bearings, etc... You will have to remeasure all of these dimensions again on assembly to be able to do the final math to accurately figure static CR. IF you're going to deck the top of the block (and you should if for no other reason then to create an absolutely flat mating surface), let me recommend a zero deck height. Do not mill the '77 head until you decide on the deck machining. Milling the head to reduce volume will be the last piece of the CR goal puzzle.

A zero deck height will help to re-establish at least a bit of quench effect, largely lost due to the thicker head gasket and a lower pin height on most replacement pistons. A deck clearance (Deck height and gasket thickness) of .045" is achieveable with a Victor head gasket of .045", and a zero deck height. That is only slightly better than the stock, OEM deck clearance of .050", the combination of the stock shim head gasket @ .025" and the standard piston to deck height of .025". Is all this worth it to gain .005" less deck clearance? My opinion is yes.

The factory lowered CR for several reasons, but, yes, smog stuff was part of it.

Keep the questions coming.

Adios, David
 
Back
Top