Torino Wagon Turbo 250 build

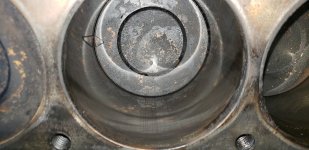
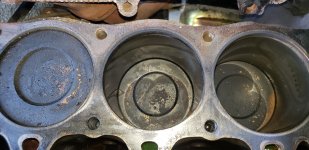
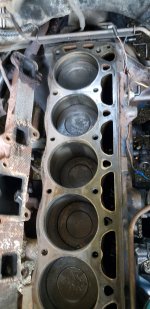
Didn't take too long to swap that over today. No obvious signs of damage to the #5 cylinder, some wear and a bit of a ridge but no deep scratches, gouges, or anything that I could feel. I didn't try a compression test afterwards yet but I'm confident that the cylinder was not the problem. Warmed it up turned it around in the driveway and it seemed to go well. Tomorrow a drive of a couple miles and then back on the road.

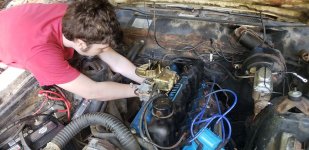
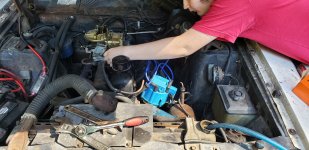
Carb mounting isn't great but it works. The carb is meant to be mounted the other way around but with a couple spacers it is ok for now. Didn't want to fight dealing with new fuel lines and throttle cables.
 

Attachments

  • 354455069_10160580536948350_6167127614431932723_n.jpg
    354455069_10160580536948350_6167127614431932723_n.jpg
    466.8 KB · Views: 21
  • 354463528_10160580536908350_1776831364927887307_n.jpg
    354463528_10160580536908350_1776831364927887307_n.jpg
    595.7 KB · Views: 23
  • 354449543_10160580536808350_5464651067386324549_n.jpg
    354449543_10160580536808350_5464651067386324549_n.jpg
    466.6 KB · Views: 22
  • 354582621_10160580536693350_2609257318137038866_n.jpg
    354582621_10160580536693350_2609257318137038866_n.jpg
    536.9 KB · Views: 21
  • 354543702_10160580536498350_23808515697968632_n.jpg
    354543702_10160580536498350_23808515697968632_n.jpg
    404.2 KB · Views: 20
  • 354234534_10160580536453350_2835214097555124729_n.jpg
    354234534_10160580536453350_2835214097555124729_n.jpg
    481.5 KB · Views: 20
That really is the best way to mount the Carb functionally with it facing the Valve Cover, at least in my OPIN.
 
That really is the best way to mount the Carb functionally with it facing the Valve Cover, at least in my OPIN.
It makes the most sense with the linkages, but the spacers are a problem. The mounting seems to be one way so the butterfly wont open if the carb is 'backwards' like this. The temporary solution is that I flipped the top spacer. Now things open but the holes between the two spacers are offset a bit causing a restriction. Maybe this weekend I'll take and match the spacers to each other as the hood closes and everything is working so far.
 
I've been putting off a compression test because these cheap chinese plug wires are falling apart. So far I have drove to town and back a few times and it is noticeably better running overall. Previously it used to smell pretty strong exhaust wise and keeping the back window down you could really smell it. Now there is hardly a smell and it feels more responsive.
 
Did you modify the carb for a blow through set up?
The one that is on it now, no. It is a cheap ebay $165 holley knock off and has been working pretty well so far. Without the turbo I have changed the jets a few times and it is running pretty well now. I have a second carb I am prepping for blow through that I picked up on craigslist. The first thing I am doing is using a boost reference power valve and plug for the original power valve passage. When the carb bowl is pressurized the power valve opens and gives more fuel. Keeping low boost levels this may be enough along with the fuel pump providing rising pressure.

Separately, after driving around a bit my radiator decided to start leaking at the seams quite a bit. It's always been iffy/oozing and driving the last mile uphill at 5-10mph to my home the temps would always creep up. Same with sitting in traffic, not super high but noticeably hotter than driving around. Having this donor falcon helped out again and it's radiator was in good shape. Drove around town and on the highway - best it's ran ever and once it got up to temp the gauge didn't move. Even up the hill back home, things stayed cool. Considering everything the wagon has been pretty reliable while making these changes. Since starting this thread I've put about 20k miles on it.

With all the new suspension parts, the driver side sway bar mount broke. It had obviously broken and been welded back on before. I had to weld the passenger side back on a while ago too. Tried to weld the driver side back and the harbor freight welder worked about as well as one of them does after sitting for a couple years. With that and barely catching my finger with the angle grinder, I'll be getting back on this after the 4th of July holiday. The turbo additions are coming very soon. All the pieces are coming together and now I'm looking to buy a better welder to make up the exhaust.
 
Last edited:
After more driving and finally a compression test, nope - still only 60psi on number 5. Based on what it looked like taken apart, there has to be something not quite sealing well with the rings. Nothing catastrophic but definitely not normal. It certainly illustrates the difference in power and driveability between 2 into 1 carb adapter compared to a head that is milled directly for the 2v.

Next steps a few things going on. I'm driving the wagon full time now so I am going to try one of those "magic" ring restore oil treatment additives. The donor wagon I'm going to do a compression test, mock up the turbo bits, take the motor and trans out, then try to get rid of the rest. If the compression test on the donor is good, then I am going to put it in the wagon, put the new head on it, and hopefully have a solid base for the next steps.
 
Yesterday I added "rislone 4-6-8 high mileage compression repair". Today I drove 250+ miles in the heat and cruising 75-80 on the highway. Tomorrow I will be doing a cold compression check on that cylinder again to see if it has helped at all. It didn't smoke today so maybe it helped, but the test will show it. Only a temporary fix, according to their instructions it should be in just about every oil change:

INSTRUCTIONS:
Add entire bottle of COMPRESSION REPAIR WITH RING SEAL to engine crankcase at or between oil changes. Do not overfill. Results will either be immediate or noticeable within a few days of driving. Install Compression Repair every 6,000 miles or with every oil change.

DOSAGE:
One bottle treats 4 to 6 quarts of oil. For larger engines, use one bottle for every 5 quarts of capacity. On 4-Stroke ATV, Motorcycle and small engines, including wet clutch applications, use approximately 100 mL per liter of oil capacity.
 
The result of the additive is in. Didn't get to it until today but it had sat since then.

Cold Compression before additive: 60psi
Cold Compression after additive and 250 miles driving: 100psi

I wasn't expecting a miracle solution, but it did better than I thought it would. No more clouds of blue oil smoke up hills either. For an extra $6 an oil change I am going to keep with it
 
Still driving it around, down a quart of oil in 500ish miles. One thought also is that maybe it is a lifter problem. I haven't checked full operation of the valvetrain. Regardless the bottom end oil pressure agrees that its old and beat. Just got married so funds are tight and most of my time coming up will be working my job. I have the new welder in so at a some point soon I will mock up the j tube and downpipe before taking the motor out of the falcon. Taking the motor out of the donor will be a task that I have to figure out because I don't have the proper tools or room currently.
 
At the large port on the baseplate. It goes from the PCV to an oil catch can to the carb.
Ok I see it now. (y)
At first look, appeared to be up on the carb, not a manifold vacuum source. Surprised by how many times guys have had it hooked up wrong. One person had it plugged into the bowl vent port. :rolleyes:
 
It's never too late to re-learn a dumb mistake. I was already late to pick up the kids by 15 min yesterday, so hurry up and get that carb bolted back on. Didn't do the proper order but I didn't think it was that tight. Usually not a problem but combine that with a somewhat crushable phenolic spacer and snap. I didn't notice it immediately but it sure didn't run well! Already late I picked the kids up with another car and found this afterwards trying to figure out what went wrong.

378006620_10160762306108350_6163065663400588326_n.jpg

Turns out the spare carb I bought before had a good baseplate but the throttle linkage was cut right where I needed to connect to. Instead of dealing with disassembling and reassembling the plate I ordered a new baseplate. Purchasing another cheap carb at the price of a holley plate gives me a whole new set of spare parts too. This failure was 100% installation error, not related to the quality.

Until that arrives, long will my hack hold up? Dime added for strength across the break. Maybe I can still make cars and coffee tomorrow.

379177221_10160762306168350_6508918327074352687_n.jpg
 
JB Weld works for now. It is actually JB Kwik so it is not quite as strong but it should work well enough. I was careful to keep the tightening even but I didn't go easy on the end tightness. Enough to compress the phenolic spacer back to flat.

This really will end as a turbo project, turns out it is a bit more work than I thought to get there.
I'm sorry to hear that. It was a cool build.
 
JB weld worked well enough. About 300 miles. Didn't break on the side road but it did fall apart when I took it off to put the new base plate on.
 
Back
Top