You are using an out of date browser. It may not display this or other websites correctly.
You should upgrade or use an alternative browser.
You should upgrade or use an alternative browser.
All Small Six Installing and Degreeing Camshaft - 1983 200lm
- Thread starter Dr_Dan_WWW
- Start date
This relates to all small sixes
I removed the gears and videoed the camshaft movement.
View attachment Bronco 1983 engine camshaft end play 1 IMG_7296.MOV
After listening to myself, I do not think inserting a feeler gauge, tightening things up, and then removing the gauge does anything. I will just have a loose cam gear. Instead, I believe the cam gear is supposed to snug up to cam spacer ring - but not the thrust plate. True??
So I took a .003 feeler gauge and pressed the gauge against the retaining plate surface and then slid the feeler over to the spacer ring to see if the spacer is thicker than the retaining plate. It is just barely thicker. Barely. The feeler gauge "hits" the edge of the spacer. Please tell me if I am barking up the right tree here assuming that the cam gear is supposed to snug up to the spacer but not the retaining plate.
Thank you for the help and expertise.
I just saw your post. I will put the cam gear back on and see if there is any end play. But as I said in the video, I am not sure there is any play. There may be some space. I will check, thanks.The end play is checked with the cam gear in place.
Pull the cam gear out and set the dial indicator to zero. Then push the cam gear in and see what the dial indicator reads.
Here's what I got after bolting on the cam gear...
View attachment Bronco 1983 engine camshaft end play 2 IMG_7297.MOV
View attachment Bronco 1983 engine camshaft end play 2 IMG_7297.MOV
That's perfect!Here's what I got after bolting on the cam gear...
Anywhere from .002" to .005" works.
Next is checking the camshaft timing.
You can use the dial indicator or piston stop to zero the degree wheel.
You said something about having a piston stop?
What type is it? Picture?
Whew!
Thank you for sticking with me on figuring out the cam end play.
Degreeing:
I called Howard cams and the technician said that the cam already has 4 degrees advance ground into it. So I will install straight up zero to dot.
Yes, I have a piston stop.

I am waiting on the crank turning socket tool. It is supposed to arrive today. With that tool then I I can attach the degree wheel and turn the crank back and forth to help find Top Dead Center. What else should I be thinking about at this point in the process?
Thank you for sticking with me on figuring out the cam end play.
Degreeing:
I called Howard cams and the technician said that the cam already has 4 degrees advance ground into it. So I will install straight up zero to dot.
Yes, I have a piston stop.

I am waiting on the crank turning socket tool. It is supposed to arrive today. With that tool then I I can attach the degree wheel and turn the crank back and forth to help find Top Dead Center. What else should I be thinking about at this point in the process?
Looks good.
The one thing that many forget about is making sure the ignition timing mark on the harmonic balancer is at zero when the piston is at TDC.
That is something you do after the timing gear cover and harmonic balancer is installed.
What is used for timing marks on your engine?
The one thing that many forget about is making sure the ignition timing mark on the harmonic balancer is at zero when the piston is at TDC.
That is something you do after the timing gear cover and harmonic balancer is installed.
What is used for timing marks on your engine?
Dr dan, in the previous post you say that the bolt is tight. I post the above, where does is say to take the gear off to check end play?Yes ring is slang, it is a spacer in the books. Do not confuse cam spacer with the two hole cam thrust retainer plate. The end play must be min .002'' to max of .007'' Position the dial indicator plunger on the end of the cam bolt or washer where flat and push the cam back and forth, if it is not within the above spec. it must be fixed.
The bolt could be short because you are not using stock parts, just get a longer grade 8 bolt if needed, that is what hot-rodding is about.
Mr. Muller is the best at explaining cam degreeing
The feeler gage test is like I stated, the purpose of the test is to check that indicator setup is not flexing or there is not a sticking plunger and giving bad reading, in the position that it is being used. I do not think you are carefully reading what I post. I feel that you do not trust what I post and dismiss what I post. I know that text is hard to follow but help me out a little bit.
Hi, you will have to come up with a way to line up the dial indicator with the lifter, directly overhead. I took an old lifter apart and found a large bolt, maybe 5/8", and long enough to to extend over the deck. I did have to do some grinding on the shank for clearance. It worked out great. Good luck
Why not use a lifter and pushrod?Hi, you will have to come up with a way to line up the dial indicator with the lifter, directly overhead. I took an old lifter apart and found a large bolt, maybe 5/8", and long enough to to extend over the deck. I did have to do some grinding on the shank for clearance. It worked out great. Good luck
I’ve always used a pushrod and never had problem.The push rod wobbles all over
Having never done this rebuild stuff, it is difficult to digest one piece of advice, and then consider several counsels. I have to reread things and imagine what it looks like. Then I miss something or interpret wrong.
My cam gear bolt really was too short. I bought the 1.25" grade 8 bolt (versus the 7/8th" stock bolt) and the cam and gear tightened up with much more positive contact and smoother. Somehow the gear really was too tight and not allowing any end play. I had to take it all apart just to get it back to the unconnected cam displacing back and forth approximately 1/8th inch (per video above). THEN when I reinstalled the gear I got the desired end play. It wasn't really a plan as much as it was just "start over." I will probably need to post more videos than words and photos.
My crank socket tool is running late. Maybe today it will come and I can find TDC. Of course that work thing interferes with all my engine rebuilding.
Pushrod:
Yeah I see these Youtube guys using one of the Summit Racing lifter/dial tools. I am not too thrilled to buy one when I may only use it once. So I planning to use a pushrod. If it wobbles all over then I will try something else as suggested. Thanks everyone for all the advice and help.
Yes, I understand, just to be clear it is the thickness of the spacer that determines the end play. I think that you understand that now. What worries me now is that at first you had no play, then you put a longer bolt in, which is the right thing to do, but now you have end play, so you are sure that it is not bottoming out, or the threads are messed up keeping the sprocket from being very tight to the spacer and cam. Just because the bolt is torqued does not mean the sprocket is tight to the spacer and cam, if it is not the pin will shear. When you are done degreeing, the cam bolt should be med loc-tighted because is not the ford interference bolt. They used what was easier, the standard grade 8 bolt is better for this.
Everything may be fine and only you know what is happening, we are not there with you.
Everything may be fine and only you know what is happening, we are not there with you.
I triple checked the bottom out, maybe five times. I checked to see if maybe there is a deeper hole than the threaded hole. There's a good 1/2 inch more hole than new bolt. I have thought about this a lot. "Why?" the change?
My best thought: I think the cam gear gradually loosen up on the cam snout as I took things apart over and over. The last time I pulled it off and put it back on the cam gear went on much easier. It wasn't the pin holding up the gear. The pin easily had a 1/32 gap above it. After pulling the gear off and on several times, the new Howard cam snout just smoothed out ever so slightly - and thus, it slid further onto the gear, thus pulling the cam toward the gear and thus providing a little bit more end play. But that's just my imagination.
Everything is new: cam, retainer, spacer, cam bolt and washer, gears (thicker), and chain. The new V.I. gear is 5/8" thick and the old stock cam gear is only 3.8" thick. I've tried to speculate on various reasons why the cam gear was too tight (if that's was truly the source problem). I settled on "everything just needed a little break-in, and little smoothing out.
(edited comment) The old cam bolt - if the old stock .875" cam bolt did not tighten up as well as the new 1.25" bolt, then that could have been the issue. The new bolt would pull the cam toward the gear better, thus providing a tiny bit more play.
I know this doesn't satisfy. And that makes me concerned. Still, at the end of the day there is the necessary cam end play. Sometimes we just take the thing apart and put it back together and it works. Sloppy science, but it happens. Oh, and of course, let's not forget that the newbie builder was on the learning curve.
Last edited:
I like that fact that you took the time to work with the cam and gear set multiple times.
It's good insurance and you also get a good feel for how things work together.
The main thing here is that you are learning a lot and are having fun with the project
It's good insurance and you also get a good feel for how things work together.
The main thing here is that you are learning a lot and are having fun with the project
I can be relentless, but you would not believe how many times, builds have been saved by my tenacity.
You guys got me saying gear, it is a sprocket, George. remember the Jetsons, he worked at, oh never mind.
You guys got me saying gear, it is a sprocket, George. remember the Jetsons, he worked at, oh never mind.
Last edited:
You're right, it's a sprocket. It sits right in front of the cam ring.
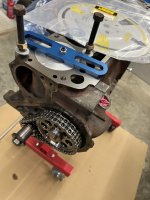
Finally I received my crank turning socket tool. It works - except I bought the wrong sized degree wheel. The wheel's center hole is too small.  Now I am off to my mechanic friend to see if I can borrow a degree wheel from him.
Similar threads
All Small Six
Camshaft Degree Troubleshooting Help
- Replies
- 30
- Views
- 8K
- Replies
- 26
- Views
- 3K
- Replies
- 1
- Views
- 2K
- Replies
- 3
- Views
- 1K


