All Small Six Keeping the carb cool

This relates to all small sixes
Was just out looking at the engine compartment and if I get rid of the voltage regulator, there is a ton of room on the drivers side to run a pipe right up to the radiator support to run a 4" or larger pipe for cold air. I could also run the pipe down the side to below the engine compartment and have a dustpan shaped scoop under the car to pull cold air. I could box the top of the carb and keep the open element filter too.

View attachment 26913


View attachment 26912
That's what I was going to suggest to try...kind of a ram air from the front grill. I didn't think of under the car...if you use both it would probably create some turbulence where they meet which could be good or bad(?) If you could get the air to twist...spin as it passes thru the tube like a vortex that might have some positive effects.
 
My experience - I added a wood spacer below my stock autolite 1100 carb and added a heat shield made from a license plate that fits around the water cooled spacer and shields the carb and fuel line from the radiant heat off the exhaust manifold. The results have been great. I've commuted on some 95+ degree days with no issues, even when sitting in traffic.
 
Yes, absolutely. I will be making a heat shield to deflect header heat from the exhaust. That is a big priority. Then I'm going to put a box around the carb opening to direct air from the grill area straight into the carb. I think both of those ideas will make a pretty substantial difference.
 
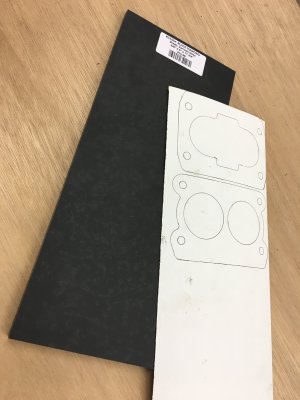
ebay has (had) precut-to-size phenolic, I got one the right size for the carb base a few years ago. In the $20's range IIRC.
 
That water cooled spacer would be the ticket if it can be refab’d to orient the Weber carb correctly.
I always thought that the carb spacer with the heater hoses connected to it was to keep the carb warm to prevent icing. Remember that the air flowing into/through the carb will have a cooling effect on the unit (it's the "wind chill" effect).
 
I always thought that the carb spacer with the heater hoses connected to it was to keep the carb warm to prevent icing. Remember that the air flowing into/through the carb will have a cooling effect on the unit (it's the "wind chill" effect).

The water cooled spacer, helps get the carb up to temperature and will help prevent freezing. It also probably helps to prevent overheating but unfortunately it won’t work with a Weber, which uses the funnel shaped adapter from 2V to 1V because it changes the orientation of the carb mount and puts the carb close to 90 from how it should be aligned.
 
Very nice @Otto
Mine will be here on Sept 12th if nothing holds it up.
Well, Santa came early this week and the phenolic spacer arrived this morning. It's installed now.

A couple of things:

1) My carb didn't appear to have any vacuum leaks and the gasket looked good but all 4 of the the nuts were finger tight when I took off the carb. Snug but literally finger tight, no wrench required to remove. I did tighten them earlier this year because they were finger tight last time I checked as well and I probably put about 7lbs or maybe a little more of torque into them with a hand wrench. I didn't want to over-torque them but I did want a decent seal. This time, I hit them with blue lock-tite when I snugged them down. Again, I probably put 7 lbs - 10 lbs of torque on them. I reused the gasket on the adapter funnel and put a new one between the cab and the spacer.

2) It's odd that I can't seem to find a genuine Redline/Weber spacer for the 38/38. I have one for a 32/36 in the Redline packaging and a bunch of 32/36 gaskets too but none of the dealers I checked with had a legit 38/38 in stock. They all said out of stock for the 38/38 part.

3) The Ebay one that arrived, is laser cut or cut on a CNC from the looks of it. It's fine but it is not a perfect fit and needed a little finessing to fit properly. That said, it is well worth the $20 + postage that I paid and I highly recommend it.

The install would have literally been a 10 minute install but the holes for the studs on the spacer were off alignment enough to warp it when you forced it into place. Teenager me, would have done something dumb like slap the carb on and force it flat but adult me knows better. I pulled two of the perpendicular positioned studs out so I could release the spacer and then I used a step drill on both sides of the spacer to get enough relief for it to slide into place without any restriction, so it would sit flat. It dragged out maybe 20 minutes or a half hour before I got it done, snugged up and lock-tited.

So far, the verdict is positive. The car started up normally and my warmup lap around the neighbourhood got the engine good and hot but the carb was cool to the touch the way you would hope it was. After it was right up to temp, the carb was still cool so I redid the idle for best lean idle and as it turns out I was able to turn the air screws in another 1/4 turn, leaning it out a little more. I'll keep a close eye on it over the next little while. I really need an AFR gauge to dial it in right.

On a related note, lately I've been doing a mix of city and highway driving and even with the big carb and choppy camshaft, I'm getting around 23 miles per gallon. I'm really happy with the fuel economy.
 
Next on the agenda is a heat deflector between the carb and the header. I'm going to cut a 36" x 8" section of aluminum and put a 75° (aprox) bend on it at 6" and I'll have the 2" part cut to accommodate for the header tubes and drilled to mount to the header studs. That should help keep the heat away from the intake. Then it gets a box and snorkel to a hole in the radiator support to cooler, fresh air.
 
Well, Santa came early this week and the phenolic spacer arrived this morning. It's installed now.

A couple of things:

1) My carb didn't appear to have any vacuum leaks and the gasket looked good but all 4 of the the nuts were finger tight when I took off the carb. Snug but literally finger tight, no wrench required to remove. I did tighten them earlier this year because they were finger tight last time I checked as well and I probably put about 7lbs or maybe a little more of torque into them with a hand wrench. I didn't want to over-torque them but I did want a decent seal. This time, I hit them with blue lock-tite when I snugged them down. Again, I probably put 7 lbs - 10 lbs of torque on them. I reused the gasket on the adapter funnel and put a new one between the cab and the spacer.

2) It's odd that I can't seem to find a genuine Redline/Weber spacer for the 38/38. I have one for a 32/36 in the Redline packaging and a bunch of 32/36 gaskets too but none of the dealers I checked with had a legit 38/38 in stock. They all said out of stock for the 38/38 part.

3) The Ebay one that arrived, is laser cut or cut on a CNC from the looks of it. It's fine but it is not a perfect fit and needed a little finessing to fit properly. That said, it is well worth the $20 + postage that I paid and I highly recommend it.

The install would have literally been a 10 minute install but the holes for the studs on the spacer were off alignment enough to warp it when you forced it into place. Teenager me, would have done something dumb like slap the carb on and force it flat but adult me knows better. I pulled two of the perpendicular positioned studs out so I could release the spacer and then I used a step drill on both sides of the spacer to get enough relief for it to slide into place without any restriction, so it would sit flat. It dragged out maybe 20 minutes or a half hour before I got it done, snugged up and lock-tited.

So far, the verdict is positive. The car started up normally and my warmup lap around the neighbourhood got the engine good and hot but the carb was cool to the touch the way you would hope it was. After it was right up to temp, the carb was still cool so I redid the idle for best lean idle and as it turns out I was able to turn the air screws in another 1/4 turn, leaning it out a little more. I'll keep a close eye on it over the next little while. I really need an AFR gauge to dial it in right.

On a related note, lately I've been doing a mix of city and highway driving and even with the big carb and choppy camshaft, I'm getting around 23 miles per gallon. I'm really happy with the fuel economy.
Good job! I always love it when someone can get good results with low tech mods. Simple is good.
 
Next on the agenda is a heat deflector between the carb and the header. I'm going to cut a 36" x 8" section of aluminum and put a 75° (aprox) bend on it at 6" and I'll have the 2" part cut to accommodate for the header tubes and drilled to mount to the header studs. That should help keep the heat away from the intake. Then it gets a box and snorkel to a hole in the radiator support to cooler, fresh air.
I've only used steel as a heat reflector, as posted earlier. Aluminum is probably as good, IDK. Just a reminder, if you need rigidity steel is acceptable.

The temperature of the carb inlet air is worth 1% power for every 5*F. It's major, worth the unsightly hose running from the carb to the front.

The ideal location for fresh air intake is the cowl below the windshield. There's positive pressure there at road speed. Only one NASCAR series still uses carbs and the intake routed to the base of the windshield. At high speed their VE is 114% from the "turbo" effect of the high pressure at the air intake.

I was considering using some steel flashing I have left over from building my shop. Light weight, strong and easy to work with. I thought I'd use aluminum for it's insulating properties. I figure aluminum will transfer the heat less than steel so the radiant heat from above the shield might be less with aluminium than with steel. IDK for sure though 🤷‍♂️

It would be nice to have a cowl induction scoop like they used had on the first gen Camaros. I think if it was set up to direct air straight to the carb, it would be a great way to go. I didn't realize they were so efficient at ramming air into the carb. A fibreglass hood with cowl induction might be on my wish list now (along with an Argentinian 2V head with big valves and 1.6 rockers).

Fortunately, I don't depend on this car for transportation so I can play around with it without being stranded or in a hurry to make it road worthy.
 
Don’t forget pictures!!😎

I should have taken some photos of the install just for interest sake.

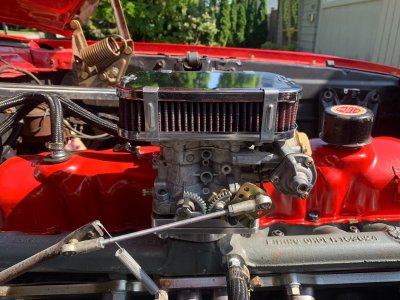
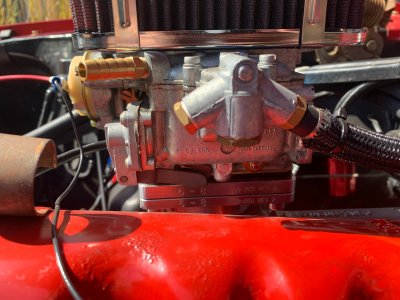
Here's a couple of photos of it post install. You can see the Clifford Performance 6 = 8 wordmark on the two piece adapter plate. I put the original gasket on the base of the adapter, then the phenolic spacer and then a Redline/Weber gasket on the top. It is a thinker beefier gasket. I might swap the base gasket with one too. I have spares.

IMG_3367.jpeg

IMG_3363.jpeg


I also cleaned and oiled my filter. The filter was dry when I got it and I meant to do that when I installed it but I kept putting it to the back of my mind. A few days ago I noticed it was pale in a photo I took so I removed it, cleaned it (it was pretty clean with about 1500 miles on it) and then I oiled it with my K&N cleaning/oiling kit. It looks much more healthy clean and oiled.
 
Referring to post #20: the thin steel reflects almost all the heat. It's not a typo: the inside of the shield when the fire is cranked is over 700*F, the hottest I ever got on the outside is low 90's. It's really almost unbelievable. I would think AL would absorb more heat, this recreating a radiant heat source on the top but IDK. I also had a smaller flat piece of same gage steel to place over the wood cradle when the fire was high. If the angle between my face and the side of the stove aligned, just like a mirror the radiant heat from the side of the box would almost burn my face via the reflection.
The only down side to reflecting the heat with steel is, it's still got to go somewhere. :unsure:
 
Last edited:
Referring to post #20: the thin steel reflects almost all the heat. It's not a typo: the inside of the shield when the fire is cranked is over 700*F, the hottest I ever got on the outside is low 90's. It's really almost unbelievable. I would thing AL would absorb more heat, this recreating a radiant heat source on the top but IDK. I also had a smaller flat piece of same gage steel to place over the wood cradle when the fire was high. If the angle between my face and the side of the stove aligned, just like a mirror the radiant heat from the side of the box would almost burn my face via the reflection.
The only down side to reflecting the heat with steel is, it's still got to go somewhere. :unsure:

Wow! That is a really helpful bit of info and yes... Aluminum is good at sinking heat and storing it. I just checked and that gauge (.012") is 30 gauge. Incredibly thin stuff. I have flashing that is about twice as thick that I can cut quite easily to use. I'm on the next mission.
 
Back
Top