You are using an out of date browser. It may not display this or other websites correctly.
You should upgrade or use an alternative browser.
You should upgrade or use an alternative browser.
All Small Six My 200 CI mystery
- Thread starter awasson
- Start date
This relates to all small sixes
Thanks. I appreciate the advice and will take it.Reminder - wait on your machine work until you have the head gasket, pistons and rings in your hands. Both the deck height (to set quench) and the bore finish will be specific to the exact parts you buy.
Now, since I'm having the block surfaced and the deck height will likely change per squish and jut out... What are the recommendations for rocker arms and pushrods.
I think, since I'm at this point, I will get a Clay Smith Camshaft. Nothing crazy. Probably the H-267-8-B: https://claysmithcams.com/h-267-8-b-excellent-low-mid-range-street-cam-ford-144-170-200-250/
I think, since I'm at this point, I will get a Clay Smith Camshaft. Nothing crazy. Probably the H-267-8-B: https://claysmithcams.com/h-267-8-b-excellent-low-mid-range-street-cam-ford-144-170-200-250/
Jmustang_65
Famous Member
Rocker arms options are stock non and adjustable 1.5 and 1.6 ratios.
Roller rockers in 1.65 are available from Rocker arms unlimited https://www.rockerarms.com/images/chartimages/F44RA.jpg and yella terra in Australia. https://store.yellaterra.com.au/cat...line/ford-inline-6-144-250-pre-crossflow.html
RAU use stock type cup/ball pushrods and Yella Terra uses oil through lifter and ball/ball oil through pushrods. You can get any size you need from Smith brothers at www.pushrods.net
Rocker arms options are stock non and adjustable 1.5 and 1.6 ratios.
Roller rockers in 1.65 are available from Rocker arms unlimited https://www.rockerarms.com/images/chartimages/F44RA.jpg and yella terra in Australia. https://store.yellaterra.com.au/cat...line/ford-inline-6-144-250-pre-crossflow.html
RAU use stock type cup/ball pushrods and Yella Terra uses oil through lifter and ball/ball oil through pushrods. You can get any size you need from Smith brothers at www.pushrods.net
Thanks for all of this. I've reached out to the people at rockerarms.com to look into getting a set of adjustable rockers and the appropriate push rods.
My head gasket kit, pistons and rings along with the oil pump shaft will arrive via FedX on Tuesday.
I was considering the Ford tempo 2.3L pistons but decided on Silvolite Part No 1120 pistons and Sealed Power E219K rings (Moly Steel Top Ring; Ductile Second Ring).
I was considering the Ford tempo 2.3L pistons but decided on Silvolite Part No 1120 pistons and Sealed Power E219K rings (Moly Steel Top Ring; Ductile Second Ring).
The head vacuum tested good and was done some time recently so I'll leave it be. I'm going to have them resurface it to make sure it's square. Same with the block. They'll just resurface it, to ensure that it's square.Are you considering a compression bump or head and valve enhancements? Kind of low cost power increase since you have it apart and at machine shop?
In the future, I'm planning on either getting an Aussie crossflow or Argentinian head or if Vintage Inlines is able to produce their head, I'll go that route but for now I'll leave it as is.
In terms of performance, I'm going the standard route of an Ebay header, Redline Webber 38/38 kit and the Clay Smith H-267-8-B cam and probably 1.6 ratio, adjustable roller rockers.
Jmustang_65
Famous Member
This is good amount of improvement but, bumping up compression to like 9.0/1 would work best with all the mods. So go ahead and calculate.In terms of performance, I'm going the standard route of an Ebay header, Redline Webber 38/38 kit and the Clay Smith H-267-8-B cam and probably 1.6 ratio, adjustable roller rockers.
The head vacuum tested good and was done some time recently so I'll leave it be. I'm going to have them resurface it to make sure it's square. Same with the block. They'll just resurface it, to ensure that it's square.
In the future, I'm planning on either getting an Aussie crossflow or Argentinian head or if Vintage Inlines is able to produce their head, I'll go that route but for now I'll leave it as is.
In terms of performance, I'm going the standard route of an Ebay header, Redline Webber 38/38 kit and the Clay Smith H-267-8-B cam and probably 1.6 ratio, adjustable roller rockers.
I agree, if you're cutting the head/block anyway, it's the ideal time to take a bit more off for a modest compression increase. Run the #'s on a good compression calculator. There's the side benefit of tighter quench too.This is good amount of improvement but, bumping up compression to like 9.0/1 would work best with all the mods. So go ahead and calculate.
Compression Ratio Calculator | UEM Pistons
 uempistons.com
PSIG
Famous Member
94! Cool. Just try to avoid greed and fall into a small hole. Adding a little compression will help a squeak on power, but if a bit too much will require de-tuning or more expensive fuel. Small gains, bigger downside, and finding a balance you can be confident won't det. I have no qualms dropping a bit from the bleeding edge, and knowing it will take my boot even with that crappy load of gas, or your local pumps drop to 91 one day.… somewhere around 9.0:1 or a little above. We have 94 octane here …
Looks like you are on your way to a Level II build which is apparently a good performance boost:
I hope to build my spare 250 for my Bronco to this level.
Good luck
I hope to build my spare 250 for my Bronco to this level.
Good luck
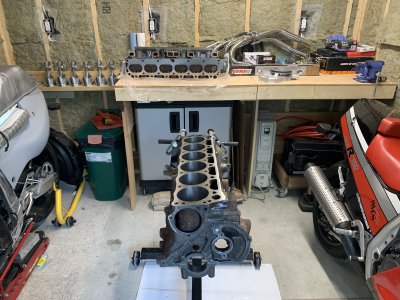
Update time. Block and crank are back, as is the head and rods. Block was magnafluxed, hot tanked, bored and decked. Crank was measured to ensure it wasn’t bent, then ground .020 under and polished. It’s still wrapped up and I’m not opening it up until I have my bearing shells so I can measure everything up. Head was vacuum tested, faced and got new valve guide seals. The rods were measured and fitted to the new pistons. The bearings will be here next week and I’ve got a new rubber rear main seal coming from Olson’s Gaskets. Next, I have to call up Clay Smith and discuss camshafts with them.
I spent a couple of hours this afternoon measuring the ring gaps and ringing the pistons. For a naturally aspirated mild engine like mine, the conventional wisdom says for every inch of bore, you want four thousandths of an inch of gap so for my engine at .060” over, it’s just under .015” gap. I’ve also read in discussion forums that the spec was pretty wide between .010 and .020 so 0.15 fits nicely in the middle. At any rate, I’ve got a ring grinder for my motorbike escapades and I was fully prepared to adjust them if necessary. It wasn’t necessary. I measured each ring in each bore and my measurements were .016” - .017” consistently for both the top and second rings. I measured the scrapers on the oil control ring just for completeness and they were at .022” - .023”.
With that done, I have to wait for parts so I’ll be priming and painting various bits until more parts arrive and then I’ll get going on more measurements. I’ll mic the crank and then measure the vertical distance of the main bearing and the rod bearings to make sure I’m within spec. Before I actually put it together, I’ll Plastigage it too, just to make sure everything is good before I final assemble it.
Attachments
TrickSix
Famous Member
Milling the head reduces the depth of the oil transfer passage where oil comes up from the block and crosses over to a head bolt hole. It is easy to deepen, smooth, and radius the corner of this passage, and of a couple other choke points, to improve oil flow up to your rocker shaft.


Thanks for the suggestion. I’ve got the time and tools so I’ll do just that.Milling the head reduces the depth of the oil transfer passage where oil comes up from the block and crosses over to a head bolt hole. It is easy to deepen, smooth, and radius the corner of this passage, and of a couple other choke points, to improve oil flow up to your rocker shaft.
View attachment 22468View attachment 22469View attachment 22470
Be careful to not over do the head stand boss, there is a lot of downward force applied by the bolt on the cast aluminum shaft stand.
Update: I'm waiting for some parts to arrive.
I installed and checked clearances on my main bearings. I couldn't find a decent micrometer/bore dial gauge to beg borrow or steal but I do have enough plastigauge for several lifetimes. Plastigauge showed clearances between .001" and .0015"
The crank is in the block for the moment on snugged up caps and plenty of zinc, moly, assembly lube and rotates like it's on butter. It's really nice but I'm waiting for my rear main seal from Olson Gaskets so that I can install the rear seal and button the bottom end up. The pistons are patiently waiting too.
I went with Mahle/Clevite MS771G main bearings and Mahle/Clevite CB583P rod bearings (both sets 20 under to account for the grind & polish).
In addition to the rear main seal, I'm also waiting for a double roller timing chain set, camshaft, lifters and I bought an ARP head stud kit. This will all be coming from Clay Smith. Not sure when that will arrive. I was hoping for this weekend but I haven't received any notification that it's on its way yet.
Anyway, I am taking tons of notes and photos that I'll transfer to a build sheet for my own reference.

I installed and checked clearances on my main bearings. I couldn't find a decent micrometer/bore dial gauge to beg borrow or steal but I do have enough plastigauge for several lifetimes. Plastigauge showed clearances between .001" and .0015"
- Front: 0.0015”
- #2: 0.001”
- #3: 0.001”
- #4: 0.00125”
- Thrust #5: 0.00125”
- #6: 0.0015”
- Rear #7: 0.0015”
The crank is in the block for the moment on snugged up caps and plenty of zinc, moly, assembly lube and rotates like it's on butter. It's really nice but I'm waiting for my rear main seal from Olson Gaskets so that I can install the rear seal and button the bottom end up. The pistons are patiently waiting too.
I went with Mahle/Clevite MS771G main bearings and Mahle/Clevite CB583P rod bearings (both sets 20 under to account for the grind & polish).
In addition to the rear main seal, I'm also waiting for a double roller timing chain set, camshaft, lifters and I bought an ARP head stud kit. This will all be coming from Clay Smith. Not sure when that will arrive. I was hoping for this weekend but I haven't received any notification that it's on its way yet.
Anyway, I am taking tons of notes and photos that I'll transfer to a build sheet for my own reference.
Similar threads
All Small Six
200 rebuild.
- Replies
- 1
- Views
- 269
- Replies
- 24
- Views
- 1K
- Replies
- 6
- Views
- 636
- Replies
- 20
- Views
- 1K